How to install & use virtualbox guest additions on ubuntu
Содержание:
- Introduction[edit]
- Гостевые дополнения VirtualBox
- What Do the Guest Additions Do?
- Download Virtualbox Guest Additions
- Страница загрузки пакета virtualbox-guest-additions-iso_6.1.16-1_all.deb
- Whonix ™-Default[edit]
- Почему вы должны использовать гостевые дополнения VirtualBox?
- Virtualbox Guest Additions Download and Install Process (Step by Step with Screenshots)
- How to Install VirtualBox Guest Additions on Windows Guest
- How to Install Guest Additions on Ubuntu VirtualBox
- Some Problems with Installing Guest Additions for VirtualBox
- Why should you use VirtualBox Guest Additions?
- Installing VirtualBox Guest Additions on Ubuntu
- Поддерживаемые операционный системы:
- Installing VirtualBox Guest Additions on Ubuntu
- Шаг 2: Установка заголовков ядра и инструментов сборки
- Download Virtualbox Guest Additions
Introduction[edit]
In Whonix , VirtualBox guest additions are installed by default.
To avoid any issues with the guest additions, users are highly recommended to:
- Use the Recommended VirtualBox Version for use with Whonix .
- Leave installation of the recommended version of VirtualBox guest additions to Whonix as dcoumented and to avoid manual installation. This documentation will be updated as required. Check back later in case you have issues.
VirtualBox guest additions from package installation helper by Whonix developers ( ) will keep guest additions updated when Whonix is updated.
There might be a few odd messages during updates which are actually . Unless actual functionality is broken, please do not ask about odd messages as per .
In case of issues, see also VirtualBox troubleshooting and consider a bug report.
Гостевые дополнения VirtualBox
Для улучшения работы с виртуальной машиной, и взаимодействия с ней, в виртуально установленной операционной системе нужно установить специальный набор инструментов, который называется «Гостевые дополнения» («Guest Additions»). Данный набор инструментов выпускается для следующих операционных систем:
- Windows (начиная с Windows NT 4.0, и заканчивая Windows 10);
- Linux (официально поддерживаются Oracle Linux, Fedora, Red Hat Enterprise Linux, SUSE (в том числе openSUSE), Ubuntu);
- Oracle Solaris;
- OS/2.
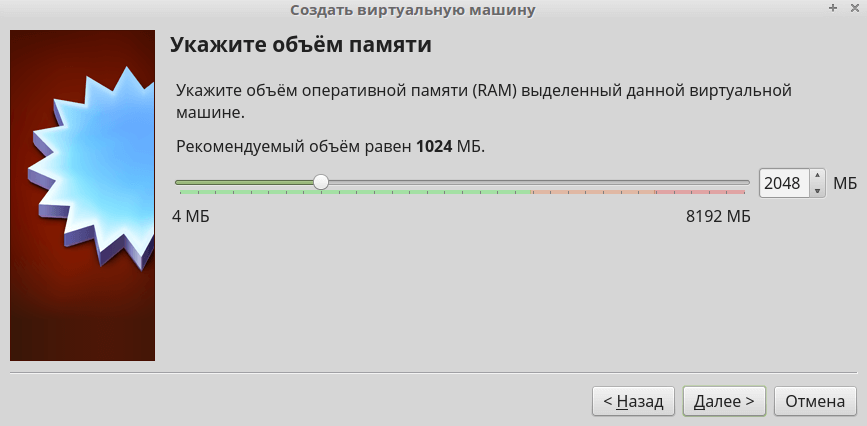
Для установки гостевых дополнений VirtualBox необходимо выполнить следующие действия:
- Включаем виртуальную машину и ждем загрузки ОС.
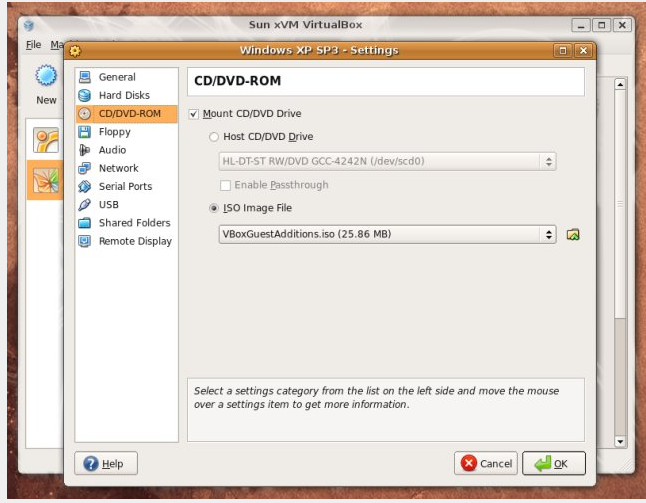
- В верхнем меню VirtualBox выбираем пункт «Устройства — Подключить образ диска Дополнений гостевой ОС…».
Дальнейшие действия зависят от того, какая операционная система установлена в VirtualBox:
Windows
- Если в системе не отключен автозапуск, то должен запуститься установщик дополнений гостевой ОС. Если же в системе выключен автозапуск, нужно запустить установщик вручную, найдя его на подключившемся диске в виртуальной машине, под именем VBoxWindowsAdditions.exe.
- Как и установка самого VirtualBox, установка гостевых дополнений максимально упрощена, и по сути представляет из себя нажатие кнопок «Next». С первым окном именно так и следует поступить.
- На следующем будет предложено выбрать место для установки гостевых дополнений. По умолчанию, рассматривается обычная для всех программ директория Program Files.
- Последним шагом, перед непосредственно самой установкой, будет выбор устанавливаемых компонентов:
- VirtualBox Guest Additions — собственно, сами гостевые дополнения VirtualBox;
- Start menu entries — ярлыки в меню «Пуск».
- Direct3D Support — третий компонент, который не выбран по умолчанию, является экспериментальной функцией по включению полноценного 3D ускорения в виртуальной машине. Для «простой» работы он не нужен.
- После нажатия на кнопку «Next» начнется установка гостевых дополнений, во время которой может появится окно с запросом на разрешения установки программного обеспечения для устройства (драйвер), которую необходимо одобрить.
- После установки дополнений потребуется перезагрузка компьютера, которую можно выполнить сразу (оставив отмеченным пункт «Reboot now»), или выполнив её позже самостоятельно (для этого нужно отметить пункт «I want to manually reboot later»).
- После перезагрузки произойдет множество полезных изменений — появится поддержка двухстороннего буфера обмена (о том, как его включить можно прочитать здесь), функция drag-n-drop между основной операционной системой и операционной системой в виртуальной машине, автоматический выбор разрешения экрана на основе размера окна VirtualBox и т. д.
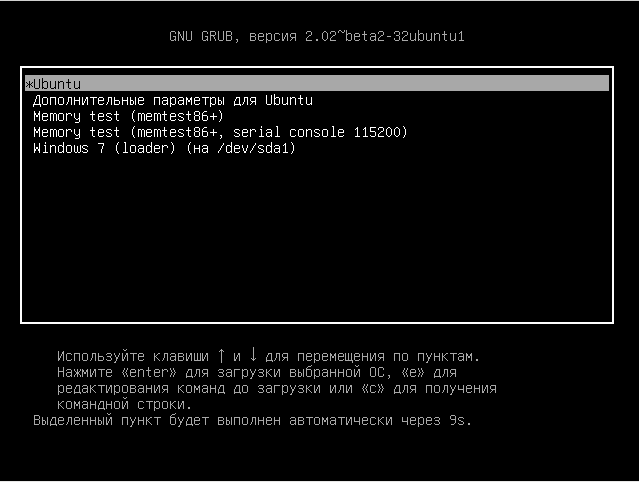
Linux
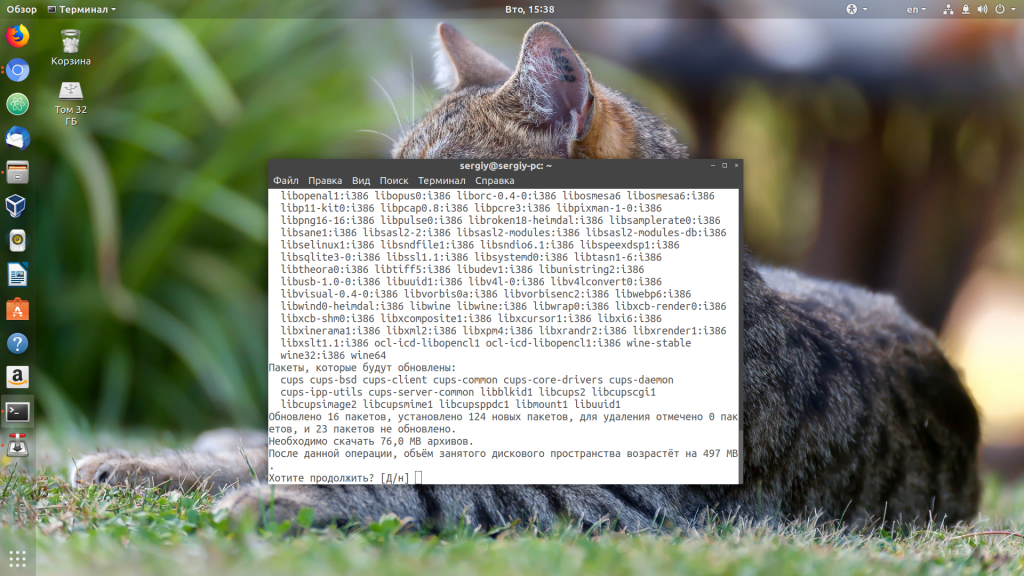
В операционных системах семейства Linux, графический установщик гостевых дополнений отсутствует, вся установка происходит через терминал. Современные дистрибутивы прекрасно сами распознают файл автозапуска на образе с гостевыми дополнениями, и предлагают его запустить автоматически.
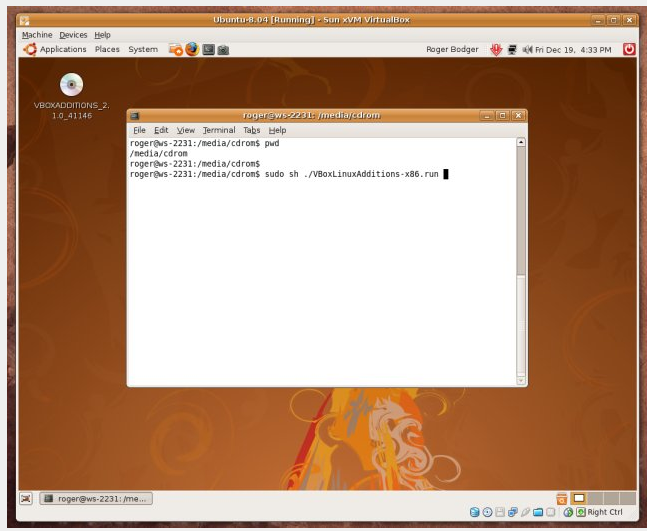
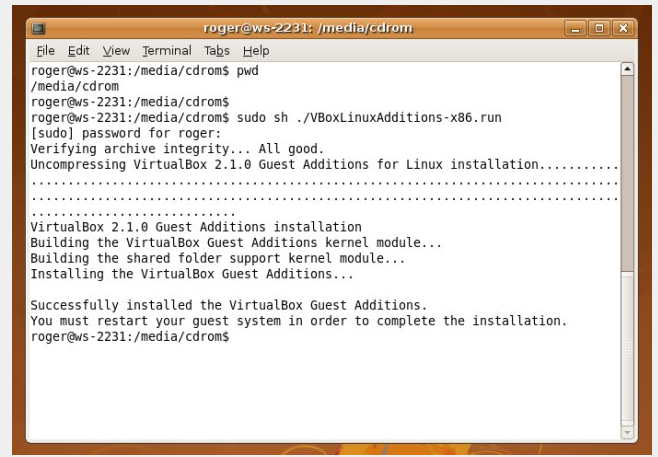
Можно так же запустить файл установки гостевых дополнений вручную. Для этого, нужно открыть терминал, и перейти в каталог, куда смонтирован виртуальный образ с файлами установки дополнений. Там же, нужно выполнить команду запуска файла установки:
После выполнения данной команды, начнется установка гостевых дополнений Linux, по завершению которой, понадобится перезагрузка системы.
What Do the Guest Additions Do?
Now that we know what Guest Additions are, let’s look at what the VirtualBox Guest Additions actually do for you.
Chances are that you’ll eventually want to move some content between your virtual machine (the guest) and your actual computer (the host). With the Guest Additions installed, VirtualBox packs a few features to make this easy.
First is the shared clipboard/drag and drop support. This allows you to copy items on one platform and paste them on the other, as well as dragging files between them. To adjust this, select your VM on the VirtualBox home page and choose Settings.
In the General section, switch to Advanced tab and you can choose options for Shared Clipboard and Drag’n’Drop. You can choose Disabled, Host to Guest, Guest to Host, or Bidirectional for both of them.
Unless you have a specific reason to choose something else, Bidirectional is the most convenient.
Once you have this enabled, both copy/paste and dragging will work across systems.
If you’d rather make folders on your host system accessible in the VM, you can utilize shared folders. This Guest Additions feature lets you mount host folders as «network resources» in the guest OS without actually using a network.
To use it, click Settings on a VM and jump to the Shared Folders section. Select the Add Share button on the right side, then choose a folder on your computer to share with the guest.
Give it a name, choose Auto-mount if you want it to connect automatically, and hit OK.
Now, that folder will appear as a network drive in the guest OS.
3. Improved Graphics Support
As mentioned earlier, virtual machines don’t support high-resolution graphics from the start. Once you install the Guest Additions, though, you’ll have full control over the resolution options in the guest OS’s settings menu. For instance, if you have a 1920×1080 monitor, you can display the VM in full-screen at 1080p.
That’s not the only graphical enhancement that the Guest Additions add. Using them, the guest OS’s resolution will dynamically resize as you adjust the VirtualBox window on your computer. This lets you use the VM at any size you like without playing with resolution options.
Finally, with Guest Additions, the guest OS can take advantage of your computer’s graphics hardware. If you’re playing games or using other graphically intensive software in a WM, this makes a huge difference.
4. Seamless App Windows
Another neat benefit of the Guest Additions is a seamless mode. This lets you run app windows from the guest alongside apps from your host OS, so it feels like they’re all part of one system. It’s a lot like how Parallels runs Windows apps on a Mac.
To use this mode, press the Host key + L when your virtual machine is in focus. If you haven’t changed it, the default Host key in VirtualBox is the right Ctrl key.
Once you’ve done this, the VM will go full-screen and VirtualBox will remove its background. You’re then free to use its windows with your regular desktop software. Hit Host + L again to turn this off—if it doesn’t seem to work, make sure you select the VirtualBox VM first.
5. Other Benefits of VirtualBox Guest Additions
The above functions are the main features of VirtualBox’s Guest Additions. There are a few other useful perks to installing them, though these are not as generally useful.
One that may affect you, depending on the guest OS, is seamless mouse integration. With most modern OSes, VirtualBox allows you to seamlessly move your mouse between your host and guest system. However, some older OSes require exclusive control of your keyboard and mouse.
If this is the case, your mouse pointer will become «trapped» inside the VirtualBox window after you click inside it. This means that you must hit the Host key (right Ctrl by default) to bring the mouse control back to the host OS.
Otherwise, the Guest Additions bring time synchronization with your host machine, the option for automated logins, and can monitor communications between the guest and host. None of this has much use for the average user.
Download Virtualbox Guest Additions
We have never realized how difficult it is to find the VirtualBox Guest additions download page. It is not accessible from the wiki. But, at this time… After some time spent on Google, we collect some vBoxGuestAdditions installation file with many version. This link will directly download the offline installer .iso from the official website. So, it’s secure and free from malware. Here is the answer:
| File Name | Version | Last Update | File Size |
| (Open the link to download) | |||
| VBoxGuestAdditions_6.0.4.iso | 6.0 | 28-Jan-2019 | 82 MB |
| VBoxGuestAdditions_5.2.26.iso | 5.2 | 28-Jan-2019 | 56 MB |
| VBoxGuestAdditions_5.1.38.iso | 5.1 | 09-May-2018 | 57 MB |
| VBoxGuestAdditions_5.0.40.iso | 5.0 | 28-Apr-2017 | 56 MB |
| VBoxGuestAdditions_4.3.40.iso | 4.3 | 22-Aug-2016 | 55 MB |
| VBoxGuestAdditions_4.2.38.iso | 4.2 | 14-Sep-2016 | 59 MB |
| VBoxGuestAdditions_4.1.44.iso | 4.1 | 11-Nov-2015 | 52 MB |
| VBoxGuestAdditions_4.0.36.iso | 4.0 | 11-Nov-2015 | 46 MB |
Страница загрузки пакета virtualbox-guest-additions-iso_6.1.16-1_all.deb
Если вы работаете в Ubuntu, для загрузки и установки пакетов настоятельно советуем использовать менеджер пакетов, например aptitude или synaptic, а не делать это вручную через данный сайт.
Используйте любой из серверов-зеркал, добавив его в свой файл /etc/apt/sources.list, например так:
deb http://cz.archive.ubuntu.com/ubuntu groovy main multiverse
Заменив cz.archive.ubuntu.com/ubuntu нужным сервером.
Вы можете скачать требуемый файл из подкаталога pool/multiverse/v/virtualbox-guest-additions-iso/ с любого из этих сайтов:
Северная Америка
- mirrors.kernel.org/ubuntu
- ftp.osuosl.org/pub/ubuntu
- lug.mtu.edu/ubuntu
- ubuntu.mirrors.tds.net/ubuntu
- ubuntu.secs.oakland.edu
- mirror.mcs.anl.gov/pub/ubuntu
- mirrors.cat.pdx.edu/ubuntu
- ubuntu.cs.utah.edu/ubuntu
- ftp.ussg.iu.edu/linux/ubuntu
- mirrors.xmission.com/ubuntu
- mirrors.cs.wmich.edu/ubuntu
- gulus.USherbrooke.ca/pub/distro/ubuntu
Азия
- kr.archive.ubuntu.com/ubuntu
- th.archive.ubuntu.com/ubuntu
- mirror.lupaworld.com/ubuntu
- kambing.vlsm.org/ubuntu
- ubuntu.mithril-linux.org/archives
- mirror.in.th/ubuntu
- mirror.rootguide.org/ubuntu
Африка
za.archive.ubuntu.com/ubuntu
Европа
- cz.archive.ubuntu.com/ubuntu
- de.archive.ubuntu.com/ubuntu
- dk.archive.ubuntu.com/ubuntu
- es.archive.ubuntu.com/ubuntu
- fr.archive.ubuntu.com/ubuntu
- ge.archive.ubuntu.com/ubuntu
- gr.archive.ubuntu.com/ubuntu
- hr.archive.ubuntu.com/ubuntu
- mt.archive.ubuntu.com/ubuntu
- nl.archive.ubuntu.com/ubuntu
- no.archive.ubuntu.com/ubuntu
- se.archive.ubuntu.com/ubuntu
- yu.archive.ubuntu.com/ubuntu
- nz.archive.ubuntu.com/ubuntu
- nz2.archive.ubuntu.com/ubuntu
- ftp.iinet.net.au/pub/ubuntu
- mirror.optus.net/ubuntu
- ftp.filearena.net/pub/ubuntu
- mirror.pacific.net.au/linux/ubuntu
Если загрузка с этих сайтов происходит медленно, попробуйте другие из полного списка серверов-зеркал.
Заметим, что при работе с некоторыми браузерами вам придётся указать браузеру, что вы хотите сохранить информацию в файл. Например, в Firefox или Mozilla вам нужно удерживать клавишу Shift при щелчке по URL.
Подробней о virtualbox-guest-additions-iso_6.1.16-1_all.deb:
| Точный размер | 44741068 байт (42,7 MByte) |
|---|---|
| Контрольная сумма MD5 | e97320e834b57281d5952f2c45eb0cab |
| Контрольная сумма SHA1 | 12d02cbbb1040be962e9b6e4df69450839a7fdfe |
| Контрольная сумма SHA256 | efdd8e88e427f78a8643b558e58cc8cf5fb31aff166f87a7e2196989afb3b05f |
Whonix ™-Default[edit]
Note:
- From VirtualBox v6+ it is no longer necessary to power off the virtual machine.
- For better usability, package shared-folder-help has already added user to group .
- Navigate to the shared folder settings of the virtual machine: → → →
- Click the folder icon that has a symbol in the upper right-hand section of the screen.
- → Navigate to the folder you want to share.
- → Type: . A different folder name can be utilized, but is recommended so it is the same as the example documented below — do not use (without the trailing )!
- Check if you do not want to write to that folder from within the guest.
- Check .
- → Leave as is (leave it empty and do not make any changes).
- Check (if that option exists).
- Press to close shared folder dialog.
- Press to close VirtualBox settings.
- The process is now complete and the shared folder can be used.
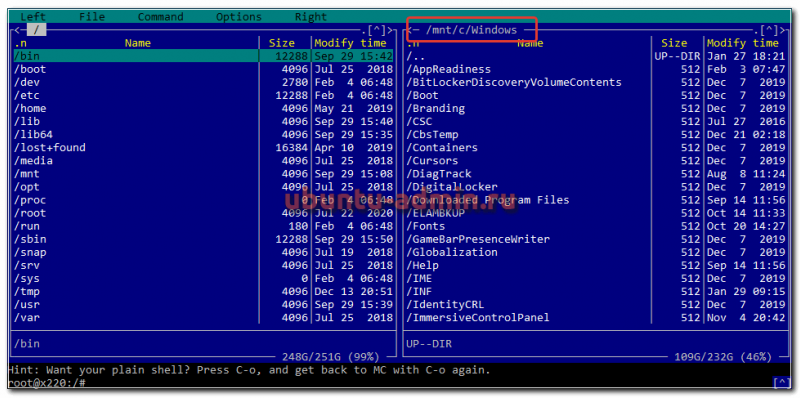
VirtualBox shared folders are found inside the virtual machine in folder .
By default, VirtualBox uses the prefix .
In the above example, the folder will become . It can be opened using a file manager like Thunar. To open it using the the command line, run.
cd /media/sf_shared
cd /media/sf_shared
Почему вы должны использовать гостевые дополнения VirtualBox?
С включенными гостевыми дополнениями VirtualBox использование виртуальной машины становится намного удобнее. Не веришь мне? Вот важные функции, которые предлагает гостевые дополнения:
- Интеграция указателя мыши: вам больше не нужно нажимать какие-либо клавиши, чтобы «освободить» курсор от гостевой ОС.
- Общий буфер обмена: с установленными гостевыми дополнениями вы можете копировать и вставлять данные между гостевой и хост-операционной системами.
- Перетаскивание: вы также можете перетаскивать файлы между хостом и гостевой ОС.
- Общие папки: Моя любимая функция; эта функция позволяет обмениваться файлами между хостом и гостем. Вы можете указать VirtualBox обрабатывать определенный каталог хоста как общую папку, и программа сделает его доступным для гостевой операционной системы как сетевой ресурс, независимо от того, есть ли у гостевой системы сеть.
- Улучшенная поддержка видео: пользовательские драйверы видео, которые устанавливаются с гостевыми дополнениями, предоставляют вам сверхвысокие и нестандартные режимы видео, а также повышенную производительность видео. Это также позволяет изменить размер окна виртуальной машины. Разрешение видео в гостевой системе будет настроено автоматически, как если бы вы вручную вводили произвольное разрешение в настройках дисплея гостевой системы.
- Бесшовные окна: отдельные окна, которые отображаются на рабочем столе виртуальной машины, могут быть сопоставлены на рабочем столе хоста, как если бы основное приложение фактически выполнялось на хосте.
- Общие каналы связи хоста/гостя: гостевые дополнения позволяют вам контролировать и мониторить действия гостевой системы. «Свойства гостя» предоставляют общий механизм на основе строк для обмена битами данных между гостем и хостом, некоторые из которых имеют особые значения для управления и контроля гостевой системы. Приложения могут быть запущены на гостевой машине с хоста.
- Синхронизация времени: благодаря гостевые системы будут регулярно синхронизировать время с хост-машиной. Параметры механизма синхронизации времени могут быть настроены.
- Автоматические входы в систему: это может быть полезной функцией.
Под впечатлением от функций, которые предоставляет гостевое дополнение? Давайте посмотрим, как вы можете установить VirtualBox Guest Additions в Ubuntu Linux.
Virtualbox Guest Additions Download and Install Process (Step by Step with Screenshots)
Ubuntu VirtualBox and VirtualBox for Windows are versatile virtualization products that can be boosted with Guest Additions The VirtualBox Guest Additions comprise device drivers and other system applications for optimizing the operating system for better performance and usability. When installed, the VirtualBox Additions tools allow the system guests to run faster and better, to use shared folders, to share mouse and clipboard with the host, and plenty more. Overall, it is an appreciated addition.
Guest Additions are pretty much similar to VMware tools for VMware workstation. This tutorial will clearly explain the procedure to install VirtualBox Guest Additions on Windows client. VirtualBox can be downloaded from here.
How to Install VirtualBox Guest Additions on Windows Guest
The procedure is straightforward. You need to boot into your guest. Then go to VirtualBox menu. Click the option of “Install Guest Additions” under Devices.
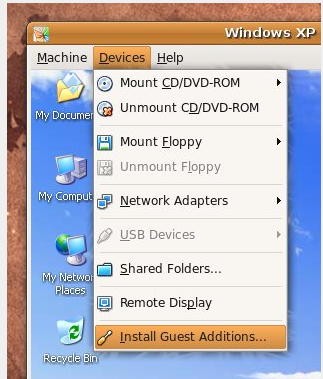
This action will pop up a wizard in your guest window. Follow it through. Now reboot and enjoy.

Once you have restarted, look for the VirtualBox icon in the system tray. It’s all smooth sailing.
How to Install Guest Additions on Ubuntu VirtualBox
The procedure for installing Guest Additions on Linux guest is again very simple. You need to repeat the first step for Ubuntu as well for mounting VirtualBox Guest Additions ISO in the form of CD ROM drive in the virtual machine.
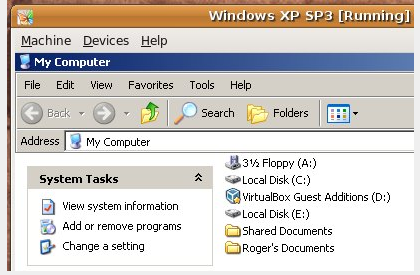
You will see a file manager window popping up, depending on the configuration of your guest, showing all the available options. It will also show the options for including Guest Additions for 32-bit and 64-bit systems, creating similar versions for Windows and Ubuntu. It may even include Solaris considering the fact the VirtualBox is owned by Sun. The system will automatically mount CD ROMs and will run the browsers/managers.
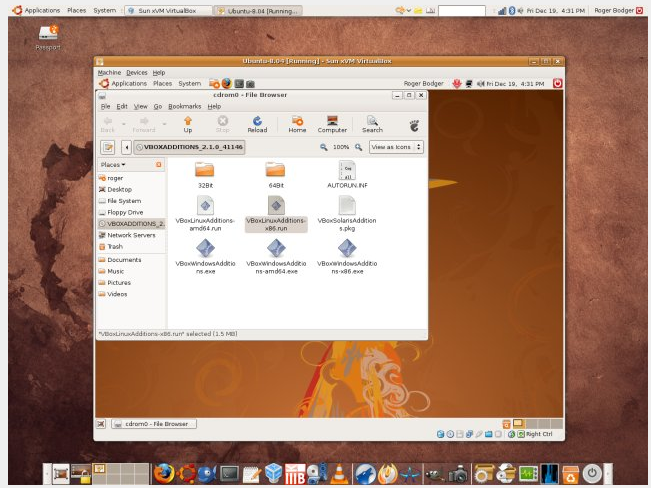
You need to choose the right package for your hardware architecture for example x86. Open a terminal window and run the script with root privileges.
“sudo sh ./<script-relevant-for-your-architecture>”
Now wait for some time till the completion of installation. Now reboot.
This completes the procedure.
Some Problems with Installing Guest Additions for VirtualBox
In general, whenever the users click the option of “Install Guest Additions”, Guest Additions ISO is supposed to be mounted by the VirtualBox. There are plenty of methods to rectify the situation.
First of all, if you don’t find the Guest Additions, VirtualBox may prompt you to access internet and then download the ISO file. This might be required to be done only once. You can also download the image by yourself and then mount manually as a CD ROM, under the Settings for the selected virtual machine.
The next time you run the virtual machine, the Guest Additions should be mounted as a virtual CD ROM. To install the Guest Additions on Windows, you need to double-click the executable. For Linux, you have to run the scripts as mentioned above.
 ,
,
It must be kept in mind that the installation of Guest Additions is even easier than VMware tools. The procedure is fast, simple and convenient. Only a little amount of playing with the commands is involved.
Why should you use VirtualBox Guest Additions?
With VirtualBox Guest Additions enabled, using the virtual machine becomes a lot more comfortable. Don’t believe me? Here are the important features that the Guest Additions offer:
- Mouse pointer integration: You no longer need to press any key to “free” the cursor from the Guest OS.
- Shared clipboard: With the Guest Additions installed, you can copy-paste between the guest and the host operating systems.
- Drag and drop: You can also drag and drop files between the host and the guest OS.
- Shared folders: My favorite feature; this feature allows you to exchange files between the host and the guest. You can tell VirtualBox to treat a certain host directory as a shared folder, and the program will make it available to the guest operating system as a network share, irrespective of whether guest actually has a network.
- Better video support: The custom video drivers that are installed with the Guest Additions provide you with extra high and non-standard video modes, as well as accelerated video performance. It also allows you to resize the virtual machine’s window. The video resolution in the guest will be automatically adjusted, as if you had manually entered an arbitrary resolution in the guest’s Display settings.
- Seamless windows: The individual windows that are displayed on the desktop of the virtual machine can be mapped on the host’s desktop, as if the underlying application was actually running on the host.
- Generic host/guest communication channels: The Guest Additions enable you to control and monitor guest execution. The “guest properties” provide a generic string-based mechanism to exchange data bits between a guest and a host, some of which have special meanings for controlling and monitoring the guest. Applications can be started in the Guest machine from the Host.
- Time synchronization: The Guest Additions will resynchronize the time with that of the Host machine regularly. The parameters of the time synchronization mechanism can be configured.
- Automated logins: Basically credentials passing, it can be a useful feature.
Impressed by the features it provides? Let’s see how you can install VirtualBox Guest Additions on Ubuntu Linux.
Installing VirtualBox Guest Additions on Ubuntu
The scenario here is that you have Ubuntu Linux installed inside VirtualBox. The host system could be any operating system.
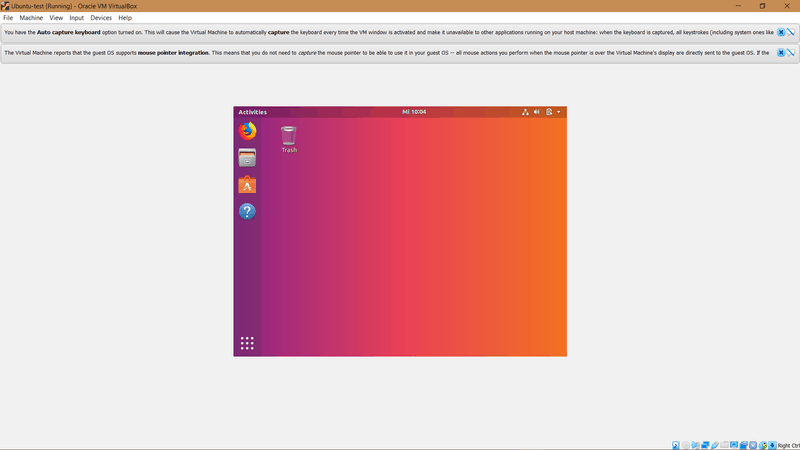
I’ll demonstrate the installation process on a minimal install of a Ubuntu virtual machine. First run your virtual machine:
VirtualBox Ubuntu Virtual Machine
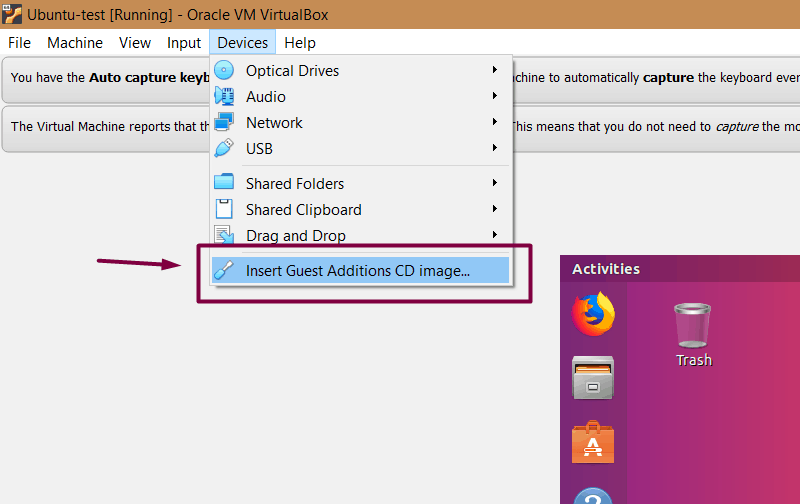
To get started, select Device > Insert Guest Additions CD image…:
Insert Guest Additions CD Image
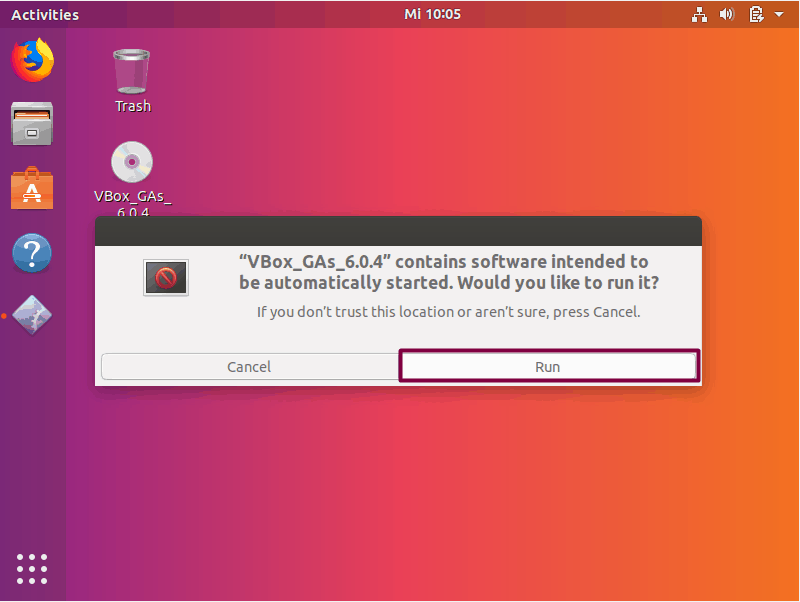
This will provide you with the required installer inside the guest system (i.e. the virtual operating system). It will try auto-running, so just click Run:
AutoRun Guest Additions Installation
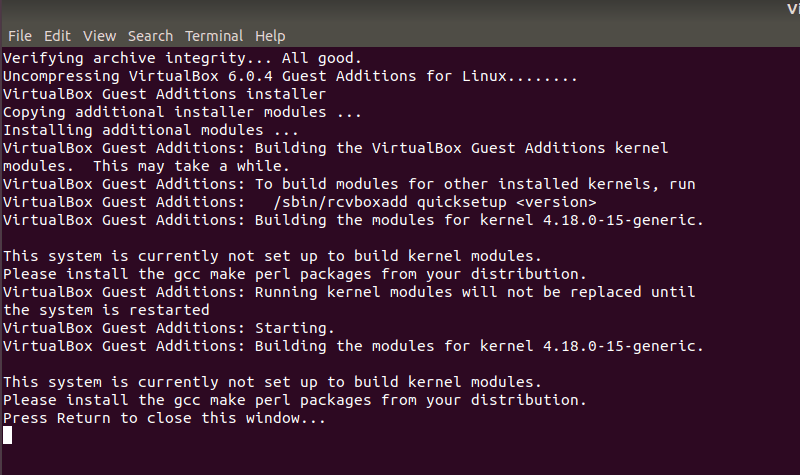
This should open up the installation in a terminal window. Follow the on-screen instructions and you’ll have the Guest Additions installed in a few minutes at most.
Troubleshooting tips:
If you get an error like this one, it means you are missing some kernel modules (happens in some cases, such as minimal installs):
Error while installing Guest Additions in Ubuntu
You need to install a few more packages here. Just to clarify, you need to run these commands in the virtual Ubuntu system:
Now run the Guest Addition setup again:
Поддерживаемые операционный системы:
Windows:
- Windows XP SP3 (32-bit и 64-bit)
- Windows Vista SP1 и выше (32-bit и 64-bit).
- Windows Server 2008 (64-bit)
- Windows Server 2008 R2 (64-bit)
- Windows 7 (32-bit и 64-bit)
- Windows 8 (32-bit и 64-bit)
- Windows 8.1 (32-bit и 64-bit)
- Windows 10 RTM build 10240 (32-bit и 64-bit)
- Windows 10 RTM build 10586 (32-bit и 64-bit)
- Windows Server 2012 (64-bit)
- Windows Server 2012 R2 (64-bit)
Mac OS X (64-bit):
- 10.8 (Mountain Lion)
- 10.9 (Mavericks)
- 10.10 (Yosemite)
- 10.11 (El Capitan)
Linux (32-bit и 64-bit):
- Ubuntu 10.04 до 15.04
- Debian GNU/Linux 6.0 («Squeeze») и 8.0 («Jessie»)
- Oracle Enterprise Linux 5, Oracle Linux 6 и 7
- Redhat Enterprise Linux 5, 6 и 7
- Fedora Core / Fedora 6 до 22
- Gentoo Linux
- openSUSE 11.4, 12.1, 12.2, 13.1
- Mandriva 2011
Solaris hosts (64-bit):
- Solaris 11
- Solaris 10 (U10 и выше
Installing VirtualBox Guest Additions on Ubuntu
The scenario here is that you have Ubuntu Linux installed inside VirtualBox. The host system could be any operating system.
I’ll demonstrate the installation process on a minimal install of a Ubuntu virtual machine. First run your virtual machine:
VirtualBox Ubuntu Virtual Machine
To get started, select Device > Insert Guest Additions CD image…:
Insert Guest Additions CD Image
This will provide you with the required installer inside the guest system (i.e. the virtual operating system). It will try auto-running, so just click Run:
AutoRun Guest Additions Installation
This should open up the installation in a terminal window. Follow the on-screen instructions and you’ll have the Guest Additions installed in a few minutes at most.
Troubleshooting tips:
If you get an error like this one, it means you are missing some kernel modules (happens in some cases, such as minimal installs):
Error while installing Guest Additions in Ubuntu
You need to install a few more packages here. Just to clarify, you need to run these commands in the virtual Ubuntu system:
Now run the Guest Addition setup again:
Шаг 2: Установка заголовков ядра и инструментов сборки
После установки репозитория EPEL продолжите установку и установите заголовки ядра и инструменты сборки, необходимые для сборки гостевых дополнений, для этого запустите команду:
sudo dnf install gcc make perl kernel-devel kernel-headers bzip2 dkms autoconf

После установки убедитесь, что версия kernel-devel соответствует версии вашего ядра Linux, выполнив следующие команды:
rpm -q kernel-devel
uname -r
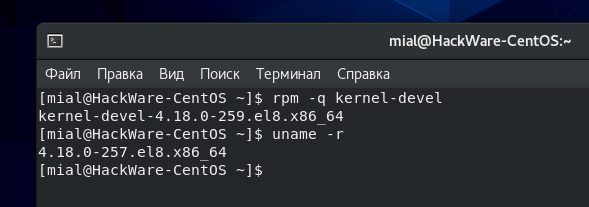
Вывод ясно указывает на конфликт между двумя версиями. Версия kernel-devel — 4.18.0-259.el8.x86_64, а версия ядра Linux — 4.18.0-257.el8.x86_64.
Чтобы решить эту проблему, обновите ядро Linux, выполнив команду:
sudo dnf update kernel-*
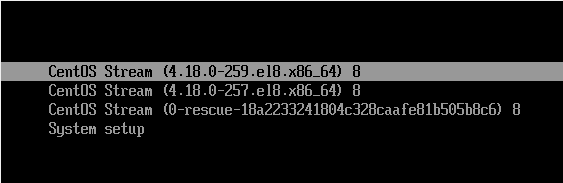
При появлении запроса нажмите «д» и нажмите ENTER, чтобы продолжить обновление. Когда обновление будет завершено, перезагрузите систему CentOS 8.
sudo reboot
Во время перезагрузки обязательно загрузитесь с последней записью ядра, соответствующей версии kernel-devel. Как видите, это обычно первая запись.
После того как система загрузится, войдите в систему и ещё раз подтвердите, что версия ядра теперь совпадает с версией ядра Linux.
rpm -q kernel-devel
uname -r
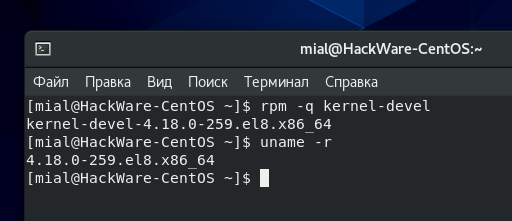
Две версии сейчас синхронизированы. Отлично! Теперь вы можете продолжить и установить гостевые дополнения VirtualBox.
Download Virtualbox Guest Additions
We have never realized how difficult it is to find the VirtualBox Guest additions download page. It is not accessible from the wiki. But, at this time… After some time spent on Google, we collect some vBoxGuestAdditions installation file with many version. This link will directly download the offline installer .iso from the official website. So, it’s secure and free from malware. Here is the answer:
| File Name | Version | Last Update | File Size |
| (Open the link to download) | |||
| VBoxGuestAdditions_6.0.4.iso | 6.0 | 28-Jan-2019 | 82 MB |
| VBoxGuestAdditions_5.2.26.iso | 5.2 | 28-Jan-2019 | 56 MB |
| VBoxGuestAdditions_5.1.38.iso | 5.1 | 09-May-2018 | 57 MB |
| VBoxGuestAdditions_5.0.40.iso | 5.0 | 28-Apr-2017 | 56 MB |
| VBoxGuestAdditions_4.3.40.iso | 4.3 | 22-Aug-2016 | 55 MB |
| VBoxGuestAdditions_4.2.38.iso | 4.2 | 14-Sep-2016 | 59 MB |
| VBoxGuestAdditions_4.1.44.iso | 4.1 | 11-Nov-2015 | 52 MB |
| VBoxGuestAdditions_4.0.36.iso | 4.0 | 11-Nov-2015 | 46 MB |