Bulk testing pagespeed insights with the seo spider
Содержание:
- Виды парсеров по сферам применения
- What Is SEO?
- Интерфейс
- Что конкретно всё это даёт?
- Building Functions & Strings with XPath Helper & Regex Search
- Configuring The Crawl
- 2) External Link Metrics Integration
- Ahrefs
- 3) Resume Previously Lost or Crashed Crawls
- 5) View Scraped Data Under The Custom Extraction Tab
- Other Updates
- 3) Input Your Syntax
- Other Updates
- 3) Custom robots.txt
- 4) hreflang Attributes
Виды парсеров по сферам применения
Для организаторов СП (совместных покупок)
Есть специализированные парсеры для организаторов совместных покупок (СП). Их устанавливают на свои сайты производители товаров (например, одежды). И любой желающий может прямо на сайте воспользоваться парсером и выгрузить весь ассортимент.
Чем удобны эти парсеры:
- интуитивно понятный интерфейс;
- возможность выгружать отдельные товары, разделы или весь каталог;
- можно выгружать данные в удобном формате. Например, в Облачном парсере доступно большое количество форматов выгрузки, кроме стандартных XLSX и CSV: адаптированный прайс для Tiu.ru, выгрузка для Яндекс.Маркета и т. д.
Популярные парсеры для СП:
- SPparser.ru,
- Облачный парсер,
- Турбо.Парсер,
- PARSER.PLUS,
- Q-Parser.
Вот три таких инструмента:
- Marketparser,
- Xmldatafeed,
- ALL RIVAL.
Парсеры для быстрого наполнения сайтов
Такие сервисы собирают названия товаров, описания, цены, изображения и другие данные с сайтов-доноров. Затем выгружают их в файл или сразу загружают на ваш сайт. Это существенно ускоряет работу по наполнению сайта и экономят массу времени, которое вы потратили бы на ручное наполнение.
В подобных парсерах можно автоматически добавлять свою наценку (например, если вы парсите данные с сайта поставщика с оптовыми ценами). Также можно настраивать автоматический сбор или обновление данных по расписания.
Примеры таких парсеров:
- Catalogloader,
- Xmldatafeed,
- Диггернаут.
What Is SEO?
Search Engine Optimisation (SEO) is the practice of increasing the number and quality of visitors to a website by improving rankings in the algorithmic search engine results.
Research shows that websites on the first page of Google receive almost 95% of clicks, and studies show that results that appear higher up the page receive an increased click through rate (CTR), and more traffic.

The algorithmic (‘natural’, ‘organic’, or ‘free’) search results are those that appear directly below the top pay-per-click adverts in Google, as highlighted below.

There are also various other listings that can appear in the Google search results, such as map listings, videos, the knowledge graph and more. SEO can include improving visibility in these result sets as well.
Интерфейс
Итак, всё начинается с поля «Enter URL to spider», куда вводится название сайта и жмётся кнопка «Start».

Понятное дело, что она запускает сканирование сайта, а когда оно завершится, мы можем приступать к анализу. И тут мы сразу получаем первые минусы по сравнению с PageWeight — нельзя задать локальный (то есть свой) роботс. В принципе, исключить разделы из сканирования можно через Configuration — Exclude, но это уже не так удобно. Впрочем, познакомимся с интерфейсом и возможностями программы.
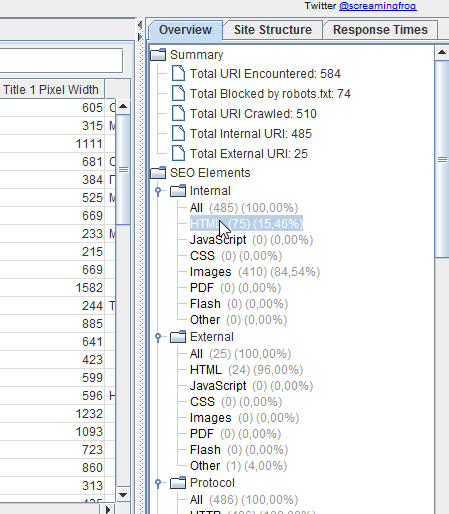
Сначала может ввести в ступор, что в списке страниц будет куча изображений, но их можно моментально отсечь — либо выбрав фильтр HTML (кстати кнопка Export отвечает за экспорт текущих результатов из главного окна в Excel, можно даже в xlsx):
Либо переключившись на HTML в сайдбаре, оба варианта оставят в основном окне программы только собственно HTML страницы:
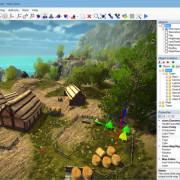
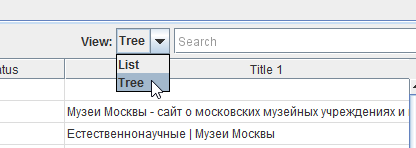
В последней версии (3.0 на момент написания статьи) появилась возможность выстроить структуру сайта. Таким образом можно, к примеру, изучить структуру конкурентов перед созданием своего сайта.
Заметьте, что у каждой вкладки программы есть свои собственные фильтры. Вы можете выбрать, например, только страницы, отдающие 301 редирект и выгрузить их в Excel. На вкладке URI вы можете выбрать урлы, чья длина больше 115 символов, урлы с нижним подчеркиванием вместо дефиса (фильтр Underscores), дубли страниц (Duplicate), урлы с параметрами (Dynamic). На вкладке Title — выбрать те тайтлы, чья длина больше 65 символов или меньше 30, совпадающие с H1 на странице, отсутствующие. На вкладке Images — все изображения больше 100 килобайт, без тега alt. Ну и так далее.

Столбцы в основном окне перемещаются по принципу Drag and Drop, так что можно переместить наиболее важные из них ближе к левой части окна и сохранить настройки через File — Default Config — Save Current.
При нажатии на название столбца происходит сортировка. Среди столбцов есть не совсем обычные:
- Title 1 Lenght — длина Title
- Title 1 Pixel Width — ширина Title в пикселях
- Level — это уровень вложенности.
- Word Сount — количество слов между тегами body.
- Size — вес страницы в байтах.
- Inlinks — количество внутренних ссылок на страницу.
- Outlinks — количество внутренних ссылок со страницы.
- External Outlinks — количество внешних ссылок со страницы. Поспорьте с пацанами, кто угадает, какое наибольшее количество ссылок со страницы размещает тот или иной сапа-сайт. Если один угадает, а второй нет — то второй покупает ссылку на свой сайт с этой страницы.
- Response Time — время загрузки страницы.
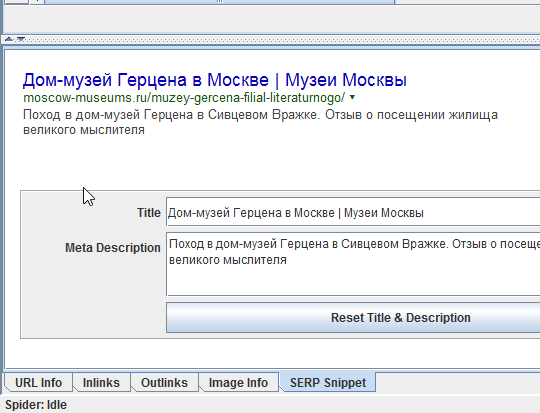
Также внизу есть окно с более подробной информацией о странице. Так, SERP Snippet показывает, как, по оценке программы, будет выглядеть сниппет в Google. Полезно, если вы заморачиваетесь, чтобы Title в выдаче выглядел кликабельнее.
Когда в окне кликаете правой кнопкой мыши на строку нужного урла, открывается контекстное меню, из которого наиболее важным пунктом является Open in Browser — открыть в браузере.
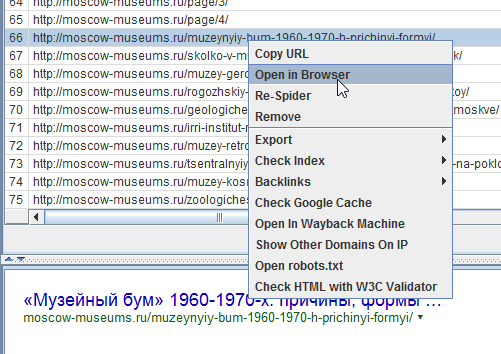
Также удобно будет выделить с помощью shift часть урлов и удалить их через Remove. Не с сайта, конечно, а из результатов сканирования. А то бы я давно с пары сайтов кое-каких чертей урлы бы поудалял…

Также с помощью контекстного меню можно проверить наличие страницы в индексе Гугла, Яху и Бинга, посмотреть бэклинки через сервисы типа Majestic SEO или Ahrefs, открыть кэш Гугла или найти страницу в Вебархиве. Ну еще роботс глянуть и проверить код страницы на наличие ошибок. Контекстное меню на всех вкладках одинаковое.
Что конкретно всё это даёт?
Это все конечно хорошо, но как применять весь этот арсенал на практике? На бложиках пишут обзорчики типа «ой, а тут у нас вот тайтлы отображаются… ой, а тут дескрипшен вот считается…» Ну и? Что это даёт? Вот конкретные 9 профитов от Screaming Frog:
- 404 ошибки и редиректы. Находим через Лягушку и исправляем.
- Дубли страниц (по одинаковым Title). Находим и удаляем.
- Пустые, короткие и длинные Title. Находим, заполняем, дополняем, правим.
- Страницы с недостаточным уровнем вложенности. Выгружаем в Excel, в столбец с урлами вставляем список продвигаемых страниц, выделяем повторяющиеся значения. Смотрим, у каких продвигаемых страниц УВ не 1, не 2, и не 3 и работаем с этой проблемой.
- Длина урлов. Находим длинные урлы, сокращаем, проставляем редиректы со старых.
- «Пустые» страницы. По данным из столбца Word Count вычисляем страницы, где контента меньше, чем в среднем (или просто мало), и либо их закрываем через роботс, либо удаляем, либо наполняем.
- Самые медленные страницы. Смотрим по столбцу Response Time.
- Внешние ссылки. Удаляем либо вообще все, либо битые, которые 404 отдают.
- Совпадающие Title и H1. Находим, правим.
- Теги <strong>, <b>, <br> и так далее. Screaming Frog позволяет найти все страницы на сайте, где используются эти теги.
Это из важного. Про баловство вроде кликабельного вида Title в выдаче или пустых description я тут промолчу
Есть еще один недостаток перед PageWeight — программа не считает вес страниц. Но тут уж выручит Netpeak Spider — он умеет.
Building Functions & Strings with XPath Helper & Regex Search
The Spider is capable of doing some very cool stuff with the extraction feature, a lot of which is listed in our guide to web scraping and extraction. The trouble with much of this is it will require you to build your own XPath or regex string to lift your intended information.
While simply right-clicking > Copy XPath within the inspect window will usually do enough to scrape, by it’s not always going to cut it for some types of data. This is where two chrome extensions, XPath Helper & Regex- Search come in useful.
Unfortunately, these won’t automatically build any strings or functions, but, if you combine them with a cheat sheet and some trial and error you can easily build one out in Chrome before copying into the Spider to bulk across all your pages.
For example, say I wanted to get all the dates and author information of every article on our blog subfolder (https://www.screamingfrog.co.uk/blog/).

If you simply right clicked on one of the highlighted elements in the inspect window and hit Copy > Copy XPath, you would be given something like:
While this does the trick, it will only pull the single instance copied (‘16 January, 2019 by Ben Fuller’). Instead, we want all the dates and authors from the /blog subfolder.
By looking at what elements the reference is sitting in we can slowly build out an XPath function directly in XPath Helper and see what it highlights in Chrome. For instance, we can see it sits in a class of ‘main-blog–posts_single-inner–text–inner clearfix’, so pop that as a function into XPath Helper:
XPath Helper will then highlight the matching results in Chrome:

Close, but this is also pulling the post titles, so not quite what we’re after. It looks like the date and author names are sitting in a sub <p> tag so let’s add that into our function:

Bingo! Stick that in the custom extraction feature of the Spider (Configuration > Custom > Extraction), upload your list of pages, and watch the results pour in!

Regex Search works much in the same way: simply start writing your string, hit next and you can visually see what it’s matching as you’re going. Once you got it, whack it in the Spider, upload your URLs then sit back and relax.
Configuring The Crawl
You don’t need to adjust the configuration to crawl a website, as the SEO Spider is set-up by default to crawl in a similar way to Google.
However, there are a myriad of ways that you can configure the crawl to get the data you want. Check out the options under ‘Configuration‘ within the tool and refer to our user guide for detail on each setting.
Some of the most common ways to control what’s crawled are to , use the (to avoid crawling URLs by URL pattern) or the features.
If your website relies on JavaScript to populate content, you can also switch to mode under ‘Configuration > Spider > Rendering’.
This will mean JavaScript is executed and the SEO Spider will crawl content and links within the rendered HTML.
2) External Link Metrics Integration
You can now connect to Majestic, Ahrefs and Moz APIs and pull in external link metrics during a crawl. This has been a much-requested feature and is extremely useful for performing a content audit, or quickly bulk checking link metrics against a list of URLs.
When you have connected to an API, link metrics will appear in real time, under the new ‘Link Metrics’ tab and in the ‘Internal’ tab, so they can be combined with all the usual crawl and analytical data.

We’ve now also introduced an ‘API’ tab into the right-hand window pane, to allow users to keep an eye on progress.

You will be required to have an account with the tool providers to pull in data using your own API credentials. Each of the tools offer different functionality and metrics from their APIs, and you’re able to customise what data you want to pull in.

The SEO Spider will calculate the API usage of pulling data based upon your API plan (where possible via the API), and can even combine link counts for HTTP and HTTPS versions of URLs for Majestic and Ahrefs to help you save time.
Moz is the only tool with a free (slower, and limited API), as well as a paid plan, which you can select and allows requests to be super fast.

So you can pull in Moz metrics such as Page Authority, Domain Authority, or Spam Score and lots more.

Ahrefs
Набор инструментов для seo-оптимизации сайта.
С их помощью можно осуществлять:
- аудит сайта,
- отслеживание позиций,
- анализ ключевых слов, контента и поисковых запросов клиентов.
Инструменты Ahrefs позволяют проводить исследование органического трафика, анализ обратных ссылок и платной выдачи любого сайта и URL. Они помогают провести аудит сайта, проверить его на наличие проблем с производительностью, количеством контента, социальными тегами и т. д., а также исправить их. Анализируют ключевые слова на основе данных 10 поисковых систем (Google, Amazon, YouTube, Baidu и др.) по расширенным метрикам, отображают частоту запросов по ключевым словам. Позволяют отслеживать позиции вашего сайта и сайтов-конкурентов в поисковой выдаче, предоставляют информацию о ранжировании в функциях SERP, видимости сайта и трафике.
Особенности:
- большая база данных (1 млрд. контентных страниц, 7 триллионов ключевых слов, 16 триллионов ссылок),
- база ключевых слов поддерживается в 171 стране и постоянно обновляется,
- есть возможность сравнения ссылочных профилей сайтов,
- есть набор бесплатных инструментов (анализатор ссылок, поисковой выдачи, авторитета сайта и др.),
- поддержка 24/5,
- доступна пробная версия, которая активизируется на 7 дней и стоит $7.
3) Resume Previously Lost or Crashed Crawls
Due to the feature above, you’re now able to resume from an otherwise ‘lost’ crawl in database storage mode.
Previously if Windows had kindly decided to perform an update and restart your machine mid crawl, there was a power-cut, software crash, or you just forgot you were running a week-long crawl and switched off your machine, the crawl would sadly be lost forever.
We’ve all been there and we didn’t feel this was user error, we could do better! So if any of the above happens, you should now be able to just open it back up via the ‘File > Crawls’ menu and resume the crawl.
Unfortunately this can’t be completely guaranteed, but it will provide a very robust safety net as the crawl is always stored, and generally retrievable – even when pulling the plug directly from a machine mid-crawl.
5) View Scraped Data Under The Custom Extraction Tab
Scraped data starts appearing in real time during the crawl, under the ‘Custom Extraction’ tab, as well as the ‘internal’ tab allowing you to export everything collected all together into Excel.
In the example outlined above, we can see the author names and number of comments next to each blog post, which have been scraped.

When the progress bar reaches ‘100%’, the crawl has finished and you can choose to ‘export’ the data using the ‘export’ buttons.
If you already have a list of URLs you wish to extract data from, rather than crawl a website to collect the data, then you can upload them using .
That’s it! Hopefully the above guide helps illustrate how to use the SEO Spider software for web scraping.
Obviously the possibilities are endless, this feature can be used to collect anything from just plain text, to Google analytics IDs, schema, social meta tags (such as Open Graph Tags & Twitter Cards), mobile annotations, hreflang values, as well as price of products, discount rates, stock availability etc. I’ve covered some more examples, which are split by the method of extraction.
Other Updates
Version 12.0 also includes a number of smaller updates and bug fixes, outlined below.
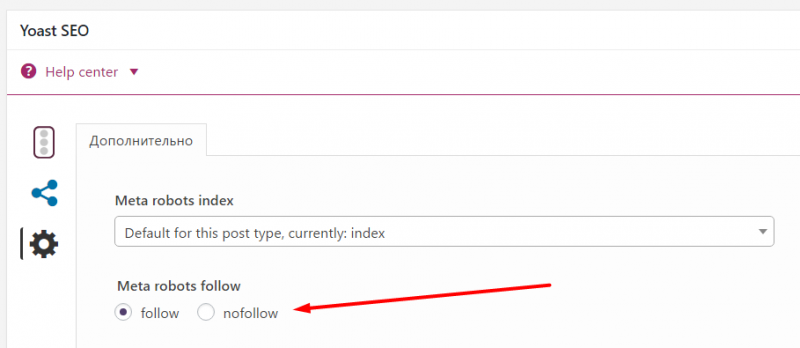
- There’s a new ‘Link Attributes’ column for inlinks and outlinks. This will detail whether a link has a nofollow, sponsored or ugc value. ‘‘ and ‘‘ configuration options will apply to links which have sponsored or ugc, similar to a normal nofollow link.
- The SEO Spider will pick up the new max-snippet, max-video-preview and max-image-preview directives and there are filters for these within the ‘‘ tab. We plan to add support for data-nosnippet at a later date, however this can be analysed using custom extraction for now.
- We’re committed to making the tool as reliable as possible and encouraging user reporting. So we’ve introduced in-app crash reporting, so you don’t even need to bring up your own email client or download the logs manually to send them to us. Our support team may get back to you if we require more information.
- The crawl name is now displayed in the title bar of the application. If you haven’t named the crawl (or saved a name for the .seospider crawl file), then we will use a smart name based upon your crawl. This should help when comparing two crawls in separate windows.
- Structured data validation has been updated to use Schema.org 3.9 and now supports FAQ, How To, Job Training and Movie Google features. We’ve also updated nearly a dozen features with changing required and recommended properties.
- ga:users metric has now been added to the .
- ‘Download XML Sitemap’ and ‘Download XML Sitemap Index’ options in , have been combined into a single ‘Download XML Sitemap’ option.
- The configuration now applies when in list mode, and to robots.txt files.
- Scroll bars have now been removed from screenshots.
- Our emulator has been updated with Google’s latest changes to larger font on desktop, which has resulted in less characters being displayed before truncation in the SERPs. The ‘Over 65 Characters’ default filter for page titles has been amended to 60. This can of course be adjusted under ‘Config > Preferences’.
- We’ve significantly sped up robots.txt parsing.
- has been improved to use less memory.
- We’ve added support for x-gzip content encoding, and content type ‘application/gzip’ for sitemap crawling.
- We removed the descriptive export name text from the first row of all exports as it was annoying.
That’s everything. If you experience any problems with the new version, then please do just let us know via our support and we’ll help as quickly as possible.
Thank you to everyone for all their feature requests, feedback, and bug reports. We appreciate each and every one of them.
Now, go and download version 12.0 of the Screaming Frog SEO Spider and let us know what you think!
3) Input Your Syntax
Next up, you’ll need to input your syntax into the relevant extractor fields. A quick and easy way to find the relevant CSS Path or Xpath of the data you wish to scrape, is to simply open up the web page in Chrome and ‘inspect element’ of the HTML line you wish to collect, then right click and copy the relevant selector path provided.
For example, you may wish to start scraping ‘authors’ of blog posts, and number of comments each have received. Let’s take the Screaming Frog website as the example.
Open up any blog post in Chrome, right click and ‘inspect element’ on the authors name which is located on every post, which will open up the ‘elements’ HTML window. Simply right click again on the relevant HTML line (with the authors name), copy the relevant CSS path or XPath and paste it into the respective extractor field in the SEO Spider. If you use Firefox, then you can do the same there too.

You can rename the ‘extractors’, which correspond to the column names in the SEO Spider. In this example, I’ve used CSS Path.

The ticks next to each extractor confirm the syntax used is valid. If you have a red cross next to them, then you may need to adjust a little as they are invalid.
When you’re happy, simply press the ‘OK’ button at the bottom. If you’d like to see more examples, then skip to the bottom of this guide.
Please note – This is not the most robust method for building CSS Selectors and XPath expressions. The expressions given using this method can be very specific to the exact position of the element in the code. This is something that can change due to the inspected view being the rendered version of the page / DOM, when by default the SEO Spider looks at the HTML source, and HTML clean-up that can occur when the SEO Spider processes a page where there is invalid mark-up.
These can also differ between browser, e.g. for the above ‘author’ example the following CSS Selectors are given –
Chrome: body > div.main-blog.clearfix > div > div.main-blog–posts > div.main-blog–posts_single–inside_author.clearfix.drop > div.main-blog–posts_single–inside_author-details.col-13-16 > div.author-details–social > aFirefox: .author-details–social > a:nth-child(1)
The expressions given by Firefox are generally more robust than those provided by Chrome. Even so, this should not be used as a complete replacement for understanding the various extraction options and being able to build these manually by examining the HTML source.
The w3schools guide on CSS Selectors and their XPath introduction are good resources for understanding the basics of these expressions.
Other Updates
Version 8.0 also includes a number of smaller updates, which include –
- The ‘Internal’ tab now has new columns for ‘Unique Inlinks’, ‘Unique Outlinks’ and ‘Unique External Outlinks’ numbers. The unique number of ‘inlinks’ was previously only available within the ‘Site Structure’ tab and displays a percentage of the overall number of pages linking to a page.
- A new ‘Noindex Confirmation Links’ filter is available within the ‘Hreflang’ tab and corresponding export in the ‘Reports > Hreflang > Noindex Confirmation Links’ menu.
- An ‘Occurences’ column has been added to the Hreflang tab to count the number on each page and identify potential problems.
- A new ‘Encoded URL’ column has been added to ‘Internal’ and ‘Response Codes’ tab.
- The ‘Level’ column has been renamed to ‘Crawl Depth’ to avoid confusion & support queries.
- There’s a new ‘External Links’ export under the ‘Bulk Export’ top level menu, which provides all source pages with external links.
- The SERP Snippet tool has been updated to refine pixel widths within the SERPs.
- Java is now bundled with the SEO Spider, so it doesn’t have to be downloaded separately anymore.
- Added a new preset user-agent for SeznamBot (for a search engine in the Czech Republic). Thanks to Jaroslav for the suggestion.
- The insecure content report now includes hreflang and rel=“next” and rel=“prev” links.
- You can highlight multiple rows, right click and open them all in a browser now.
- List mode now supports Sitemap Index files (alongside usual sitemap .xml files).
We also fixed up some bugs.
- Fixed a couple of crashes in JavaScript rendering.
- Fixed parsing of query strings in the canonical HTTP header.
- Fixed a bug with missing confirmation links of external URLs.
- Fixed a few crashes in Xpath and in GA integration.
- Fixed filtering out custom headers in rendering requests, causing some rendering to fail.
If you spot any bugs, or have any issues, then please do get in touch with us via support.
We’re now starting work on version 9.0, which has a couple of very big features we’re already excited about. Thanks to everyone for all their feedback, suggestions and continued support. There’s lots more to come!
Now go and download version 8.0 of the SEO Spider.
I also wanted to say a quick thank you to our friends at Jolt hosting, for working hard to keep the server online yesterday! If you’re experiencing any problems downloading, do let us know via .
3) Custom robots.txt
You can download, edit and test a site’s robots.txt using the new custom robots.txt feature under ‘Configuration > robots.txt > Custom’. The new feature allows you to add multiple robots.txt at subdomain level, test directives in the SEO Spider and view URLs which are blocked or allowed.

During a crawl you can filter blocked URLs based upon the custom robots.txt (‘Response Codes > Blocked by robots.txt’) and see the matches robots.txt directive line.

Custom robots.txt is a useful alternative if you’re uncomfortable using the regex , or if you’d just prefer to use robots.txt directives to control a crawl.
The custom robots.txt uses the selected in the configuration and works well with the new fetch and render feature, where you can test how a web page might render with blocked resources.
We considered including a check for a double UTF-8 byte order mark (BOM), which can be a problem for Google. According to the spec, it invalidates the line – however, this will generally only ever be due to user error. We don’t have any problem parsing it and believe Google should really update their behaviour to make up for potential mistakes.
Please note – The changes you make to the robots.txt within the SEO Spider, do not impact your live robots.txt uploaded to your server. You can read more about testing robots.txt in our user guide.
4) hreflang Attributes
First of all, apologies, this one has been a long time coming. The SEO Spider now extracts, crawls and reports on hreflang attributes delivered by HTML link element and HTTP Header. They are also extracted from Sitemaps when crawled in list mode.
While users have historically used to collect hreflang, by default these can now be viewed under the ‘hreflang’ tab, with filters for common issues.

While hreflang is a fairly simple concept, there’s plenty of issues that can be encountered in the implementation. We believe this is the most comprehensive auditing for hreflang currently available anywhere and includes checks for missing confirmation links, inconsistent languages, incorrect language/regional codes, non-canonical confirmation links, multiple entries, missing self-reference, not using the canonical, missing the x-default, and missing hreflang completely.
Additionally, there are four new hreflang reports available to allow data to be exported in bulk (under the ‘reports’ top level menu) –
- Errors – This report shows any hreflang attributes which are not a 200 response (no response, blocked by robots.txt, 3XX, 4XX or 5XX responses) or are unlinked on the site.
- Missing Confirmation Links – This report shows the page missing a confirmation link, and which page requires it.
- Inconsistent Language Confirmation Links – This report shows confirmation pages which use different language codes to the same page.
- Non Canonical Confirmation Links – This report shows the confirmation links which are to non canonical URLs.
This feature can be fairly resource-intensive on large sites, so extraction and crawling are entirely configurable under ‘Configuration > Spider’.