Изучаем sublime text 3: плагины для веб-разработчиков
Содержание:
- Custom Build Key Bindings
- Configuration
- Windows Errors 12029 and 12057
- Features
- Settings
- License
- Configuring
- Usage
- Enabling the Debug Log
- Blackd Mode
- License
- Settings
- Adding Additional Accounts
- 3.0 Beta
- License
- Case Conversion
- Readme
- Installation
- Usage
- [BONUS] Custom Statistics
- Expanding abbreviation
- Usage
- Installation
- Installation
- Using the External Libraries
Custom Build Key Bindings
If you have different shortcuts for launching builds, you need to modify your
files, as this plugin comes baked with configuration to hook
on to the default Sublime Text keyboard shortcuts for launching builds. These
bindings must have the following context:
"context":
For example, say you have a key binding for F13 to build:
{
  "keys": ,  "command": "build",
},
To configure it to trigger the Buildview plugin, change it like:
{
  // the usual config...
  "keys": ,  "command": "build",
  // ...this is the extra bit
  "context":
},
Configuration
Several aspects of the plugin’s behaviour can be changed as detailed below. They
can be changed on a per-view basis via the Command Palette in either the view
source code or with build output, or through settings under .
Note: it seems settings set via Command Palette are persisted through sublime
exits/launches, so you might not have to edit the JSON files.
Windows Errors 12029 and 12057
On Windows, Package Control utilizes the WinINet C++ API for web requests.
This allows Package Control to rely on your OS for auto-configuration of
proxies and secure certificate validation.
Unfortunately there are a couple of common WinINet errors that users run
into, including:
-
Connection refused (errno 12029) during HTTP write phase of
downloading -
Error checking for server certificate revocation (errno 12057)
during HTTP write phase of downloading
Since WinINet is a system API, it is configured through Internet Explorer.
Errno 12029
A number of users have reported success in resolving this issue by resetting
the Internet Explorer advanced settings to their default values.
- Open Internet Explorer
- Click the gear icon
- Select Internet Options
- Change to the Advanced tab
- Click the Reset Advanced Settings button
- Scroll down to the Security section of the options
- Verify that TLS 1.0, TLS 1.1 and TLS 1.2 are checked
Errno 12057
Some users run into issues trying to check for SSL certificate revocation.
This may have to do with a proxy server not properly proxying the requests
for the certificate revocation list.
- Open Internet Explorer
- Click the gear icon
- Select Internet Options
- Change to the Advanced tab
- Scroll down to the Security section of the options
- Uncheck the option Check for server certificate revocation*
- Restart your machine
This error indicates something on your machine is blocking the connection
to the server. It could be any number of different things.
Features
- Familiar syntax: as a web-developer, you already know how to use Emmet. Abbreviation syntax is similar to CSS Selectors with shortcuts for id, class, custom attributes, element nesting and so on.
- Dynamic snippets: unlike default editor snippets, Emmet abbreviations are dynamic and parsed as-you-type. No need to predefine them for each project, just type to convert any word into a tag.
- CSS properties shortcuts: Emmet provides special syntax for CSS properties with embedded values. For example, will be exampled to .
- Available for most popular syntaxes: use single abbreviation to produce code for most popular syntaxes like HAML, Pug, JSX, SCSS, SASS etc.
Settings
A list of regular expressions patterns to ignore. Note that these regular expressions are compared against the file or directory name.
Boolean to keep selection panel open after selecting a resource to open.
Boolean setting specifying if a single command should be listed in the command palette for viewing and editing files or if multiple commands should be used.
True if, when moving up a directory, you would like the previous selection to be automatically chosen. False otherwise.
License
The MIT License (MIT)
Copyright 2013 Scott Kuroda
Permission is hereby granted, free of charge, to any person obtaining a copy of this software and
associated documentation files (the “Software”), to deal in the Software without restriction,
including without limitation the rights to use, copy, modify, merge, publish, distribute,
sublicense, and/or sell copies of the Software, and to permit persons to whom the Software
is furnished to do so, subject to the following conditions:
The above copyright notice and this permission notice shall be included in all copies or
substantial portions of the Software.
THE SOFTWARE IS PROVIDED “AS IS”, WITHOUT WARRANTY OF ANY KIND, EXPRESS OR IMPLIED, INCLUDING
BUT NOT LIMITED TO THE WARRANTIES OF MERCHANTABILITY, FITNESS FOR A PARTICULAR PURPOSE AND
NONINFRINGEMENT. IN NO EVENT SHALL THE AUTHORS OR COPYRIGHT HOLDERS BE LIABLE FOR ANY CLAIM,
DAMAGES OR OTHER LIABILITY, WHETHER IN AN ACTION OF CONTRACT, TORT OR OTHERWISE, ARISING FROM,
sOUT OF OR IN CONNECTION WITH THE SOFTWARE OR THE USE OR OTHER DEALINGS IN THE SOFTWARE.
Configuring
For adding additional library paths (Django and extra libs paths for
Python or extra paths to look for .js files for JavaScript for example),
either add those paths as folders to your Sublime Text project or
modify SublimeCodeIntel User settings. User settings can be configured
in the User File Settings:
Do NOT edit the default SublimeCodeIntel settings. Your changes will be
lost when SublimeCodeIntel is updated. ALWAYS edit the user
SublimeCodeIntel settings by selecting “Preferences->Package
Settings->SublimeCodeIntel->Settings — User”. Note that individual
settings you include in your user settings will completely replace
the corresponding default setting, so you must provide that setting in
its entirety.
Available settings:
-
A list of disabled languages can be set using
“disabled_languages”. Ex. - Live autocomplete can be disabled by setting “live” to
false. - Information for more settings is available in the
file in the package.
Usage
The first time you run one of the commands, it will ask you for your GitHub username and password in order to create a GitHub API access token, which gets saved in the Sublime GitHub user settings file. Your username and password are not stored anywhere, but if you would rather generate the access token yourself, see the “Generating Your Own Access Token” section below.
The following commands are available in the Command Palette:
-
GitHub: Switch Accounts
Switch to another GitHub account (see Adding Additional Accounts below)
-
GitHub: Private Gist from Selection
Create a private gist from the currently selected text (or, if nothing is selected,
the contents of the active editor. -
GitHub: Public Gist from Selection
Create a public gist from the currently selected text (or, if nothing is selected,
the contents of the active editor. -
GitHub: Copy Gist to Clipboard
Displays a quick select panel listing all of your gists, and selecting one will
copy the contents of that gist to your clipboard. -
GitHub: Copy Starred Gist to Clipboard
Displays a quick select panel listing only your starred gists, and selecting one will
copy the contents of that gist to your clipboard. -
GitHub: Open Gist in Editor
Displays a quick select panel listing all of your gists, and selecting one will
open a new editor tab with the contents of that gist. -
GitHub: Open Starred Gist in Editor
Displays a quick select panel listing only your starred gists, and selecting one will
open a new editor tab with the contents of that gist. -
GitHub: Open Gist in Browser
Displays a quick select panel listing all of your gists, and selecting one will
open that gist in your default web browser. -
GitHub: Open Starred Gist in Browser
Displays a quick select panel listing only your starred gists, and selecting one will
open that gist in your default web browser. -
GitHub: Update Gist
Update the gist open in the current editor.
The following commands require the Git plugin, available through the Package Manager. After installing, restart Sublime Text.
Note: These commands use the currently checked out branch to generate GitHub URLs. Each command also has a corresponding version, such as GitHub: Blame (master), that always uses the master branch, regardless of which branch is checked out locally. All commands except GitHub: Edit have a corresponding “permalink” version too, like GitHub: Blame (permalink), that uses the most recent commit on the current branch (more info).
-
GitHub: Open Remote URL in Browser
Open the current file’s location in the repository in the browser. If you have any lines selected, they will be highlighted in the browser. The default protocol is ‘https’. The default remote used is » (no remote). If you want to change either of those set them in your GitHub.sublime-settings file for your specific account.
-
GitHub: Copy Remote URL to Clipboard
Put the url of the current file’s location in the repository into the clipboard. If you have any lines selected, they will be included in the URL and highlighted when opened in a browser.
-
GitHub: Blame
Open the GitHub blame view of the current file in the browser. If you have any lines selected, they will be highlighted in the browser.
-
GitHub: History
Open the GitHub commit history view of the current file in the browser.
-
GitHub: View
Alias for GitHub: Open Remote URL in Browser
-
GitHub: Edit
Open the current file for editing on GitHub. I’m not sure why you’d want to do that, but it was easy enough to add.
Enabling the Debug Log
If purging and reinstalling did not help resolve an issue, the next step
is to enable the debug log. The debug log contains extensive information
about what Package Control is doing behind the scenes, and can help to
diagnose why it isn’t working properly.
- Click the Preferences menu
- Select Package Settings
- Choose Package Control
- Click Settings — User
- Add the setting "debug": true
- Save the settings file
Now when performing actions with Package Control, debug information will
be printed to the Sublime Text console. The console can be opened by
pressing ctrl+` or using the View
> Show Console menu entry.
Blackd Mode
Sublack supports blackd. If option black_use_blackd is to true, Sublack will use blackd (and not black) according to the ‘host’ and ‘port’ configuration.
You can run blackd from SublimeText manually via Start Blackd Server command or automatically at SublimeText start via setting black_blackd_autostart to true.
Blackd server started via SublimeText can be stopped manually via the Stop Blackd Server command or automatically at sublime’s exit.
Unlike «standalone» blackd, using sublack with blackd will continue to take care of the pyproject file.
Using standard mode ou blackd mode in sublack should always have the same result…or it’s a bug 🙂
Blackd is faster than Black.
Diff is always run with black.
License
Copyright 2013 — 2017 Peter Varo
This program is free software: you can redistribute it and/or modify it under
the terms of the GNU General Public License as published by the Free Software
Foundation, either version 3 of the License, or (at your option) any later
version.
This program is distributed in the hope that it will be useful, but WITHOUT ANY
WARRANTY; without even the implied warranty of MERCHANTABILITY or FITNESS FOR A
PARTICULAR PURPOSE. See the GNU General Public License for more details.
You should have received a copy of the GNU General Public License along with
this program, most likely a file in the root directory, called ‘LICENSE’. If
not, see http://www.gnu.org/licenses.
Settings
PlainTasks is an opinionated plugin, which means that it is highly configured to look in a specific way, but this does not mean that you can not customize it. If you feel that something does not look right and you want to change it, you can easily do it in your user settings file.
Go to and open , there you can override all the default settings, to get an idea you can take a look at .
Here is a list of PlainTasks’ specific settings:
| Setting | Default | Options/Description |
|---|---|---|
| open_tasks_bullet | ||
| done_tasks_bullet | ||
| cancelled_tasks_bullet | ||
| date_format | See strfti.me for quick reference; detailed documentation: , | |
| done_tag | true | Determines whether done tasks should gain a tag or not |
| done_date | true | Determines whether done tasks should gain a date or not |
| before_tasks_bullet_margin | 1 | Determines the number of spaces (default indent) before the task bullet |
| project_tag | true | Postfix archived task with project tag, otherwise prefix |
| archive_name | Make sure it is the unique project name within your todo files | |
| new_on_top | true | How to sort archived tasks (done_tag=true and default date_format are required) |
| header_to_task | false | If true, a project title line will be converted to a task on the certain keystroke |
| decimal_minutes | false | If true, minutes in lasted/wasted tags will be percent of hour, e.g. 1.50 instead of 1:30 |
| tasks_bullet_space | whitespace or tab | String to place after bullet, might be any character(s) |
| highlight_past_due | true | If true, highlight past, soon, and invalid |
| highlight_due_soon | 24 | Hours as int, threshold to define which will be soon |
| scope_past_due | Any scope, define color for past | |
| scope_due_soon | Any scope, define color for will be soon | |
| scope_misformatted | Any scope, define color for mismatch date_format | |
| icon_past_due | Gutter icon¹ | |
| icon_due_soon | Gutter icon¹ | |
| icon_misformatted | Gutter icon¹ | |
| icon_critical | Gutter icon¹ | |
| icon_high | Gutter icon¹ | |
| icon_low | Gutter icon¹ | |
| icon_today | Gutter icon¹ | |
| show_remain_due | false | In Sublime 3, show remain or overdue time under due tags |
| show_calendar_on_tags | false | In Sublime 3, if true, automatically show date picker when cursor is on tag (you can get date picker any time via context menu) |
| due_preview_offset | Place preview date outside of parens of , 1 — within | |
| due_remain_format | will be replaced with actual value | |
| due_overdue_format | will be replaced with actual value |
¹ Icon value can be , , , , , or custom relative path to existing png file,
e.g. .
Changing color scheme
If you don’t like colors used in bundled schemes just copy any from PlainTasks to
your User directory, change colors and paste the code below in your user settings file:
{ "color_scheme" "Path to your custom color scheme file. e.g. Packages/User/custom_plaintasks.hidden-tmTheme" }
N.B., sometimes you have to restart Sublime Text to apply changes made in tmTheme file.
N.B., , , and settings can assign any scopes defined in tmTheme file, e.g.
you can set and then just add style definition in tmTheme for this scope.
Taskpaper Compatibility
If you need to keep your files compatible with Taskpaper, go to
and open , then
add these settings to the json file:
{
  "translate_tabs_to_spaces" false,
  "date_format" "(%y-%m-%d)",
  "taskpaper_compatible" true
}
Spell check
It is build-in feature of Sublime, you can toggle spell check with F6.
For convinience, you may add bullets in list of ignored words into , e.g.
{
  "ignored_words"  "☐", "", "✘", "✄"
}
Adding Additional Accounts
If have multiple GitHub accounts, or have a private GitHub installation, you can add the other
accounts and switch between them whenever you like.
Go to the GitHub user settings file (Preferences -> Package Settings -> GitHub -> Settings — User),
and add another entry to the dictionary. If it is another GitHub account, copy the
for the default GitHub entry (if you don’t see it, you can get it from Preferences ->
Package Settings -> GitHub -> Settings — Default, or in the example below), and just give the
account a different name. If you’re adding a private GitHub installation, the will be
whatever the base url is for your private GitHub, plus “/api/v3”. For example:
"accounts":
{
    "GitHub":
    {
        "base_uri": "https://api.github.com",
        "github_token": "..."
    },
    "YourCo":
    {
        "base_uri": "https://github.yourco.com/api/v3",
        "github_token": ""
    }
}
Don’t worry about setting the –that will be set for you automatically, after you
switch accounts (Shift-Cmd-P, “GitHub: Switch Accounts”).
3.0 Beta
by wbond
at 5:00pm
on Thursday, December 11th, 2014
After a couple of months of bug fixes and feature development, I‘m excited
to announce the first Package Control 3.0 beta! Over the next few days
I would like to get it in the hands of a bunch of users to work out any
final kinks. Hopefully 3.0 will be a little less eventful than the 2.0
rollout.
A set of full release notes will be displayed via Package Control messages,
however here are some highlights:
- depedency support
- an SSL module for Linux
- error-free theme, color scheme and syntax upgrades
- improved HTTP support on Windows
- functionality to sync package removals via the User/ folder
If you are willing to help, perform the following instructions to
upgrade to version 3.0.0-beta. Once upgraded, keep an eye
on the Sublime Text console for Python exceptions. If you experience any
issues, please
open an issue.
-
Open Preferences> Package Settings
> Package Control > Settings – User
and set the install_prereleases setting to true -
Run the Add Repository command and enter
https://sublime.wbond.net/prerelease/packages.json. -
Run the Upgrade Package command and choose
Package Control
License
“None are so hopelessly enslaved as those who falsely believe they are free.” Johann Wolfgang von Goethe
Copyright 2014 Tito Bouzout tito.bouzout@gmail.com
This license apply to all the files inside this program unless noted different for some files or portions of code inside these files.
This program is free software: you can redistribute it and/or modify it under the terms of the GNU General Public License as published by the Free Software Foundation. http://www.gnu.org/licenses/gpl.html
This program is distributed in the hope that it will be useful, but WITHOUT ANY WARRANTY; without even the implied warranty of MERCHANTABILITY or FITNESS FOR A PARTICULAR PURPOSE. See the GNU General Public License for more details.
You should have received a copy of the GNU General Public License along with this program. If not, see http://www.gnu.org/licenses/gpl.html
Case Conversion
Позволяет переключаться между snake_case, camelCase, PascalCase и т. д. После установки плагина с помощью Package Control (введите «pic» для быстрого доступа к Install Package), попробуйте:
До: navMenu
Нажмите: ;;c, затем ;;c
После: nav_menu
Обратите внимание, что это не будет работать должным образом, если вы попытаетесь преобразовать целую строку. До:
До: <nav id=»menu_system» class=»nav_menu isOpen»>
Нажмите: ;;c, затем ;;c (для camelCase)
После: navIDMenuSystemClassNavMenuIsOpen
Если вы являетесь веб-разработчиком, использующим Package Control Sublime Text 3, советую попробовать перечисленные в этой статье плагины! Если они вам не понравятся, всегда можно удалить их с помощью Package Control: Remove Package.
Readme
- Source
- raw.githubusercontent.com
is a simple theme with bright colors and comes in three versions — dark, mirage and light for all day long comfortable work.
File Icons
from version supports customization via A File Icon package. Please install it and restart Sublime for better experience.
Custom UI fonts
Since verion monospaced fonts options were removed. But it’s still possible to use your favourite font in the
user interface of the theme, just follow through these simple steps:
- Pull up command pallete via cmd/ctrl + shift + p
- Type in
- Navigate to the folder
- Create a file named to modify mirage or and
- Open that file in Sublime
- Copy and paste following content:
     {
       "class" "sidebar_label",
       "font.face" "PragmataPro Mono Liga"
     },
     {
       "class" "sidebar_heading",
       "font.face" "PragmataPro Mono Liga"
     },
     {
       "class" "tab_label",
       "font.face" "PragmataPro Mono Liga"
     },
     {
       "class" "label_control",
       "font.face" "PragmataPro Mono Liga"
     },
     {
       "class" "quick_panel_label",
       "font.face" "PragmataPro Mono Liga"
     },
     {
       "class" "quick_panel_path_label",
       "font.face" "PragmataPro Mono Liga"
     }
- Replace with the font of your choice
- Save and enjoy 🙂
Light with option on
Mirage with option off
Dark with option on
Settings
"ui_native_titlebar"       true, // use native titlebars on macOs
"ui_separator"             true, // separators between panels
"ui_wide_scrollbars"       true, // wider scrollbars
Installation
Recommended
You can install via Package Control.
- Press cmd/ctrl + shift + p to open the command palette.
- Type and press enter. Then search for
Manual
- Download the latest release, extract and rename the directory to .
- Move the directory inside your sublime directory. (Preferences > Browse packages…)
Activation
Recommended
Open command palette via (or cmd/ctrl + shift + p) and type .
With Skins package
Skins provides a simple and efficient way to change themes, save your own presets and quickly try out new looks. Activation is as simple as opening up the command palette, running and choosing or from the list.
Via Preferences
Add these lines to your user settings Preferences > Setting — User:
For light theme:
"theme" "ayu-light.sublime-theme",
"color_scheme" "Packages/ayu/ayu-light.sublime-color-scheme",
For mirage theme:
"theme" "ayu-mirage.sublime-theme",
"color_scheme" "Packages/ayu/ayu-mirage.sublime-color-scheme",
"theme" "ayu-dark.sublime-theme",
"color_scheme" "Packages/ayu/ayu-dark.sublime-color-scheme",
Related projects and ports
- for Ace: https://github.com/ayu-theme/ayu-ace
- colors as NPM package: https://github.com/ayu-theme/ayu-colors
- for VSCode: https://github.com/teabyii/vscode-ayu
- for XCode: https://github.com/vburojevic/ayu-xcode-theme
- for Kakoune: https://github.com/icantjuddle/kak-ayu
made with ️ by @dempfi
Installation
Note with either method, you may need to restart Sublime Text for the plugin to load properly.
Package Control
Installation through package control is recommended. It will handle updating your packages as they become available. To install, do the following.
- In the Command Palette, enter
- Search for
Manual
Clone or copy this repository into the packages directory. Ensure it is placed in a folder named . By default, the Packages directories for Sublime Text 2 are located at:
- OS X: ~/Library/Application Support/Sublime Text 2/Packages/
- Windows: %APPDATA%/Roaming/Sublime Text 2/Packages/
- Linux: ~/.config/sublime-text-2/Packages/
By default, the Packages directories for Sublime Text 3 are located at:
- OS X: ~/Library/Application Support/Sublime Text 3/Packages/
- Windows: %APPDATA%/Roaming/Sublime Text 3/Packages/
- Linux: ~/.config/sublime-text-3/Packages/
Usage
NOTE: In Windows or Linux use ctrl instead of ⌘
☐ ⌘ + enter or ⌘ + i: new task
☐ ⌘ + d: toggle task as completed.
☐ ctrl + c: toggle task as cancelled on Mac. alt + c on Windows/Linux.
☐ ⌘ + shift + a will archive the done tasks, by removing them from your list and appending them to the bottom of the file under Archive project
☐ ⌘ + shift + o will archive in Org-Mode style, removing the entire subtree after cursor and appending it to new file next to original one, e.g. if original is then new would be
☐ ⌘ + shift + u will open the url under the cursor in your default browser, other than http(s) schemes must be enclosed within , e.g.
☐ Anything with colon at the end of the line is a project title, you can also nest projects by indenting them.
☐ You can write plain text as notes or descriptions wherever you want. Use or for italic and bold just like in Markdown.
☐ You can add tags using sign
You can place cursors on tags, click right mouse button and Filter by tags under cursors:
pending tasks with selected tags will remain visible (and their notes and projects they belong to), but everything else will be hidden/folded; to unfold all press ⌘+k, ⌘+j or ⌘+k, ⌘+0
☐ You can navigate tags in current document via ⌘+shift+r.
☐ PlainTasks comes with a simple snippet for creating separators, if you feel that your task list is becoming too long you can split it into several sections (and fold some of them) using this snippet:
and then tab will give you this:
☐ Completion rules (ctrl+space or alt+/ to see list of them):
- type , press tab — it’ll become — this one is highlighted differently than other tags;
- , tab — ;
- , tab — ;
- , tab — ;
- , tab — — press tab again and current date will be inserted, when you’ll complete or cancel a task with such tag, you’ll know how many time has passed since start; if you have to change done/cancelled/started time, then you can recalculate the time spent on task by pressing tab while cursor is placed on a tag;
- , tab, tab work in the same manner as , but inserts — so you can pause and resume to get more correct result when done/cancel; each toggle tag is either pause or resume depending on its place in sequence;
- , tab, tab — (⌘ + shift + enter creates a new task with this tag);
-
, tab —
If you press tab again, it’ll insert current date, same for .
You can type short date (similar to OrgMode’s date prompt, but not the same) and then press tab to expand it into default format.
Short date should be ___
Dot can be used instead of hyphen, but should be consistent _-
year, month, minute, hour can be omitted:
Notation Meaning 1st day of next month always 1st day of current month always 5th day of current month (or next month if current day is 5th or older) February 3rd of current year or next one 31st day of current/next month at 23 hours and minutes are equal to current moment January 1st of 2016 at 01:01 -
relative period of time starts with a plus sign or two
____ — number is optional as well as letter for days or letter for weeks.Notation Meaning tomorrow as well as or one week since current date, i.e. 3 weeks since current date, i.e. one day since if any, otherwise it is equal to two hours since current date 555 minutes since current date 2 days and 12 hours since current date
-
☐ You can create a link to a file within your project by prefixing the file name with a dot and (back)slash like: or .
The line and column can be specified by colons: .
In SublimeText 3 you can specify a symbol inside that file by using > character like: .
In SublimeText 2 you can specify a text inside that file by using inch characters like: .
Pressing ctrl + o (alt + o on Windows/Linux) will open the file in Sublime and scroll to specific position if any.
Also in SublimeText 3 link may point to directory, open such link will add the directory to current project (sidebar).
In addition, Markdown and “wiki” (Org-Mode, NV, etc.) styles are supported as well, examples:
[](path)
[](path ":11:8")
[](path ">symbol")
[](path "any text")
`path`
]
]
]
`path` ":11:8"
`path` ">symbol"
`path` "any text"
☐ To convert current document to HTML, bring up the command palette ⌘ + shift + p and type — it will be opened in default webbrowser, so you can view and save it. ask if you want to save and if yes, allow to choose directory and filename (but won’t open it in webbrowser).
Editor Useful Tools:
☐ Use ⌘ + control + up/down (ctrl + shift + up/down on Windows) to move tasks up and down.
☐ Use ⌘ + r to see a list of projects and quickly jump between them
★ See the Tutorial for more detailed information.
[BONUS] Custom Statistics
Statistics of current file are represented in status-bar, based on , which is by default — as you can see it’s just a string containing special directives (see table bellow) and regular chars.
| Directive | Description |
|---|---|
| Amount of pending tasks | |
| Amount of completed tasks | |
| Amount of cancelled tasks | |
| Sum of completed and cancelled tasks | |
| Sum of all tasks | |
| Ratio of to | |
| Percent as pseudo graphics (absents if less than 10%) | |
| Date of lastly completed task | |
| Return tasks which matched by regex ; e.g. — amounts of tasks with ; or {{@a |
So you can customise it as you like, by adding to , e.g.
{
    "stats_format": "☐$o $d ✘$c",

    // if you want the statistics do not include the archived tasks:
    "stats_ignore_archive": true
}
Additional settings for progress bar
{
    "bar_full": "■",   // any char
    "bar_empty": "☐", // any char

    // if you want to avoid Unicode when copy stats — you can define replacements
    // e.g. to convert ■■■■■■☐☐☐☐ to
    "replace_stats_chars": , ,  "], ]
}
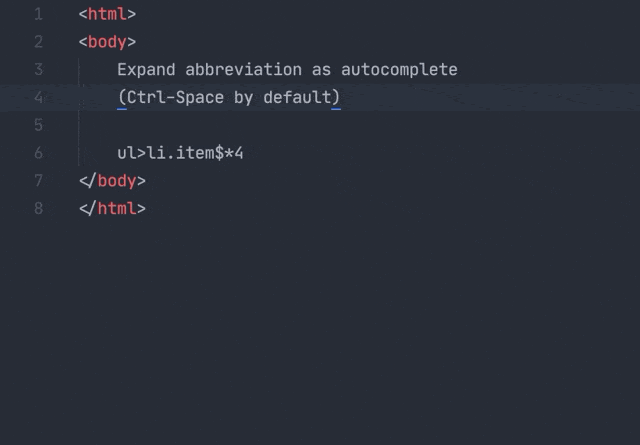
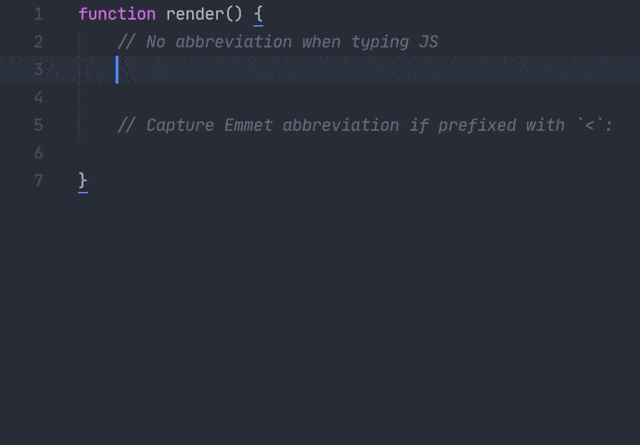
Expanding abbreviation
If you used previous version of Emmet plugin, you already know how to expand abbreviations: type something like and hit Tab or Ctrl-E. While this approach generally works, it has lots of downsides:
- Tab key hijacking: Emmet binds Tab key for expanding abbreviations so user is unable to insert native Sublime Text snippet or put tab right after word since almost every word can be abbreviation for Emmet.
- No preview of expanded abbreviations: writing complex abbreviations becomes trial and error with expand/undo/expand actions.
- Unpredictable result: it’s not possible to determine what happens when you hit Tab key, it will either expand abbreviation, insert native snippet or just output tab character.
In this plugin, abbreviation expander acts as autocomplete provider and automatically captures abbreviation as you type.
When you start typing in Emmet-supported context (HTML, CSS, Slim etc.) Emmet detects if you’re typing something similar to abbreviation and adds underline which indicates captured abbreviation. When captured abbreviation becomes complex (e.g. contains attributes or multiple elements), you’ll see a preview of expanded abbreviation every time caret is inside it. Hit Tabkey inside captured abbreviation to expand it, hit Esc to remove mark from abbreviation so you can use Tab for expanding native ST snippets or insert tab character.
If you already have an abbreviation in document and you want to expand it, move caret to the end of abbreviation and invoke autocomplete (Ctrl+Space by default) to capture abbreviation:
JSX support
Writing Emmet abbreviations in JSX is a bit tricky: in most cases you’d expect Tab key to expand native Sublime Text snippets and use Emmet for specific context only. So a default abbreviation capturing for every variable or snippet would annoy you.
To solve this problem, Emmet uses prefixed abbreviations in JSX: it will capture and expand abbreviation only if it’s prefixed with a specific symbol(s). By default, it’s a character:
Emmet detects camel-cased module notation in JSX: will be expanded as instead of . Expression attributes are supported as well: .
CSS support
In CSS, Sublime Text uses slightly different autocomplete behavior by default: it displays completions by default and doesn’t re-populate completions list as you type further, which prevents Emmet from building proper dynamic completion. To overcome this issue, Emmet displays abbreviation preview right after caret as phantom:
If you don’t like inline preview for CSS, you can disable it for CSS only:
- Go to Preferences > Package Settings > Emmet > Settings menu item.
- Set option to , e.g. . This will enable previews for markup syntaxes (HTML, XML, JSX etc.) only.
- You can also disable previews completely by setting value to .
In Emmet 2, CSS abbreviations are enhanced with dynamic color snippets: you can type, for example, to quickly get .
Disable abbreviation capturing
To fine tune automatic abbreviation capturing, go to Preferences > Package Settings > Emmet > Settings menu item and update option:
- Set value to to completely disable abbreviation capturing.
- Set value to either or to enable capturing for markup (HTML, XML, JSX etc) or stylesheet (CSS, SCSS, LESS etc.) syntaxes only.
For example, if you want abbreviation capturing for HTML and disable it for CSS, set . You can also apply the same values for option to enable/disable interactive previews completely or for specific syntaxes only.
With abbreviation capturing disabled, you have several options to expand abbreviations manually:
You can type abbreviation (or put caret behind existing abbreviation) and run Emmet: Expand Abbreviation action from command palette. It is recommended to set keyboard shortcut for this action:
// Put this code snippet into your .sublime-keymap file
// and modify `keys` value with desired shortcut
{
    "keys" "ctrl+e"],
    "command" "emmet_expand_abbreviation"
}
Another option is to run Emmet: Enter Abbreviation Mode command: the ⋮> mark indicates that you are in explicit abbreviation mode and everything you type will be treated and validated as Emmet abbreviation. You can then hit Tab or Enter key to expand it, Esc to dispose.
It is recommended to add keyboard shortcut for this action as well:
// Put this code snippet into your .sublime-keymap file
// and modify `keys` value with desired shortcut
{
    "keys" "ctrl+."],
    "command" "emmet_enter_abbreviation"
}
Usage
-
- Run Black on the current file:
-
Press Ctrl-Alt-B to format the entire file.
You can also Ctrl-Shift-P (Mac: Cmd-Shift-P) and select Sublack: Format file.
-
- Run Black with —diff:
-
Press Ctrl-Alt-Shift-B will show diff in a new tab.
You can also Ctrl-Shift-P (Mac: Cmd-Shift-P) and select Sublack: Diff file.
-
- Toggle Black on save for current view :
-
Press Ctrl-Shift-P (Mac: Cmd-Shift-P) and select Sublack: Toggle black on save for current view.
-
- run Black Format All :
-
Press Ctrl-Shift-P (Mac: Cmd-Shift-P) and select Sublack: Format All. Run black against each root folder in a standard way (without taking care of sublack options and configuration). Same thing as running black . being in the folder.
-
- Start Blackd Server :
-
Press Ctrl-Shift-P (Mac: Cmd-Shift-P) and select Sublack: Start BlackdServer.
-
- Stop Blackd Server :
-
Press Ctrl-Shift-P (Mac: Cmd-Shift-P) and select Sublack: Stop BlackdServer.
Installation
Via Package Control
The fastest and easiest way to install these packages for Sublime Text is the
following:
- Install Package Control
- Open →
- Select
- Search for and packages and install them
- Happy coding 😉
Set as default
After you installed the language definition file successfully, all you have to
do is assign the files to always open with this syntax highlighter. Go to
→ → →
To remove this setting, you can always overwrite this preference.
Manual installation
Download the files from the python and Cython branches of this
repository. Navigate to your folder and create a and/or a
folder(s) and copy the and sublime-build files into.
Theme file
If you want to use my Work-In-Progress theme file: navigate to
folder and copy into it. Then go to user-settings, and change
your old color theme to the new one.
Installation
Package Control
The preferred method of installation is via Sublime Package Control.
- Install Sublime Package Control
- From inside Sublime Text, open Package Control’s Command Pallet: CTRL SHIFT P (Windows, Linux) or CMD SHIFT P (Mac).
- Type , select command and hit Return. A list of available packages will be displayed.
- Type , select the package and hit Return. The package will be downloaded to the appropriate directory.
Manual Installation
-
Download or clone this repository to a directory in the Sublime Text Packages directory for your platform:
- Mac:
- Windows:
- Linux:
- Restart Sublime Text to complete installation.
The features listed above should now be available.
Using the External Libraries
(check each license in project pages)
- “getImageInfo” to get width and height for images from “bfg-pages”. See: http://code.google.com/p/bfg-pages/
- “desktop” to be able to open files with system handlers. See: http://pypi.python.org/pypi/desktop
- “send2trash” to be able to send to the trash instead of deleting for ever!. See: http://pypi.python.org/pypi/Send2Trash
- “hurry.filesize” to be able to format file sizes. See: http://pypi.python.org/pypi/hurry.filesize/
- “Edit.py” ST2/3 Edit Abstraction. See: http://www.sublimetext.com/forum/viewtopic.php?f=6&t=12551