Анимация элементов в css. часть 1
Содержание:
- Flying birds
- CSS Properties
- Scrolling mouse
- CSS transitions
- Рисуйте на CSS
- Cross my hamburger
- The 6 steps of animation
- Setting a Delay
- Examples
- Библиотека animate.css
- Timing functions
- Dynamic animations
- Указание ключевых кадров анимации
- Creating CSS3 Animations
- CSS Properties
- CSS Advanced
- CSS Properties
- The @keyframes rule
Flying birds
- Author: Steven Roberts
We start with completely straight vector lines, drawing each frame of our animation, depicting the bird in a different state of flight. We then manipulate the vector points and round the lines and edges. Finally, we put each frame into an equally sized box and place them side-by-side. Export the file as an SVG.
The HTML setup is really simple. We just need to wrap each bird in a container in order to apply multiple animations – one to make the bird fly and the other to move it across the screen.
We apply our bird SVG as the background to our bird div and choose the size we want each frame to be. We use the width to roughly calculate the new background position. The SVG has 10 cells, so we multiply our width by 10 and then alter the number slightly until it looks correct.
CSS animation has a couple of tricks you may not be aware of. We can use the animation-timing-function to show the image in steps – much like flicking through pages in a notebook to allude to animation.
Now we’ve created our fly cycle, our bird is currently flapping her wings but isn’t going anywhere. In order to move her across the screen, we create another keyframe animation. This animation will move the bird across the screen horizontally while also changing the vertical position and the scale to allow the bird to meander across more realistically.
Once we’ve created our animations, we simply need to apply them. We can create multiple copies of our bird and apply different animation times and delays.
CSS Properties
align-contentalign-itemsalign-selfallanimationanimation-delayanimation-directionanimation-durationanimation-fill-modeanimation-iteration-countanimation-nameanimation-play-stateanimation-timing-functionbackface-visibilitybackgroundbackground-attachmentbackground-blend-modebackground-clipbackground-colorbackground-imagebackground-originbackground-positionbackground-repeatbackground-sizeborderborder-bottomborder-bottom-colorborder-bottom-left-radiusborder-bottom-right-radiusborder-bottom-styleborder-bottom-widthborder-collapseborder-colorborder-imageborder-image-outsetborder-image-repeatborder-image-sliceborder-image-sourceborder-image-widthborder-leftborder-left-colorborder-left-styleborder-left-widthborder-radiusborder-rightborder-right-colorborder-right-styleborder-right-widthborder-spacingborder-styleborder-topborder-top-colorborder-top-left-radiusborder-top-right-radiusborder-top-styleborder-top-widthborder-widthbottombox-decoration-breakbox-shadowbox-sizingbreak-afterbreak-beforebreak-insidecaption-sidecaret-color@charsetclearclipclip-pathcolorcolumn-countcolumn-fillcolumn-gapcolumn-rulecolumn-rule-colorcolumn-rule-stylecolumn-rule-widthcolumn-spancolumn-widthcolumnscontentcounter-incrementcounter-resetcursordirectiondisplayempty-cellsfilterflexflex-basisflex-directionflex-flowflex-growflex-shrinkflex-wrapfloatfont@font-facefont-familyfont-feature-settingsfont-kerningfont-sizefont-size-adjustfont-stretchfont-stylefont-variantfont-variant-capsfont-weightgapgridgrid-areagrid-auto-columnsgrid-auto-flowgrid-auto-rowsgrid-columngrid-column-endgrid-column-gapgrid-column-startgrid-gapgrid-rowgrid-row-endgrid-row-gapgrid-row-startgrid-templategrid-template-areasgrid-template-columnsgrid-template-rowshanging-punctuationheighthyphens@importisolationjustify-content@keyframesleftletter-spacingline-heightlist-stylelist-style-imagelist-style-positionlist-style-typemarginmargin-bottommargin-leftmargin-rightmargin-topmax-heightmax-width@mediamin-heightmin-widthmix-blend-modeobject-fitobject-positionopacityorderoutlineoutline-coloroutline-offsetoutline-styleoutline-widthoverflowoverflow-xoverflow-ypaddingpadding-bottompadding-leftpadding-rightpadding-toppage-break-afterpage-break-beforepage-break-insideperspectiveperspective-originpointer-eventspositionquotesresizerightrow-gapscroll-behaviortab-sizetable-layouttext-aligntext-align-lasttext-decorationtext-decoration-colortext-decoration-linetext-decoration-styletext-indenttext-justifytext-overflowtext-shadowtext-transformtoptransformtransform-origintransform-styletransitiontransition-delaytransition-durationtransition-propertytransition-timing-functionunicode-bidiuser-selectvertical-alignvisibilitywhite-spacewidthword-breakword-spacingword-wrapwriting-modez-index
Scrolling mouse
- Author: Steven Roberts
A subtle scrolling mouse animation can give direction to the user when they first land on a website. Although this can be accomplished using HTML elements and properties, we’re going to use SVG as this is more suited to drawing.
Inside our SVG we need a rectangle with rounded corners and a circle for the element we’re going to animate, by using SVG we can scale the icon to any size we need.
Now we’ve created our SVG, we need to apply some simple styles in order to control the size and position of the icon within our container. We’ve wrapped a link around the mouse SVG and positioned it to the bottom of the screen.
Next we’ll create our animation. At 0 and 20 per cent of the way through our animation, we want to set the state of our element as it begins. By setting it to 20% of the way through, it will stay still for part of the time when repeated infinitely.
We need to add in the opacity start point and then transform both the Y position and the vertical scale at the 100% mark, the end of our animation. The last thing we need to do is drop the opacity in order to fade out our circle.
Lastly we apply the animation to the circle, along with the ‘transform-origin’ property and the will-change property to allow hardware acceleration. The animation properties are fairly self-explanatory. The cubic-bezier timing function is used to first pull the circle back before dropping it to the bottom of our mouse shape; this adds a playful feel to the animation.
CSS transitions
Идея проста. Мы указываем, что некоторое свойство будет анимироваться при помощи специальных CSS-правил. Далее, при изменении этого свойства, браузер сам обработает анимацию.
Например, CSS, представленный ниже, 3 секунды анимирует свойство .
Теперь любое изменение фонового цвета будет анимироваться в течение 3х секунд.
При клике на эту кнопку происходит анимация её фона:
Есть всего 5 свойств, задающих анимацию:
Далее мы изучим их все, пока лишь заметим, что общее свойство может перечислять их все, в порядке: , а также задавать анимацию нескольких свойств сразу.
Например, при клике на эту кнопку анимируются одновременно цвет и размер шрифта:
Далее мы рассмотрим свойства анимации по отдельности.
Рисуйте на CSS
Это один из моих любимых советов, который в последнее время почему-то приходится давать… нет, не стажерам, и даже не джуниорам, а, как это ни странно, людям со многими годами опыта, которые разрабатывают здоровенные SPA, но при этом не умеют верстать. Да, вот так.
В русскоязычном сообществе как-то так повелось (причем уже давно, я не застал начало этого феномена) разделять “верстальщиков” и “фронтендеров”. И считается, что верстальщики – это люди, которые знают HTML и CSS, но совершенно не умеют в JS, а фронтендеры – это люди, которые пишут на JS, но при этом верстку считают занятием недостойным и так и не начинают в ней разбираться. Наверное это работает в каких-то крупных компаниях, где действительно можно организовать такое разделение задач, что каждый занимается чем-то одним, но мне кажется, что у нас профессия все же единая – мы делаем интерфейсы для сайтов, веб-приложений – тут можно по всякому играть словами, но набор навыков должен быть один и тот же у всех. Ну может быть за исключением WebGL, как узконаправленной технологии, которая действительно нужна не везде.
Но что-то мы ушли от темы. Я это все к тому, что у опытных фронтендеров, которые решили заняться CSS-анимациями, обычно все сложности связаны не с анимациями как таковыми, а с версткой, в которую эти анимации нужно интегрировать.
Для того, чтобы быстро прокачать свое понимание CSS, очень полезно на CSS порисовать. И поанимировать то, что нарисовали, раз уж мы говорим про анимации. Это звучит глупо, несколько лет назад это казалось вообще странной затеей, но, как показала практика – работает. В одной более-менее комплексной CSS-картинке будет такое количество хитрых задачек на верстку, которое вы с обычных лендингов будете собирать неделями. Вариант “просто верстать страницы, пока не научишься” работает не так хорошо, как хотелось бы. Слишком медленный он. А здесь, именно за счет концентрации задач, идет ускорение обучения. Такой экспресс-курс в неочевидные возможности CSS получается. Ну и результат может быть забавным, не без этого.
Cross my hamburger
- Author: Steven Roberts
This animation is used all over the web, turning three lines into a cross or close icon. Until fairly recently, the majority of implementations have been achieved using HTML elements, but actually SVG is much more suited to this kind of animation – there’s no longer a need to bloat your buttons code with multiple spans.
Due to the animatable nature and SVG and its navigable DOM, the code to accomplish the animation or transition changes very little – the technique is the same.
We start by creating four elements, be it spans inside of a div or paths inside of an SVG. If we’re using spans, we need to use CSS to position them inside the div; if we’re using SVG, this is already taken care of. We want to position lines 2 and 3 in the centre – one on top of another – while spacing lines 1 and 4 evenly above and below, making sure to centre the transform origin.
We’re going to rely on transitioning two properties: opacity and rotation. First of all, we want to fade out lines 1 and 4, which we can target using the :nth-child selector.
The only thing left to do is target the two middle lines and rotate them 45 degrees in opposite directions.
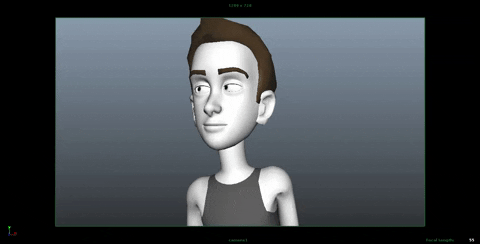
The 6 steps of animation
We’ve talked about the workflow of the animation filmmaking pipeline, now lets go into the actual steps of character animation.
Here are the 6 steps of animation:
- Shooting reference video
- Key posing
- Blocking
- Splining
- Smoothing
- Adding life
Step 1: Shooting Reference video
This is a very important and overlooked step. It’s weird how people really think they know what certain actions look like, and how long they take, but end up getting it wrong.
Physical actions are something you need to analyze before animating, especially if you’re a beginner.
You have a shot of a guy throwing a baseball? Search YouTube for videos of pitchers throwing balls.
Don’t assume you know what an action looks like just because you’ve seen it before.
Looking at an action as an animator is completely different from looking at it as a viewer.
Step 2: Posing
After shooting a reference, it’s time to create the key poses of the shot.
These poses are called key poses because they are the most important poses of the shot. These are the poses that convey the story of the shot. We need to make sure we get those poses right, because we’re going to build on those for the rest of the process.
Step 3: Blocking
Once we’re happy with our key poses, we start breaking down the movement from each pose to the next by adding ‘in betweens’ (also known as breakdown poses or passing poses). These are the poses that connect the key poses.
We keep adding more poses until the movement looks as good as it could, while still staying in stepped mode (stepped mode is when you don’t allow interpolation between poses, which results in a very choppy/blocky motion).
Step 4: Splining
Splining is a 3D animation term. It’s the process in which you convert the interpolation of the keys from stepped to spline.
In other words – you make the computer connect the movement between each of your poses, and that makes the movement look smoother.
The problem is that the computer doesn’t do a very good job at interpolating. It only works with what it has. That’s why the better the blocking is – the better the splined version is going to look.
Step 5: Refining & offset
Now that all of our keys are in spline mode, we need to work on them. We refined the animation curves and make sure the movement looks smooth.
It’s also a good idea to offset some of the actions so it doesn’t look so ‘stop and start’, as if the character is doing all the motion at once.
By the end of this step your shot should look pretty solid and almost finished.
Step 6: Adding life
This step is the a lot of fun.
We’re already finished with the grunt work of animation, and it’s time to add small imperfections that bring life to the character.
Setting a Delay
As with transitions, animations can be delayed before they execute. Use the animation-delay property to wait some time before pulsing the icon:
(In this version, the icon pulses three times.)
Whenever two time measurements are specified in a shorthand property value, the second is interpreted as the delay:
This more elaborate example shows a delayed animation within a mobile interface. After an initial pause, content shifts down to make room for a series of banner advertisements, which then continuously cycle horizontally and rewind to display the first:
(View live sample)
To achieve this effect, the animation-delay property makes content shift down after 4 seconds. Here is the relevant CSS:
The animation-iteration-count property makes the animation execute only once. (The next section explains the animation-fill-mode property.)
The banner’s first animation (insertBanner) closely mirrors that of the content (displaceContent) shown above. After 4 seconds, it slides into view from off the screen:
The banner’s second animation (scrollBanner) takes over at the 5-second mark, after the first has completed. Over the course of 25 seconds, it shifts the banner sideways to view each advertisement for nearly 5 seconds. After rewinding to its initial position 97% of the way through the keyframes, setting animation-iteration-count to infinite makes the animation replay indefinitely:
Examples
In the following example, we’re going to create a falling effect for a piece of text using CSS animations. The text will “swing” and fall down by rotating it using CSS transforms and then fading it out by animating its opacity.
In the keyframes set, we’re going to start with the initial position of the text, when it’s neither transformed nor faded out:
@keyframes fall {
    from {
        transform: rotate(0) translateX(0);
        opacity: 1;
    }
    /* ... */
}
We know that we want the text to be rotated by 90 degrees at the end of the animation, translated downwards and faded out..
@keyframes fall {
    from {
        transform: rotate(0) translateX(0);
        opacity: 1;
    }
    /* ... */
    to {
        transform: rotate(90deg) translateX(200px);
        opacity: 0;
    }
}
By specifying only these two keyframes, this is how the animation looks so far:
View this demo on the Codrops Playground
As you can see, the fall doesn’t look very realistic. We need the text to rotate first so that it looks like it’s going to fall, by attaching only its left edge to the initial position, and then have it fall down (translate) and fade out from there. We need to control the intermediate steps of the animation, so we’ll specify the rotation and position of the text during the animation using more keyframes.
We want the element to rotate first, and then after rotating we can allow it to fall down by moving to the last keyframe directly. So we can add one more step (keyframe) where we rotate the element, but don’t translate it and don’t fade it out:
@keyframes fall {
    from {
        transform: rotate(0) translateX(0);
        opacity: 1;
    }
    50%, 60% {
        transform: rotate(90deg) translateX(0);
        opacity: 1;
    }
    to {
        transform: rotate(90deg) translateX(200px);
        opacity: 0;
    }
}
Depending on the effect you’re after, the intermediate keyframe can be at ‘50%’ or any other percentage. Sometimes all you have to do is experiment and play with the values to see how it changes the animation. And sometimes a little math can do. In this example, we expect the text to rotate before it falls down, stays a little bit in the “hanging” position, and then fall down. Here is the result of applying the intermediate keyframe to the animation:
View this demo on the Codrops Playground
We can make the effect more realistic by changing the speed and timing function by which each keyframe animates. We’re going to use the timing function to specify a custom easing that adds a “swinging” effect to the text right before it falls down. We’ll add that timing function to the keyframe selector declaration block because we want it to be applied to the animation when the element is moving from its initial position to its rotated “hanging” position. Similarly, we’re also going to add a timing function to the animation between the intermediate and the final keyframes that makes the falling down appear faster and more realistic.
We’re also going to add one more keyframe at ‘85%’ to make the dropping and fading effect be applied earlier in the cycle, and a keyframe at ‘15%’ because otherwise the element will start the animation instantly and we wouldn’t be able to see its initial state. So our final looks like this:
@keyframes fall {
    from, 15% {
        transform: rotate(0) translateX(0);
        opacity: 1;
        animation-timing-function: cubic-bezier(.07,2.02,.67,.57);
    }
    50%, 60% {
        transform: rotate(90deg) translateX(0);
        opacity: 1;
        animation-timing-function: cubic-bezier(.13,.84,.82,1);
    }
    85%, to {
        transform: rotate(90deg) translateX(200px);
        opacity: 0;
    }
}
The result of the above keyframe rules is the following. Try playing with the keyframe percentage values and easing functions to get a better feel of how the animation is controlled by them and how you can create your own effects.
Библиотека animate.css
В большинстве случаев анимации применяется для создания известных типовых эффектов. Почему бы в таком случае не воспользоваться готовыми наработками в этой области? Есть несколько разных CSS-библиотек, которые достаточно лишь подключить к своему сайту и добавить к желаемым элементам заданный класс. Из таких библиотек популярными являются Animate.css и magic.
Animate.css это бесплатная библиотека доступная по адресу http://daneden.github.io/animate.css/. На сайте выбираете из списка готовый эффект и смотрите как он применяется к заголовку.
Для начала следует скачать библиотеку. Есть два варианта.
- Полная версия. Содержит более трёх тысяч строк кода объёмом около 60 кБ. Она хорошо подходит на первом этапе ознакомления с анимацией в целом, поскольку позволяет взглянуть, как всё устроено.
- Упакованная версия. В css-файле нет табуляции, пробелов и переносов строк. Объём файла за счёт этого сокращается раза в полтора, но читать код при этом становится затруднительно.
Далее подключаем файл animate.css через <link> как это делается с любым другим стилевым файлом.
Чтобы применить эффект анимации к желаемому элементу, добавляем к нему два класса — animated и класс с названием эффекта (список всех эффектов и их названия смотрим на сайте). Например, вы желаете добавить мерцание к изображению на странице. В HTML записываем следующее:
После загрузки страницы изображение померцает и анимация после этого остановится. Для бесконечного повторения добавьте класс infinite.
По умолчанию вся анимация в animate.css длится одну секунду, увеличить время можно через собственный стиль. Если требуется изменить продолжительность только у выбранного эффекта, то используйте класс animated.flash, как показано в примере 3. Вместо flash укажите применяемый эффект. Для изменения времени у всех эффектов оставьте только класс animated.
Пример 3. Использование animate.css
<!DOCTYPE html>
<html>
<head>
<meta charset=»utf-8″>
<title>Анимация</title>
<link href=»animate.css» rel=»stylesheet»>
<style>
.animated.flash {
animation-duration: 3s;
}
</style>
</head>
<body>
<p><img src=»image/figure.jpg» alt=»» class=»animated infinite flash»></p>
</body>
</html>
Timing functions
The same set of timing functions that apply to transitions also apply to animations. (For details, see .) The animation-timing-function property allows you to control the response curve for each keyframe’s progress. It recognizes keyword values ease, ease-in, ease-out, ease-in-out, linear, along with cubic-bezier() functions for custom response curves.
By default, the ease value starts each keyframe slowly, builds speed, then slows at the end, which is not always appropriate behavior. In this example, a series of items, skewed to appear fast-moving, slide in haphazardly from the right edge of the screen, then hit a wall at the left edge and wobble to a stop:
(View live sample)
Setting the timing function to linear makes the shift from a moving to a stopped state as abrupt as possible. This occurs at the 70% keyframe:
For greater control, you can even manipulate the value of the animation-timing-function property within each keyframe, so that it changes over the course of the animation.
Dynamic animations
The example above uses JavaScript to assign random delays to stagger each animation’s execution. Any animation property can be set directly on an element’s style object, but as of this writing you also need to add alternative Webkit-prefixed property names:
Once an animation starts to execute, setting the animation-play-state property to pause stops it, and a value of running resumes it.
As in the following example, you would typically want to pause an animation if it becomes part of an interface element that is no longer in an active state:
(View live sample)
To dynamically initiate an animation, specify a different name. In this example, applying an animate class overrides the animation-name property’s default value, which is an empty string. The sequence animation executes each time the class is applied after having been absent:
Once the animate class is applied, simply reapplying it has no effect, because the animation’s name has to actually change its value. The same is true when applying the property directly to the element. The first button below only works once, but the second can be repeated because it responds to asynchronous mouse or touch input:
As a workaround, you can inject CSS into a local style region. Re-interpreting the CSS causes the animation to re-execute:
Applying a @keyframes rule is a bit more complex than it is to set properties. Perhaps the easiest way is to inject the CSS into a style region in the same way as described above:
A more formal API is available, especially to modify existing rules. Briefly, suppose this is your first declared style:
Here is how you might change the initial color to a shade of gray:
See CSSKeyframesRule, CSSKeyframeRule and CSSRule for details.
Указание ключевых кадров анимации
Вы можете указывать ключевые кадры анимации в определенных точках анимации. Это указывается с помощью , при этом нужно указать произвольное название анимации и перечислить список правил.
Имя анимации вы указываете своё, его в дальнейшем мы будет использовать внутри свойства .
Правила задаются с указанием ключевых кадров в процентах или с указанием ключевых свойств и .
— название анимации для элемента
Указывает список анимаций применяемых для элемента. Здесь вам нужно указать названия анимаций которые вы хотели бы применить для выбранного элемента.
— продолжительность анимации
Данное свойство позволяет задавать продолжительность анимации. Значение указывается в секундах или миллисекундах.
— направление анимации
Свойство определяет, должна ли анимация воспроизводиться в обратном порядке в некоторых или во всех циклах. Когда анимация воспроизводится в обратном порядке, временные функции также меняются местами. Например, при воспроизведении в обратном порядке функция будет вести себя как .
| Все повторы анимации воспроизводятся так, как указано. Значение по умолчанию. | |
| Все повторы анимации воспроизводятся в обратном направлении от того, как они были определены. | |
| Каждый нечетный повтор цикла анимации воспроизводятся в нормальном направлении, каждый четный повтор воспроизводится в обратном направлении. | |
| Каждый нечетный повтор цикла анимации воспроизводятся в обратном направлении, каждый четный повтор воспроизводится в нормальном направлении. | |
| Устанавливает значение свойства в значение по умолчанию. | |
| Наследует значение свойства от родительского элемента. |
— свойство для управления работой функции
С помощь данного свойства вы можете останавливать и запускать функцию указывая определенные значения.
Вы можете прописать данное свойство для псевдокласса и останавливать анимацию после наведения курсора на элемент.
Creating CSS3 Animations
In the previous chapter you’ve seen how to do simple animations like animating a property from one value to another via CSS3 transitions feature. However, the CSS3 transitions provide little control on how the animation progresses over time.
The CSS3 animations take it a step further with keyframe-based animations that allow you to specify the changes in CSS properties over time as a set of keyframes, like flash animations. Creating CSS animations is a two step process, as shown in the example below:
- The first step of building a CSS animation is to defining individual keyframes and naming an animation with a keyframes declaration.
- The second step is referencing the keyframes by name using the property as well as adding and other optional to control the animation’s behavior.
However, it is not necessary to define the keyframes rules before referencing or applying it. The following example will show you how to animate a box horizontally from one position to another using the CSS3 animation feature.
Example
Try this code
You must specify at least two properties and the (greater than 0), to make the animation occur. However, all the other are optional, as their default values don’t prevent an animation from happening.
Note: Not all CSS properties are animatable. In general, any CSS property that accepts values that are numbers, lengths, percentages, or colors is animatable.
CSS Properties
align-contentalign-itemsalign-selfallanimationanimation-delayanimation-directionanimation-durationanimation-fill-modeanimation-iteration-countanimation-nameanimation-play-stateanimation-timing-functionbackface-visibilitybackgroundbackground-attachmentbackground-blend-modebackground-clipbackground-colorbackground-imagebackground-originbackground-positionbackground-repeatbackground-sizeborderborder-bottomborder-bottom-colorborder-bottom-left-radiusborder-bottom-right-radiusborder-bottom-styleborder-bottom-widthborder-collapseborder-colorborder-imageborder-image-outsetborder-image-repeatborder-image-sliceborder-image-sourceborder-image-widthborder-leftborder-left-colorborder-left-styleborder-left-widthborder-radiusborder-rightborder-right-colorborder-right-styleborder-right-widthborder-spacingborder-styleborder-topborder-top-colorborder-top-left-radiusborder-top-right-radiusborder-top-styleborder-top-widthborder-widthbottombox-decoration-breakbox-shadowbox-sizingbreak-afterbreak-beforebreak-insidecaption-sidecaret-color@charsetclearclipclip-pathcolorcolumn-countcolumn-fillcolumn-gapcolumn-rulecolumn-rule-colorcolumn-rule-stylecolumn-rule-widthcolumn-spancolumn-widthcolumnscontentcounter-incrementcounter-resetcursordirectiondisplayempty-cellsfilterflexflex-basisflex-directionflex-flowflex-growflex-shrinkflex-wrapfloatfont@font-facefont-familyfont-feature-settingsfont-kerningfont-sizefont-size-adjustfont-stretchfont-stylefont-variantfont-variant-capsfont-weightgapgridgrid-areagrid-auto-columnsgrid-auto-flowgrid-auto-rowsgrid-columngrid-column-endgrid-column-gapgrid-column-startgrid-gapgrid-rowgrid-row-endgrid-row-gapgrid-row-startgrid-templategrid-template-areasgrid-template-columnsgrid-template-rowshanging-punctuationheighthyphens@importisolationjustify-content@keyframesleftletter-spacingline-heightlist-stylelist-style-imagelist-style-positionlist-style-typemarginmargin-bottommargin-leftmargin-rightmargin-topmax-heightmax-width@mediamin-heightmin-widthmix-blend-modeobject-fitobject-positionopacityorderoutlineoutline-coloroutline-offsetoutline-styleoutline-widthoverflowoverflow-xoverflow-ypaddingpadding-bottompadding-leftpadding-rightpadding-toppage-break-afterpage-break-beforepage-break-insideperspectiveperspective-originpointer-eventspositionquotesresizerightrow-gapscroll-behaviortab-sizetable-layouttext-aligntext-align-lasttext-decorationtext-decoration-colortext-decoration-linetext-decoration-styletext-indenttext-justifytext-overflowtext-shadowtext-transformtoptransformtransform-origintransform-styletransitiontransition-delaytransition-durationtransition-propertytransition-timing-functionunicode-bidiuser-selectvertical-alignvisibilitywhite-spacewidthword-breakword-spacingword-wrapwriting-modez-index
CSS Advanced
CSS Rounded CornersCSS Border ImagesCSS BackgroundsCSS ColorsCSS Color KeywordsCSS Gradients
Linear Gradients
Radial Gradients
CSS Shadows
Shadow Effects
Box Shadow
CSS Text EffectsCSS Web FontsCSS 2D TransformsCSS 3D TransformsCSS TransitionsCSS AnimationsCSS TooltipsCSS Style ImagesCSS Image ReflectionCSS object-fitCSS object-positionCSS ButtonsCSS PaginationCSS Multiple ColumnsCSS User InterfaceCSS Variables
The var() Function
Overriding Variables
Variables and JavaScript
Variables in Media Queries
CSS Box SizingCSS Media QueriesCSS MQ ExamplesCSS Flexbox
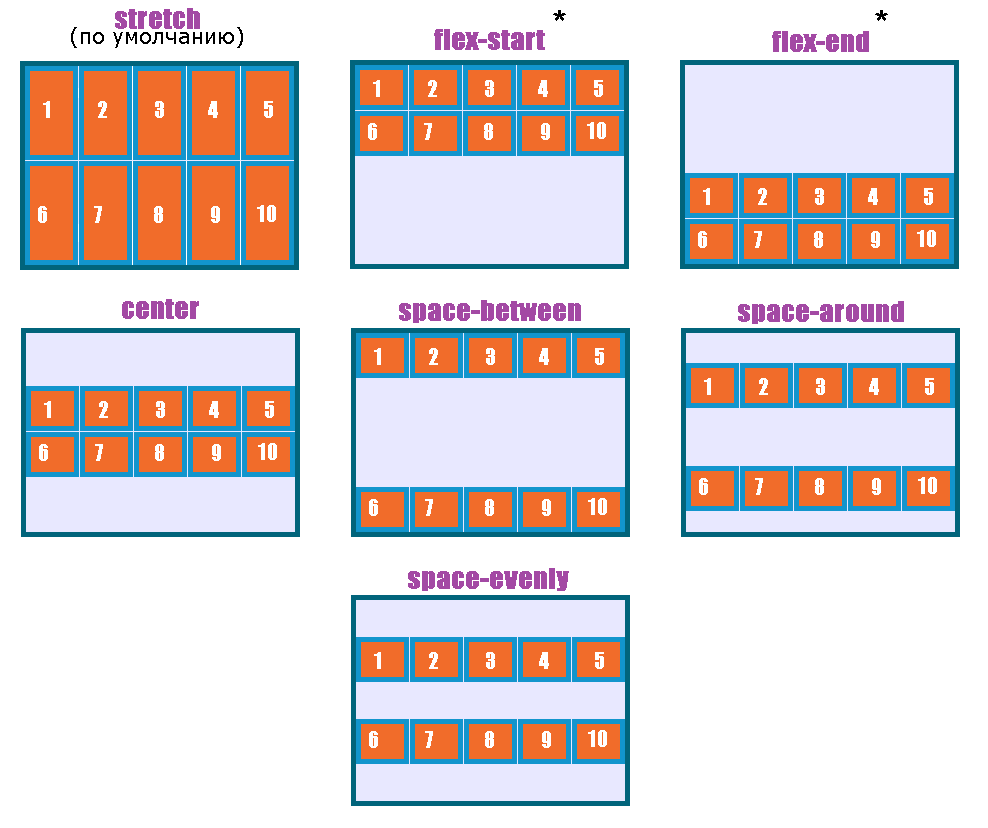
CSS Flexbox
CSS Flex Container
CSS Flex Items
CSS Flex Responsive
CSS Properties
align-contentalign-itemsalign-selfallanimationanimation-delayanimation-directionanimation-durationanimation-fill-modeanimation-iteration-countanimation-nameanimation-play-stateanimation-timing-functionbackface-visibilitybackgroundbackground-attachmentbackground-blend-modebackground-clipbackground-colorbackground-imagebackground-originbackground-positionbackground-repeatbackground-sizeborderborder-bottomborder-bottom-colorborder-bottom-left-radiusborder-bottom-right-radiusborder-bottom-styleborder-bottom-widthborder-collapseborder-colorborder-imageborder-image-outsetborder-image-repeatborder-image-sliceborder-image-sourceborder-image-widthborder-leftborder-left-colorborder-left-styleborder-left-widthborder-radiusborder-rightborder-right-colorborder-right-styleborder-right-widthborder-spacingborder-styleborder-topborder-top-colorborder-top-left-radiusborder-top-right-radiusborder-top-styleborder-top-widthborder-widthbottombox-decoration-breakbox-shadowbox-sizingbreak-afterbreak-beforebreak-insidecaption-sidecaret-color@charsetclearclipclip-pathcolorcolumn-countcolumn-fillcolumn-gapcolumn-rulecolumn-rule-colorcolumn-rule-stylecolumn-rule-widthcolumn-spancolumn-widthcolumnscontentcounter-incrementcounter-resetcursordirectiondisplayempty-cellsfilterflexflex-basisflex-directionflex-flowflex-growflex-shrinkflex-wrapfloatfont@font-facefont-familyfont-feature-settingsfont-kerningfont-sizefont-size-adjustfont-stretchfont-stylefont-variantfont-variant-capsfont-weightgapgridgrid-areagrid-auto-columnsgrid-auto-flowgrid-auto-rowsgrid-columngrid-column-endgrid-column-gapgrid-column-startgrid-gapgrid-rowgrid-row-endgrid-row-gapgrid-row-startgrid-templategrid-template-areasgrid-template-columnsgrid-template-rowshanging-punctuationheighthyphens@importisolationjustify-content@keyframesleftletter-spacingline-heightlist-stylelist-style-imagelist-style-positionlist-style-typemarginmargin-bottommargin-leftmargin-rightmargin-topmax-heightmax-width@mediamin-heightmin-widthmix-blend-modeobject-fitobject-positionopacityorderoutlineoutline-coloroutline-offsetoutline-styleoutline-widthoverflowoverflow-xoverflow-ypaddingpadding-bottompadding-leftpadding-rightpadding-toppage-break-afterpage-break-beforepage-break-insideperspectiveperspective-originpointer-eventspositionquotesresizerightrow-gapscroll-behaviortab-sizetable-layouttext-aligntext-align-lasttext-decorationtext-decoration-colortext-decoration-linetext-decoration-styletext-indenttext-justifytext-overflowtext-shadowtext-transformtoptransformtransform-origintransform-styletransitiontransition-delaytransition-durationtransition-propertytransition-timing-functionunicode-bidiuser-selectvertical-alignvisibilitywhite-spacewidthword-breakword-spacingword-wrapwriting-modez-index
The @keyframes rule
The animation-name property specifies an animation named pulse. Use a @keyframes rule within the CSS to define each named animation sequence:
The entire sequence between from and to executes over the span of time defined by the animation-duration property. Each keyframe within the sequence behaves like a CSS selector, manipulating the values of individual properties. Shifts from one keyframe to another work the same as transitions, and the same set of properties that can be transitioned can also be manipulated in keyframes. In this case, opacity dims the icon and transform shrinks it. (See the tutorial on transforms for details on the transform property’s scale() function.)
As with animation properties, each @keyframes rule also needs to be prefixed redundantly to run on WebKit-based browsers such as Chrome and Safari. The transform properties below are also prefixed:
This example also substitutes 0% and 100% for their synonymous keywords from and to. (If you don’t specify either, values transition from the next available keyframe in the series.)