7 единиц измерения css, о которых вы могли не знать
Содержание:
- Using rems with Media Query Breakpoints
- Wrapping Up
- Изменения, которые нужно учесть
- Резюмируя
- Изменение размеров уровней компонента
- Какие бывают единицы измерения CSS
- Примеры использования viewport единиц
- Using rem Units for Scaling Documents
- Предотвращение наследования
- Practical Application
- The Effect of Browser Settings on the HTML Element Font Size
- Using Only EMs to Make a Header Element
- ex и ch
- What is EM?
- CSS-переменные облегчают разделение поведения и стиля
- Why Use em Units
- User Changed Their Browser’s Font Setting.
- vmin и vmax
Using rems with Media Query Breakpoints
The use of em or rem units inside media queries is closely related to the notion of “optimal line length” and how it influences the reading experience. In September 2014, Smashing Magazine published a comprehensive study on web typography called Size Matters: Balancing Line Length And Font Size In Responsive Web Design. Among many other interesting things, the articles gives an estimate for optimal line length: between 45 and 75-85 characters (including spaces and punctuation), with 65 the “ideal” target value.
Using a rough estimate of 1rem = 1character, we can control the flow of text for a single column of content, in a mobile-first approach:
There is, however, one interesting detail about rem and em units when used as units for media queries: they always keep the same value of 1rem = 1em = browser-set font size. The reason for this behavior is explained in the (emphasis added):
Let’s see a quick example of this behavior:
First, in our HTML, we have a element where we will write the width of the viewport:
Next we have two media queries, one with rem units and the other with em units (this uses Sass for simplicity):
Finally, we use a bit of jQuery to display the viewport width on the page, updating the value when the window size changes:
We begin with the 62.5% trick to show that the modified root font size does not have any effect on the values used for the media queries. As we change the width of the browser window we can see that the first media query kicks in at 320px (20 × 16px) while the second one becomes active at 480px (30 × 16px). None of the changes we declared had any effect on the breakpoints. The only way to change the media query breakpoint values is to modify the default font size in the browser settings.
For this reason, it doesn’t really matter if we use em or rem units for media query breakpoints. Zurb Foundation (currently at v6.5.3 at the moment this was written) makes use of em units in the media queries.
Wrapping Up
Let’s have a quick bullet point recap of what we’ve covered:
- and units are computed into pixel values by the browser, based on font sizes in your design.
- units are based on the font size of the element they’re used on.
- units are based on the font size of the element.
- units can be influenced by font size inheritance from any parent element
-
units can be influenced by font size inheritance from browser font settings.
- Use units for sizing that should scale depending on the font size of an element other than the root.
- Use units for sizing that doesn’t need units, and that should scale depending on browser font size settings.
- Use units unless you’re sure you need units, including on font sizes.
- Use units on media queries
- Don’t use or in multi column layout widths — use instead.
- Don’t use or if scaling would unavoidably cause a layout element to break.
I hope you’ve now built a robust and complete picture of exactly how and units work, and through that know how to best leverage them in your designs.
I encourage you to try the usage guidelines contained in this tutorial for yourself, and enjoy the fully fledged scalability and responsiveness of the layouts they’ll enable you to create.
Изменения, которые нужно учесть
Во время написания этого поста, уже после глубокого изучения и понимания концепции логических свойств, я заметил несколько упущенных моментов, которые следует поправить в будущем:
- заменить на
- заменить на
Но, похоже, пока не стоит этого ждать, по крайней мере в отношении . Это свойство обновили буквально только что и в его названии по-прежнему присутствует . Пример: .
Но кто знает, может этот пост попадётся на глаза правильным людям из W3C 🙂
Резюмируя
Вот и всё. Я надеюсь, что вам понравилась эта статья и вы узнали что-то новое. Я буду признателен, если вы поаплодируете или поделитесь этим постом 🙂
Изменение размеров уровней компонента
Понятие «компоненты» довольно популярно сейчас. Оно хорошо подходит для модульных методов CSS, а также для идеи инкапсулированных разделов кода в целом. И я предполагаю, что следующий метод будет еще более интересным, когда веб-компоненты получат широкую поддержку.
Метод работает следующим образом: используется свойство font-size, которое создает основную единицу для различных элементов внутри модуля. Поскольку единица измерения em рассчитывается на основе font-size родительского элемента, то это делает весь компонент легко редактируемым путем изменения свойства font-size родительского элемента.
Давайте посмотрим на это в действии:
Этот модуль состоит из четырех основных элементов. Подвигайте слайдер в верхней части на демонстрационной странице, чтобы изменить размер модуля. Если хотите, можете просмотреть его в полноэкранном режиме. Слайдер содержит одно значение корневого элемента компонента: значение font-size.
Следует отметить, что установка размеров компонента через одно свойство CSS не обязательна, пользователь может менять размеры в настройках. Это сделано для того, чтобы разработчик мог быстро внести изменения, не перебирая различные значения во всех частях компонента.
Когда размер шрифта изменяется, это сказывается на всех em CSS значениях родительского элемента, а также всех его дочерних элементах, делая все части компонента пропорционально гибкими.
Обратите внимание, что:
- Внутри компонента все размеры задаются с помощью em. Кроме внешней границы и изображения, которое при желании можно изменить, но меня устраивает размер, который в данном случае статичен;
- Значок в правом верхнем углу, похожий на слезинку — это псевдоэлемент, который аналогичным образом использует размер шрифта родительского элемента;
- CSS также включает в себя два медиа-запроса, которые корректируют размер шрифта родительского элемента. Что показывает полноценность этого метода, потому что не нужно менять все размеры в медиа-запросах, а только размер шрифта.
Некоторые замечания, упущения и т.д.
Как видно на примере, этот тип гибкого изменения размера не всегда то, что стоит использовать. Его можно несколько ограничить.
Возможно, вам придется подправить некоторые значения единицы измерения em в CSS. И как в случае с границей родительского элемента в примере, вы вряд ли захотите изменить размер. Так как свойство применяется ко всем элементам. Можно решить эту проблему, просто избегая em элементов, которые хотите сохранить.
Не нужно использовать пиксели, чтобы установить корневой font-size. Вы можете использовать для этого em, но помните, что эти единицы измерения будут передаваться по наследству от родителей.
Какие бывают единицы измерения CSS
После рассмотрения способов задания цветов CSS автор видеоурока перейдет к подробному рассказу о единицах измерения CSS — размеров шрифтов, отступов и прочих элементов веб-страничек, где необходимо задание размеров.
Пиксели — самые распространенные единицы измерения CSS
Самым распространенным и известным определением размеров является задание их в пикселях. Базовым размером шрифта, который по умолчанию применяется большинством браузеров, является 16px.
Ключевые слова как вариант единиц измерения шрифтов в CSS
Для определения размера шрифта CSS также предлагает 7 ключевых слов, которые задают этот размер относительно базового: xx-small, x-small, small, medium, large, x-large и xx-large. Базовым является medium (16px), остальные уменьшают или увеличивают базовый размер. Эти единицы измерения CSS используют крайне редко.
Единицы измерения CSS — проценты
Задание единиц измерения CSS в процентах означает определение размеров относительно величин, заданных браузером либо размеров, прописанных в родительском блоке. Базовый размер шрифта (16px) равнозначен 100%. Относительные размеры могут изменяться, если наследуются значения тега-предка. Все вложенные теги наследуют его и используют для вычисления своих размеров.
Исключения!
- При установке свойства margin-left в % процент берется от ширины родительского блока, а не от его margin-left.
- При установке свойства line-height в % процент берется от текущего размера шрифта, а вовсе не от line-height родителя.
- Для width/height процент берется обычно от ширины/высоты родителя, но при position: fixed процент задается от ширины/высоты окна (а не родителя или документа).
Единицы измерения CSS — em
Следующие единицы измерения размеров в CSS — em. 1 em равен, как и при задании размеров в процентах, базовому размеру. Принцип работы механизма наследования с em точно такой же как и с процентами.
Современные единицы измерения CSS — rem
С появлением CSS3 появилась новая единица измерения размеров CSS — rem, что означает root element. Его значение основано на значении шрифта корневого root-элемента. В подавляющем большинстве случаев это относится к базовому размеру шрифта, а корневым элементом считается HTML. Для использования единиц измерения CSS rem можно установить базовый размер шрифта для элемента HTML, а затем применять rem для определения значений шрифтов относительно этого базового размера.
.main-menu {
font-size: .5rem; /*.5rem = 10px*/
}
.heading {
font-size: 1.5rem; /*1.5rem = 30px*/
}
Единицы измерения CSS относительно viewport — vw и vh
В CSS3 также появились такие новые единицы измерения, как vw и vh, они определяются относительно размеров области просмотра, т.е. размера viewport.
- 1vw = 1% ширины окна;
- 1vh = 1% высоты окна.
К этому типу единиц измерения относятся и следующие:
- vmin — наименьшее значение из vw и vh;
- vmax — наибольшее значение из vw и vh.
Эти единицы созданы для поддержки мобильных устройств, поскольку любые размеры, которые заданы в них, автоматически масштабируются в соответствии с размерами экрана, что очень удобно при создании адаптивных сайтов.
Этим видеоуроком завершится наш курс по основам CSS. Надеемся, полученные вами знания очень пригодятся вам в дальнейшем вашем развитии как веб-разработчика.
Приятного всем просмотра! Учитесь с удовольствием! Всегда ваш Loftblog.
Примеры использования viewport единиц
В следующих секциях мы посмотрим на некоторые примеры использования единиц viewport и на то, как их применять в ваших рабочих проектах.
Размер шрифта
Единицы вьюпорта идеальны для адаптивной типографики. Для примера, мы можем использовать следующий код для заголовка статьи:
Размер заголовка будет увеличиваться или уменьшаться в зависимости от ширины вьюпорта. Это как будто бы мы выдали размеру шрифта 5% ширины страницы. Однако, как бы не хотелось, а надо протестировать и смотрим, что получается.
Обратите внимание, что шрифт стал очень мелким при мобильных размерах, это очень плохо в плане доступности и UX. Насколько я знаю, минимальный размер шрифта на мобильных устройствах не должен быть ниже
А там у нас выходит уже ниже .
Чтобы решить эту проблему, нам надо дать заголовку минимальный размер шрифта, который не может быть меньше положенной нормы. И тут CSS спешит на помощь!
У функции будет основное значение и оно добавит к нему . Учитывая это, размер шрифта точно не будет слишком маленьким.
Ещё стоит рассмотреть то, как себя будет вести размер шрифта на больших экранах, к примеру на 27” аймаках. Что будет? Ну вы уже наверное предположили. Размер шрифта бахнет аж в , что само по себе уже кошмар. Чтобы предохраниться от этой ситуации мы можем использовать медиа запросы на определённых брейкпоинтах и менять размеры шрифтов.
Сбрасывая мы можем быть уверены в том, что размер шрифта не будет слишком большим. Тут возможно вам понадобится несколько медиа запросов, но это сугубо ваше личное дело когда и как их использовать в контексте проекта.
Полноэкранные секции
Иногда нам надо, чтобы секция забирала 100% высоты виюпорта. Это так называемые полноэкранные секции. Для их создания мы можем использовать вьюпорт единицу высоты.
Добавив , мы можем точно убедиться в том, высота секции будет в 100% высоту вьюпорта. Также, тут я добавил немного флексбокса, чтобы отцентровать контент вертикально и горизонтально.
Прилипающий футер
На больших экранах вы могли уже обратить внимание на то, что футер не прилипает к концу страницы. Ну и это нормально
Это даже не рассматривается как плохая практика. Однако, тут у нас есть пространство для улучшений. Давайте рассмотрим следующий кейс, в котором и происходит эта ошибка.
Чтобы её решить, нам нужно отдать основному контенту высоту, равную разнице между высотой вьюпорта и суммой хедера и футера. Динамически это довольно хитрая операция, но с помощью единиц вьюпорта всё становится довольно быстро и понятно.
Первое решение: calc и единицы вьюпорта
Если высота хедера и футера фиксированны, то их можно совместить с помощью функции :
Это решение не гарантирует того, что оно будет всегда работать, особенно для футера. За всю свою карьеру я никогда не использовал футер с фиксированной высотой, потому что это просто непрактично, особенно на разных размерах экранов.
Второе решение: Flexbox и вьюпорт единицы (рекомендуемое)
Добавляя как высоту для элемента, мы можем использовать флексы для того, чтобы основной контент занимал всё оставшееся место.
С учетом этого, наша проблема решена и у нас есть прилипающий футер вне зависимости от длины контента.
Адаптивные элементы
Занимаясь подготовкой материала я наткнулся на эту статью и она мне реально понравилась. Так что я возьму пример использования оттуда и объясню его своим способом.
Предположим, что у нас есть портфолио для того, чтобы показать свои адаптивные работы и у нас имеется три типа устройства (мобильные, планшеты и ноутбук). В каждом устройстве есть по изображению. Суть в том, чтобы сделать этот контент 100% отзывчивым на CSS.
Используя гриды и единицы вьюпорта, мы можем сделать это адаптивным и динамическим.
Обратите внимание, что вьюпорт единицы используются в grid-* свойствах. Они также используются для , и других свойств
Всё это приведет к флюидному дизайну.
Выходим за пределы контейнера
Я обратил внимание на случай, который больше всего подходит для редакторских шаблонов. А именно когда дочерний элемент забирает 100% ширины вьюпорта, хотя его родитель ограничен в ней
Давайте рассмотрим пример ниже:
Чтобы достигнуть такого же эффекта, мы можем использовать вьюпорт единицы и свойства позиционирования. Вот наш CSS:
Давайте разберем всё по полочкам и поймём как это работает.
Добавляем
Самый важный шаг, который даст изображению ширину равную 100% вьюпорта.
Добавляем
Чтобы отцентровать изображение, нам понадобится выдать отрицательный маргин с половиной ширины вьюпорта.
Добавляем
И наконец, мы отодвинем изображение в правую сторону со значением 50% от ширины его родителя.
Using rem Units for Scaling Documents
A third use we can find for rem units is to build scalable components. By expressing widths, margins, and padding in rem units, it becomes possible to create an interface that grows or shrinks in tune with the root font size. Let’s see how this thing works using a couple of examples.
In this first example, we change the root font size using media queries. Just like in the previous section, the purpose is to customize the reading experience for the device used. As element padding values and margins are expressed using rem, the entire component scales with the device size.
Let’s see another:
See the Pen Dynamic Sizing of Modules with Rem Units by SitePoint (@SitePoint) on CodePen.
In the second example we do the same alteration using JavaScript. This time the user has control over the size of the interface, adjusting it to fit his needs. Add a way to store these custom values (using either a database, cookies or local storage) and you have the base of a personalization system based on user preferences.
Предотвращение наследования
Когда переменные CSS используются для хранения данных, их поведение по умолчанию — наследование — желательно. Определяем переменные в корневом элементе и можем переопределять их в поддереве. Но наследование часто мешает. Рассмотрим следующий пример, в котором используется переменная для применения тонкого свечения с предопределенным цветом, смещением и радиусом размытия, но с переменным разбросом:
See this code Cancelling inheritance on x.xhtml.ru.
Это приводит к тому, что тонкое свечение применяется не только к элементу , но и к любому из его дочерних элементов, включая ссылки , выделение и т.д.
Чтобы это исправить, нужно отключить наследование, добавив к первому правилу. Поскольку прямое приложение всегда имеет приоритет над унаследованными правилами, оно переопределит унаследованные значения, но из-за низкой специфичности оно уступит место всему, что указано в элементе.
Practical Application
There may be some debate among web designers and I’m sure different people have different preferred approaches, however my recommendation is as follows.
Use Units For:
Any sizing that should scale depending on the font-size of an element other than the root.
Generally speaking, the only reason you’ll need to use units is to scale an element which has non default font sizing.
As per our example above, design components like menu items, buttons, and headings may have their own explicitly stated font sizes. If you change these font sizes, you want the entire component to scale proportionately.
Common properties this guideline will apply to are , , , and settings, when used on elements with non default font sizing.
I recommend that when you do employ units, the font size of the element they’re used on should be set in units to preserve scalability but avoid inheritance confusion.
Typically Don’t Use Units for Font Sizes
It’s quite common to see units used for font sizing, particularly in headings, however I would suggest that designs are more manageable if units are typically used for font sizing.
The reason headings often use units is they’re a better choice than units, being relative to regular text size. However units can achieve this goal equally well. If any font size adjustment on the element is made, the heading sizes will still scale too.
Try changing the font size on the element in this CodePen to see for yourself:
More often than not, we don’t want our font sizes to scale based on any element other than the root, with only a few exceptions.
One example where we might want based font sizing could be a drop down menu, where we have second level menu item text sized depending on the font size of the first level. Another example might be a font icon used inside a button, where the icon’s size should relate to the button’s text size.
However most elements in a web design will tend not to have this type of requirement, so you’ll generally want to use units for font sizing, with units only where specifically needed.
Use units for:
Any sizing that doesn’t need units for the reasons described above, and that should scale depending on browser font size settings.
This accounts for almost everything in a standard design including most heights, most widths, most padding, most margins, border widths, most font sizes, shadows, basically almost every part of your layout.
In a nutshell, everything that can be made scalable with units, should be.
Tip
When creating layouts it’s often easier to think in pixels but output in units.
You can have pixel to calculations done automatically via a preprocessor like Stylus / Sass / Less, or a postprocessor like PostCSS with the PXtoRem plugin.
Alternatively, you can use PXtoEM to manually do your conversions.
Always Use Media Queries
Importantly, when using units to create a uniformly scalable design, your media queries should also be in units. This will ensure that whatever a user’s browser font size, your media queries will respond to it and adjust your layout.
For example, if a user scales up text very high, your layout may need to snap down from a two columns to a single column, just as it might on a smaller screened mobile device.
If your breakpoints are at fixed pixel widths, only a different viewport size can trigger them. However with based breakpoints they will respond to different font sizing too.
Don’t Use or For:
Multi Column Layout Widths
Column widths in a layout should typically be based so they can fluidly fit unpredictably sized viewports.
However single columns should still generally incorporate values via a setting.
For example:
This keeps the column flexible and scalable, but prevents it from becoming too wide for the text therein to be comfortably readable.
When an Element Should be Strictly Unscalable
In a typical web design there won’t be many parts of your layout that can’t be designed for scalability. However occasionally you will come across elements that really do need to use explicit fixed values for the purpose of preventing scaling.
The precondition for employing fixed sizing values should be that if the element in question were scaled it would break. This really doesn’t come up often, so before you’re tempted to whip out those units, ask yourself if using them is an absolute necessity.
The Effect of Browser Settings on the HTML Element Font Size
By default browsers usually have a font size of 16px, but this can be changed to anywhere from 9px to 72px by the user.
Important to Know:
The root element inherits its font size from the settings in the browser, unless overridden with an explicitly set fixed value.
So while the font size on the element is what directly determines values, that font size may have first come from browser settings.
Thus browser font size settings can effect the value of every unit used in a design, as well as every unit via inheritance.
Browser Setting Effect When No HTML Font Size is Set
Unless overridden, the element it will inherit whatever the default font size setting in the browser is. For example, let’s take a site where no property is set on the element.
If a user has their browser at the default font size of 16px, the root font size will be 16px. In Chrome Developer Tools you can see what an element has inherited by checking Show inherited properties under the Computed tab.
In this case equates to , i.e. 10 x 16 = 160.
If the user bumps their browser font size up to 18px, the root font size becomes 18px. Now translates to , i.e. 10 x 18 = 180.
Browser Setting Effect with Unit HTML Font Size
When an based font size is set on the element, the pixel value it translates to will be a multiple of the browser font size setting.
For example, if the site’s element had a property set to , the root font size would be 1.25 times the browser font size setting.
If the browser font size was set to , the root font size would come out as , i.e. 1.25 x 16 = 20.
In this case would equal , i.e. 10 x 20 = 200.
However, if the browser font size was set to , the root font size would instead translate to , i.e. 1.25 x 20 = 25.
Now would equal , i.e. 10 x 25 = 250.
Using Only EMs to Make a Header Element
An implementation isn’t far from the code we left off. All we have to do is change to .
Both and will look exactly the same as their counterparts.
Is that it?
Nope!
It’s highly unlikely that your website contains only one header element. We have to consider how this header interacts with other elements on your page.
It’s common to see other elements before or after the header, like this:
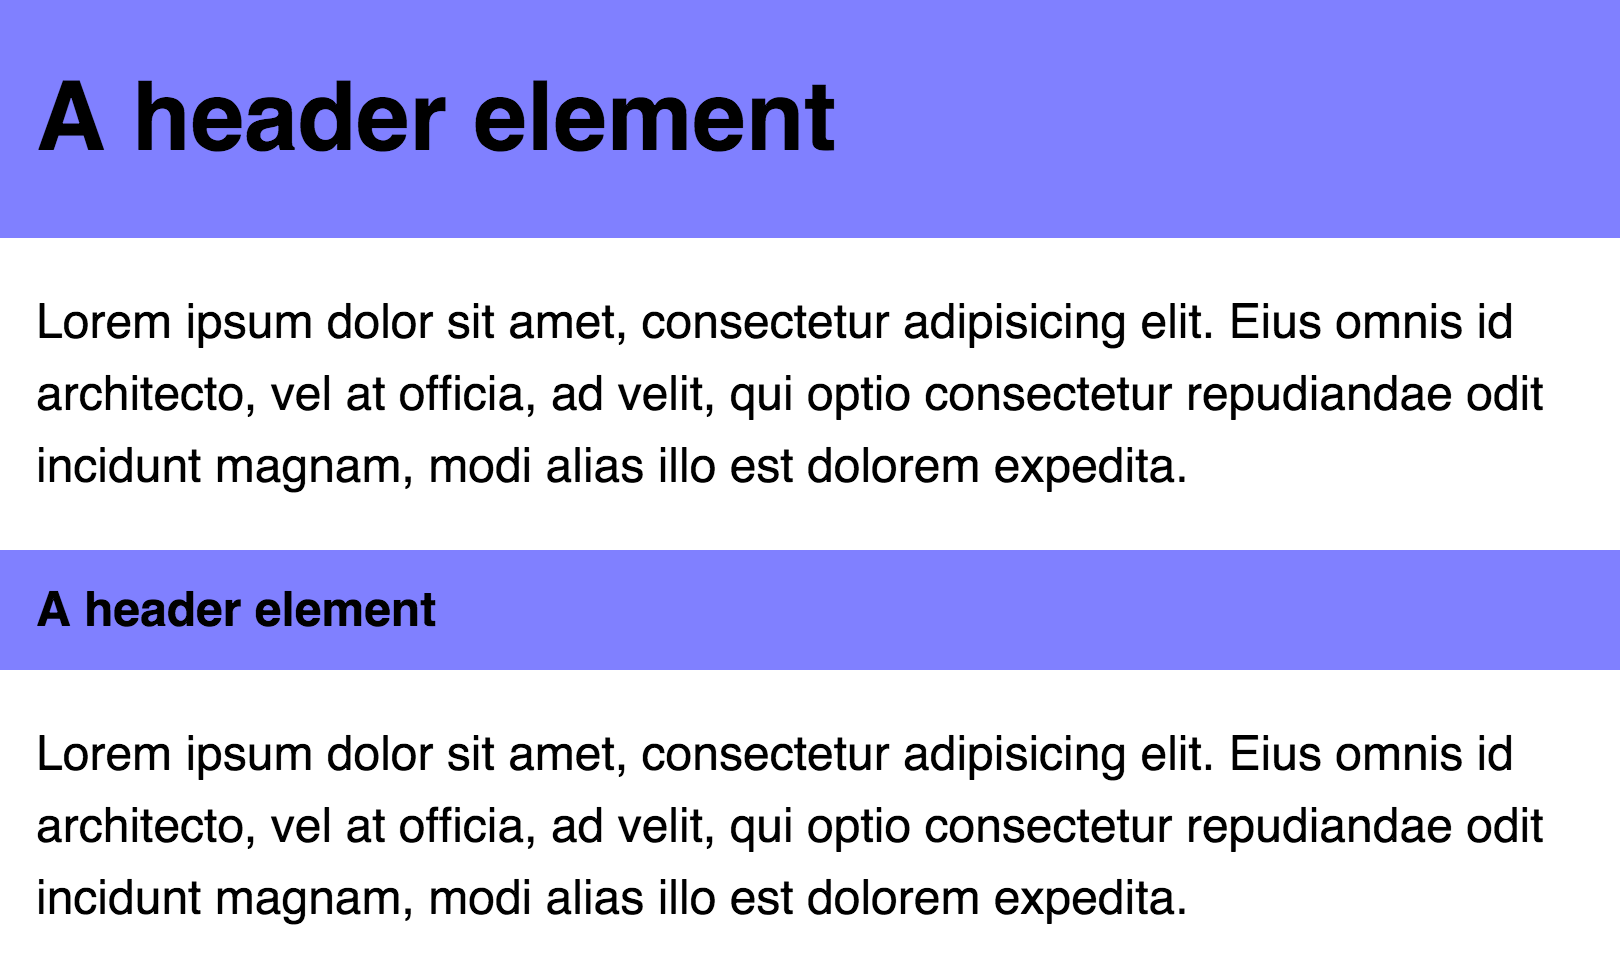 Header elements have other relationships surrounding it
The markup for this set of elements is:
For the styles, we need to add some s to the left and right of the tags.
 Uh oh. `padding` on the large header are doesn’t align with the text
Nooo! 🙁
The on the left and right of is too big!
If you insist on using only , the only way to fix this problem is to redeclare the and properties on the large header:
Left and right paddings are now aligned!
Notice the pattern here? The of is twice the size of the of . Yet, the and of are half the and of !
Like in the above case, we can simplify the code if you are open to using a combination of and in your code. Specifically, for left and right s and for top and bottom s:
As you can see, the unit is useful when you need to scale a property with it’s . However, you’ll run into problems if you need to size the property accordingly to the root .
It’s much clearer to see how and can work together in a component now, isn’t it?
Now, let’s take it a notch further and see how the header and paragraph interacts with a grid.
ex и ch
Единицы и , по аналогии с и , соотносятся с текущим шрифтом и размером шрифта. Но, в отличие от и , они также соотносятся c .
или character является продвинутой единицей измерения ширины от нуля, . Наиболее интересные обсуждения того, что это может значить, можно найти в блоге Эрика Мейерса. Вкратце, если мы возьмем моноширинный шрифт, контейнер с шириной из букв, тогда, например, всегда будет содержать выражение из 40 единиц этого конкретного шрифта. Когда стандартным использованием этого правила является пример шрифта Брайля, возможности творческого подхода существенно расширяют его функционал.
обозначается как «x-высота текущего шрифта ИЛИ половина «. выбранного шрифта называется высота буквы x нижнего регистра этого шрифта. Часто эта высота оказывается срединной точки всей высоты шрифта.
X-высота; высота буквы x нижнего регистра (читайте больше про структуру веб типографики)
Для этой единицы измерения существует множество вариантов использования, большинство из них являются небольшими дополнениями к основной типографике. Например, элемент , который обозначает надстрочные символы, может быть приподнят относительно своей позиции, если ему задать position: relative и значение свойства bottom 1ex. Таким же образом вы можете опустить подстрочные буквы еще ниже. Стандартные настройки браузера использует свои правила надстрочных и подстрочных символов. Но если вам нужна более тонкая настройка, вы можете сделать ее следующим образом:
Могу ли я это использовать?
Единица существует примерно , а вот для такой поддержки вы не найдете. Для ознакомления со спецификацией по поддержке свойств, ознакомьтесь со значениями и единицами CSS в блоге Эрика Мейерса.
What is EM?
This statement doesn’t make sense on the web since we don’t use . It makes complete sense if we substituted with though.
What it means is: if a selector has a of .
The unit can be used to declare font-sizes. In fact, it’s a best practice to use relative units like for .
Consider the following:
What’s the actual size of the selector here?
We have to look at the parent element in order to compute the ‘s . Let’s say the parent element is , and its is set to .
When put this way, we can see that the computed value of is , or .
Although this is possible, it’s often a bad idea to set in the to a pixel value because it overrides the user’s browser settings.
Instead, you can either choose to use a value, or leave out the declaration entirely.
Note: will be set to if you left it out entirely.
For most users (and browsers), a of would default to unless they change the default through their browser settings. It’s rare that anyone would do that though.
Okay so far? Let’s come back to .
can also be used to specify values for other properties in addition to . and are two of such properties that are commonly sized in s.
This is where many people start to get confused with values.
Consider the following code. What should the value be for both the and elements? (Assume of is set to ).
Are you surprised that the computed value of on is different in these two scenarios`?
This phenomenon occurs because is equal to its current . Since the in is now set to . Other properties computed with in would see that .
What throws people off is that can take on different values in different parts of the code. It can be confusing if you’re just starting out with s.
Anyway, that’s . Let’s find out what is next.
CSS-переменные облегчают разделение поведения и стиля
Реактивность переменных CSS — это делает их мощными. При правильном использовании стили могут оставаться в CSS, а вычисления — в JavaScript, где им и положено находиться. Предположим, нужен радиальный градиентный фон, на котором центральная точка градиента следует за курсором мыши. Раньше приходилось генерировать весь градиент в JavaScript и устанавливать его во встроенном (inline) стиле HTML-элемента при каждом движении мыши. С CSS-переменными в JavaScript необходимо установить только две переменные: и . В обычном JavaScript это может выглядеть так:
Затем надо в CSS настроить эффект, например, так:
See this code CSS gradient that follows the mouse with CSS variables on x.xhtml.ru.
Совершенно другой эффект будет со слоистыми градиентами, в которых используется одна и та же центральная точка:
See this code CSS gradients that follow the mouse with CSS variables on x.xhtml.ru.
Предположим, надо сделать, чтобы оттенки и угол в коническом градиенте менялись в зависимости от времени суток. Тот же самый JavaScript будет работать и для мыши, поэтому следует добавить немного JavaScript, который устанавливает CSS-переменную с текущим часом (0–23):
Затем включить эту переменную в CSS и использовать её в вычислениях:
See this code CSS gradient «clock» that follows the mouse with CSS on x.xhtml.ru.
Поскольку все три переменные, установленные с помощью JavaScript, являются чистыми данными, а не значениями из CSS, их можно использовать в нескольких несвязанных CSS-правилах. (Они не относятся непосредственно к эффектам только для фона.)
Why Use em Units
The key value units offer is they allow sizing values to be determined by a font size other than that of the element.
For this reason, the primary purpose of units should be to allow for scalability within the context of a specific design element.
For example, you might set the , and around a navigation menu item to use values.
Menu with 0.9rem font size
This way if you change the menu’s font size the spacing around the menu items will scale proportionately, independently of the rest of the layout.
Menu with 1.2rem font size
In the earlier section on inheritance you saw how quickly keeping track of units can get out of hand. For this reason, I recommend only using units if you identify a clear need for them.
User Changed Their Browser’s Font Setting.
Many developers like to believe that users don’t change their browser’s since it’s hidden deeeep inside the settings.
Well, it’ll be awesome if all users exhibit this behavior because we don’t have to do this experiment! 🙂
Unfortunately, there’s no data to proof that users don’t change their browser’s s, so it’s still our duty as developers to bake the flexibility into our websites.
In this experiment, I enlarged the default of the four browsers I tested with in the following way (incase you wanted to follow along):
- Chrome: Go to , , .
- Firefox: Go to , , .
- Internet Explorer: Click on , then
The only browser I couldn’t figure out where to set the font-size was Safari. So I used a proxy instead. I change the settings such that the smallest font-size is larger than 16px. To do so, go to , , .
This was the only test that all browsers behaved in the same way:
Results from all browsers for scenario 3
As you can see, the pixel queries triggered earlier than or queries.
There aren’t any bugs here. This is the correct implementation since px are absolute units. The breakpoint should remain at 400px no matter what the user set’s their default to.
and , on the other hand, is based on the of the browser. Hence, their media queries should get updated when the user changes their default setting.
So… I’m sorry to break your bubble, pixel fans, but it’s a no-go for pixel based queries.
(Here’s a more detailed explanation for people who found this last experiment confusing.)
Try to imagine you’ve coded up a website that has a breakpoint at 600px. This 600px breakpoint is perfect for a font-size of 16px (the default).
Let’s call the viewport smaller than 600px the small viewport, while that larger than 600px the medium viewport.
Let’s further assume that you only changed the layout at 600px. You used a one-column layout below 600px, and a two-column layout above 600px.
Now, change your browser font-size setting to 20px and look at your website at 650px.
If you used or based media queries, your user would see a one-column layout at 650px. This behavior would be consistent with the first two scenarios.
If you used based media queries, your user would see a two-column layout at 650px. This behavior would be inconsistent with the above scenarios. (And the design would not fit the screen).
vmin и vmax
В то время как и всегда относятся к высоте и ширине viewport, и относятся к минимальной и максимальной ширине или высоте viewport, в зависимотсти от того, какая из величин больше, а какая меньше. Например, если ширина окна браузера задана в 1100px, а высота в 700px, будет равен 7px, а 11px. Но, если ширина будет установлена в 800px, а высота в 1080px, то будет равен 8px, а – .
Итак, как можно воспользоваться этими значениями?
Представьте, что вам нужно создать элемент, который всегда будет находиться в видимой части экрана. Используя значения высоты и ширины , заданные меньше 100, вы сможете это осуществить. Например, элемент квадратной формы, который всегда касается как минимум двух краев экрана может быть задан так:
Если вам нужен квадратный блок, который будет покрывать весь viewport (касаться четырех сторон экрана одновремнно), используйте те же правила, но с .
Совмещая эти правила можно получить очень адаптивный и зачастую необычный способ для изменения размеров вашего viewport.