Python requests post
Содержание:
- Содержимое ответа
- Client Side Certificates
- Examples of Request Message
- OpenerDirector Objects
- Объект Response
- GET
- http.client
- Производительность
- Request Header Fields
- Использование Translate API
- The Message Body
- Request Objects
- Python requests credentials
- Parameter Values
- PHP GET request in Symfony
- POST Multiple Multipart-Encoded Files
- Debugging HTTP requests
Содержимое ответа
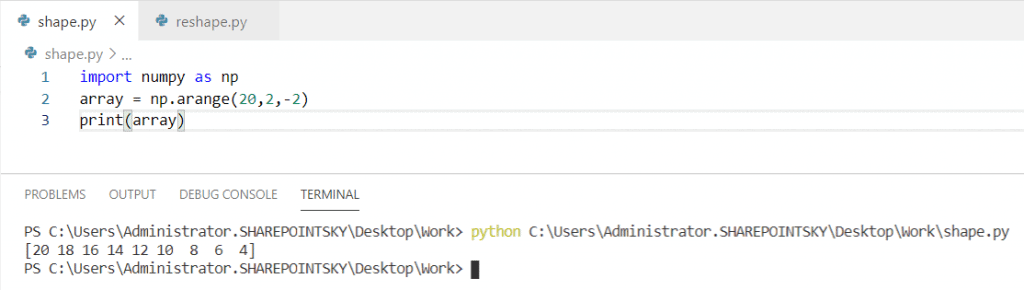
Мы можем читать содержимое ответа сервера. Рассмотрим тайм-лайн GitHub снова:
>>> import requests
>>> r = requests.get('https://api.github.com/events')
>>> r.text
u'[{"repository":{"open_issues":0,"url":"https://github.com/...
будет автоматически декодировать содержимое ответа сервера. Большинство Unicode кодировок без проблем декодируются.
Когда вы делаете запрос, делает предположение о кодировке, основанное на заголовках HTTP. Кодировка текста, угаданная , используется при обращение к . Вы можете узнать, какую кодировку использует , и изменить её воспользовавшись свойством :
>>> r.encoding
'utf-8'
>>> r.encoding = 'ISO-8859-1'
Если вы измените кодировку, Requests будет использовать новое значение всякий раз, когда вы будете использовать . Вы можете сделать это в любой ситуации, где нужна более специализированная логика работы с кодировкой содержимого ответа. Например, в HTML и XML есть возможность задавать кодировку прямо в теле документа. В подобных ситуациях вы должны использовать , чтобы найти кодировку, а затем установить . Это позволит вам использовать с правильной кодировкой.
Requests может также использовать пользовательские кодировки в случае, если вы в них нуждаетесь. Если вы создали свою собственную кодировку и зарегистрировали её в модуле , вы можете просто использовать название кодека в качестве значения , и будет работать с этой кодировкой для вас.
Client Side Certificates
You can also specify a local cert to use as client side certificate, as a single
file (containing the private key and the certificate) or as a tuple of both
files’ paths:
>>> requests.get('https://kennethreitz.org', cert=('/path/client.cert', '/path/client.key'))
<Response >
or persistent:
s = requests.Session()
s.cert = '/path/client.cert'
If you specify a wrong path or an invalid cert, you’ll get a SSLError:
>>> requests.get('https://kennethreitz.org', cert='/wrong_path/client.pem')
SSLError:  _ssl.c:347: error:140B0009:SSL routines:SSL_CTX_use_PrivateKey_file:PEM lib
Examples of Request Message
Now let’s put it all together to form an HTTP request to fetch hello.htm page from the web server running on tutorialspoint.com
GET /hello.htm HTTP/1.1
User-Agent: Mozilla/4.0 (compatible; MSIE5.01; Windows NT)
Host: www.tutorialspoint.com
Accept-Language: en-us
Accept-Encoding: gzip, deflate
Connection: Keep-Alive
Here we are not sending any request data to the server because we are fetching a plain HTML page from the server. Connection is a general-header, and the rest of the headers are request headers. The following example shows how to send form data to the server using request message body:
POST /cgi-bin/process.cgi HTTP/1.1
User-Agent: Mozilla/4.0 (compatible; MSIE5.01; Windows NT)
Host: www.tutorialspoint.com
Content-Type: application/x-www-form-urlencoded
Content-Length: length
Accept-Language: en-us
Accept-Encoding: gzip, deflate
Connection: Keep-Alive

licenseID=string&content=string&/paramsXML=string
Here the given URL /cgi-bin/process.cgi will be used to process the passed data and accordingly, a response will be returned. Here content-type tells the server that the passed data is a simple web form data and length will be the actual length of the data put in the message body. The following example shows how you can pass plain XML to your web server:
POST /cgi-bin/process.cgi HTTP/1.1
User-Agent: Mozilla/4.0 (compatible; MSIE5.01; Windows NT)
Host: www.tutorialspoint.com
Content-Type: text/xml; charset=utf-8
Content-Length: length
Accept-Language: en-us
Accept-Encoding: gzip, deflate
Connection: Keep-Alive

<?xml version="1.0" encoding="utf-8"?>
<string xmlns="http://clearforest.com/">string</string>
Previous Page
Print Page
Next Page
OpenerDirector Objects
instances have the following methods:
- (handler)
-
handler should be an instance of . The following methods
are searched, and added to the possible chains (note that HTTP errors are a
special case). Note that, in the following, protocol should be replaced
with the actual protocol to handle, for example would
be the HTTP protocol response handler. Also type should be replaced with
the actual HTTP code, for example would handle HTTP
404 errors.-
— signal that the handler knows how to open protocol
URLs.See for more information.
-
— signal that the handler knows how to handle HTTP
errors with HTTP error code type.See for more information.
-
— signal that the handler knows how to handle errors
from (non-) protocol. -
— signal that the handler knows how to pre-process
protocol requests.See for more information.
-
— signal that the handler knows how to
post-process protocol responses.See for more information.
-
- (url, data=None, timeout)
-
Open the given url (which can be a request object or a string), optionally
passing the given data. Arguments, return values and exceptions raised are
the same as those of (which simply calls the
method on the currently installed global ). The
optional timeout parameter specifies a timeout in seconds for blocking
operations like the connection attempt (if not specified, the global default
timeout setting will be used). The timeout feature actually works only for
HTTP, HTTPS and FTP connections).
- (proto, *args)
-
Handle an error of the given protocol. This will call the registered error
handlers for the given protocol with the given arguments (which are protocol
specific). The HTTP protocol is a special case which uses the HTTP response
code to determine the specific error handler; refer to the
methods of the handler classes.Return values and exceptions raised are the same as those of .
OpenerDirector objects open URLs in three stages:
The order in which these methods are called within each stage is determined by
sorting the handler instances.
Объект Response
Response — это объект для проверки результатов запроса.
Давайте сделаем тот же запрос, но на этот раз сохраним его в переменную, чтобы мы могли более подробно изучить его атрибуты и поведение:
В этом примере вы захватили значение, возвращаемое значение , которое является экземпляром Response, и сохранили его в переменной response. Название переменной может быть любым.
Код ответа HTTP
Первый кусок данных, который можно получить из ответа — код состояния (он же код ответа HTTP). Код ответа информирует вас о состоянии запроса.
Например, статус означает, что ваш запрос был успешно выполнен, а статус означает, что ресурс не найден. Есть множество других ответов сервера, которые могут дать вам информацию о том, что произошло с вашим запросом.
Используя вы можете увидеть статус, который вернул вам в ответ сервер:
вернул 200 — это значит, что запрос успешно выполнен и сервер отдал вам запрашиваемые данные.
Иногда эту информацию можно использовать в коде для принятия решений:
Если сервер возвращает 200, то программа выведет , если код ответа 400, то программа выведет .
Requests делает еще один шаг к тому, чтобы сделать это проще. Если вы используете экземпляр Response в условном выражении, то он получит значение , если код ответа между 200 и 400, и False во всех остальных случаях.
Поэтому вы можете сделать проще последний пример, переписав :
Помните, что этот метод не проверяет, что код состояния равен 200.
Причиной этого является то, что ответы с кодом в диапазоне от 200 до 400, такие как и , тоже считаются истинными, так как они дают некоторый обрабатываемый ответ.
Например, статус 204 говорит о том, что запрос был успешным, но в теле ответа нет содержимого.
Поэтому убедитесь, что вы используете этот сокращенный вид записи, только если хотите узнать был ли запрос успешен в целом. А затем обработать код состояния соответствующим образом.
Если вы не хотите проверять код ответа сервера в операторе , то вместо этого вы можете вызвать исключение, если запрос был неудачным. Это можно сделать вызвав :
Если вы используете , то HTTPError сработает только для определенных кодов состояния. Если состояние укажет на успешный запрос, то исключение не будет вызвано и программа продолжит свою работу.
Теперь вы знаете многое о том, что делать с кодом ответа от сервера. Но когда вы делаете GET-запрос, вы редко заботитесь только об ответе сервера — обычно вы хотите увидеть больше.
Далее вы узнаете как просмотреть фактические данные, которые сервер отправил в теле ответа.
Content
Ответ на Get-запрос, в теле сообщения часто содержит некую ценную информацию, известную как «полезная нагрузка» («Payload»). Используя атрибуты и методы Response, вы можете просматривать payload в разных форматах.
Чтобы увидеть содержимое ответа в байтах, используйте :
Пока дает вам доступ к необработанным байтам полезной нагрузки ответа, вы можете захотеть преобразовать их в строку с использованием кодировки символов UTF-8. Response это сделает за вас, когда вы укажите :
Поскольку для декодирования байтов в строки требуется схема кодирования, Requests будет пытаться угадать кодировку на основе заголовков ответа. Вы можете указать кодировку явно, установив перед указанием :
Если вы посмотрите на ответ, то вы увидите, что на самом деле это последовательный JSON контент. Чтобы получить словарь, вы можете взять строку, которую получили из и десериализовать ее с помощью . Однако, более простой способ сделать это — использовать .
Тип возвращаемого значения — это словарь, поэтому вы можете получить доступ к значениям в объекте по ключу.
Вы можете делать многое с кодом состояний и телом сообщений. Но если вам нужна дополнительная информация, такая как метаданные о самом ответе, то вам нужно взглянуть на заголовки ответа.
Заголовки
Заголовки ответа могут дать вам полезную информацию, такую как тип ответа и ограничение по времени, в течение которого необходимо кэшировать ответ.
Чтобы посмотреть заголовки, укажите :
возвращает похожий на словарь объект, позволяющий получить доступ к значениям объекта по ключу. Например, чтобы получить тип содержимого ответа, вы можете получить доступ к Content-Type:
Используя ключ или — вы получите одно и то же значение.
Теперь вы узнали основное о Response. Вы увидели его наиболее используемые атрибуты и методы в действии. Давайте сделаем шаг назад и посмотрим как изменяются ответы при настройке Get-запросов.
GET
Теперь мы будем использовать HTTP-клиент, чтобы получить ответ и статус по URL-адресу. Давайте посмотрим на фрагмент кода:
import http.client

connection = http.client.HTTPSConnection("www.journaldev.com")
connection.request("GET", "/")
response = connection.getresponse()
print("Status: {} and reason: {}".format(response.status, response.reason))

connection.close()
В приведенном выше сценарии мы использовали URL-адрес и проверили статус с помощью объекта подключения. Давайте посмотрим на результат этой программы.
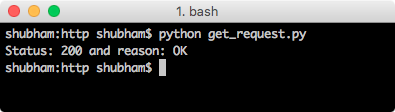
Не забудьте закрыть соединение, как только вы закончите работу с объектом
Также обратите внимание, что мы использовали HTTPSConnection для установления соединения, поскольку веб-сайт обслуживается по протоколу HTTPS
http.client
См.также
- https://docs.python.org/2/library/httplib.html
- https://docs.python.org/3/library/http.client.html
представляет собой простую обертку вокруг модуля
, которая обеспечивает наибольший контроль при обращении
к web-сайту.
Отправка запроса.
import http.client
conn = http.client.HTTPConnection("lectureswww.readthedocs.org")
conn.request("GET", "/ru/latest/")
r1 = conn.getresponse()
print(r1.status)

data1 = r1.read()
conn.request("GET", "/parrot.spam")
r2 = conn.getresponse()
print(r2.status)

data2 = r2.read()
conn.close()
200
404
В переменных , хранится тело ответа.
запрос, с использованием модуля для
преобразования Python словаря в строку параметров для HTTP запроса:
import http.client
import urllib.parse

params = urllib.parse.urlencode(
    {'@number' 12524, '@type' 'issue', '@action' 'show'}
)
headers = {"Content-type" "application/x-www-form-urlencoded",
           "Accept" "text/plain"}
conn = http.client.HTTPConnection("bugs.python.org")
conn.request("POST", "", params, headers)
response = conn.getresponse()
print(response.status, response.reason)

data = response.read()
print(data)

conn.close()
Производительность
При использовании , особенно в продакшене, важно учитывать влияние на производительность. Такие функции, как контроль времени ожидания, сеансы и ограничения повторных попыток, могут обеспечить вам бесперебойную работу приложения
Время ожидания
Когда вы отправляете запрос во внешнюю службу, вашей системе потребуется дождаться ответа, прежде чем двигаться дальше. Если ваше предложение слишком долго ожидает ответа — запросы к службе могут быть скопированы, пользовательский интерфейс может пострадать или фоновые задания могут зависнуть.
По умолчанию, будет ждать ответа до бесконечности, поэтому вы почти всегда должны указывать время ожидания. Чтобы установить время ожидания, используйте параметр . Тайм-аут может быть целым числом или числом с плавающей запятой, представляющим количество секунд ожидания ответа:
В первом запросе, время ожидания истекает через одну секунду. Во втором — через 3,05 секунд.
Вы также можете передать кортеж тайм-ауту. Первый элемент в кортеже является тайм-аутом соединения (время, которое позволяет установить клиенту соединение с сервером), а второй элемент — время ожидания чтения (время ожидания ответа после того, как клиент установил соединение):
Если запрос устанавливает соединение в течение 2 секунд и получает данные в течение 5 секунд после установки соединения, то ответ будет возвращен. Если время ожидания истекло — функция вызовет исключение :
Ваша программа может перехватить исключение и ответить соответствующим образом.
Объект Session
До сих пор вы имели дело с интерфейсами API высокого уровня, такими как и . Эти функции являются абстракциями над тем, что происходит когда вы делаете свои запросы. Они скрывают детали реализации, такие как управление соединениями, так что вам не нужно беспокоиться о них.
Под этими абстракциями находится класс . Если вам необходимо настроить контроль над выполнением запросов и повысить производительность вашего приложения — вам может потребоваться использовать экземпляр напрямую.
Сеансы используются для сохранения параметров в запросах. Например, если вы хотите использовать одну и ту же аутентификацию для нескольких запросов, вы можете использовать сеанс:
Каждый раз, когда вы делаете запрос в сеансе, после того, как он был инициализирован с учетными данными аутентификации, учетные данные будут сохраняться.
Первичная оптимизация производительности сессий происходит в форме постоянных соединений. Когда ваше приложение устанавливает соединение с сервером, используя , оно сохраняет это соединение в пуле с остальными соединениями. Когда ваше приложение снова подключиться к тому же серверу, оно будет повторно использовать соединение из пула, а не устанавливать новое.
Максимальное количество попыток
В случае сбоя запроса, вы можете захотеть, чтобы приложение отправило запрос повторно. Однако не делает этого за вас по умолчанию. Чтобы реализовать эту функцию, вам необходимо реализовать собственный .
Транспортные адаптеры позволяют вам определять набор конфигураций для каждой службы , с которой вы взаимодействуете. Например, вы хотите, чтобы все запросы к https://api.github.com, повторялись по три раза, прежде чем вызовется исключение . Вы должны сконструировать транспортный адаптер, установить его параметр и подключить его к существующему сеансу:
Когда вы монтируете и в — будет придерживаться этой конфигурации в каждом запросе к https://api.github.com.
Время ожидания, транспортные адаптеры и сеансы, предназначены для обеспечения эффективности вашего кода и отказоустойчивости приложения.
Request Header Fields
We will study General-header and Entity-header in a separate chapter when we will learn HTTP header fields. For now, let’s check what Request header fields are.
The request-header fields allow the client to pass additional information about the request, and about the client itself, to the server. These fields act as request modifiers.Here is a list of some important Request-header fields that can be used based on the requirement:
-
Accept-Charset
-
Accept-Encoding
-
Accept-Language
-
Authorization
-
Expect
-
From
-
Host
-
If-Match
-
If-Modified-Since
-
If-None-Match
-
If-Range
-
If-Unmodified-Since
-
Max-Forwards
-
Proxy-Authorization
-
Range
-
Referer
-
TE
-
User-Agent
You can introduce your custom fields in case you are going to write your own custom Client and Web Server.
Использование Translate API
Теперь перейдем к чему-то более интересному. Мы используем API Яндекс.Перевод (Yandex Translate API) для выполнения запроса на перевод текста на другой язык.
Чтобы использовать API, нужно предварительно войти в систему. После входа в систему перейдите к Translate API и создайте ключ API. Когда у вас будет ключ API, добавьте его в свой файл в качестве константы. Далее приведена ссылка, с помощью которой вы можете сделать все перечисленное: https://tech.yandex.com/translate/
script.py
Ключ API нужен, чтобы Яндекс мог проводить аутентификацию каждый раз, когда мы хотим использовать его API. Ключ API представляет собой облегченную форму аутентификации, поскольку он добавляется в конце URL запроса при отправке.
Чтобы узнать, какой URL нам нужно отправить для использования API, посмотрим документацию Яндекса.
Там мы найдем всю информацию, необходимую для использования их Translate API для перевода текста.
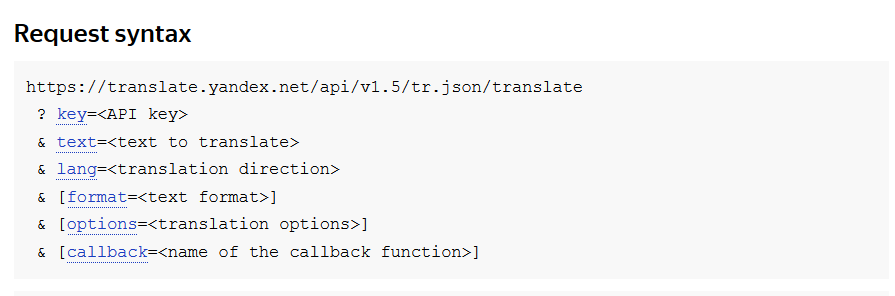
Если вы видите URL с символами амперсанда (&), знаками вопроса (?) или знаками равенства (=), вы можете быть уверены, что это URL запроса GET. Эти символы задают сопутствующие параметры для URL.
Обычно все, что размещено в квадратных скобках ([]), будет необязательным. В данном случае для запроса необязательны формат, опции и обратная связь, но обязательны параметры key, text и lang.
Добавим код для отправки на этот URL. Замените первый созданный нами запрос на следующий:
script.py
Существует два способа добавления параметров. Мы можем прямо добавить параметры в конец URL, или библиотека Requests может сделать это за нас. Для последнего нам потребуется создать словарь параметров. Нам нужно указать три элемента: ключ, текст и язык. Создадим словарь, используя ключ API, текст и язык , т. к. нам требуется перевод с английского на испанский.
Другие коды языков можно посмотреть здесь. Нам нужен столбец 639-1.
Мы создаем словарь параметров, используя функцию , и передаем ключи и значения, которые хотим использовать в нашем словаре.
script.py
Теперь возьмем словарь параметров и передадим его функции .
script.py
Когда мы передаем параметры таким образом, Requests автоматически добавляет параметры в URL за нас.
Теперь добавим команду печати текста ответа и посмотрим, что мы получим в результате.
script.py
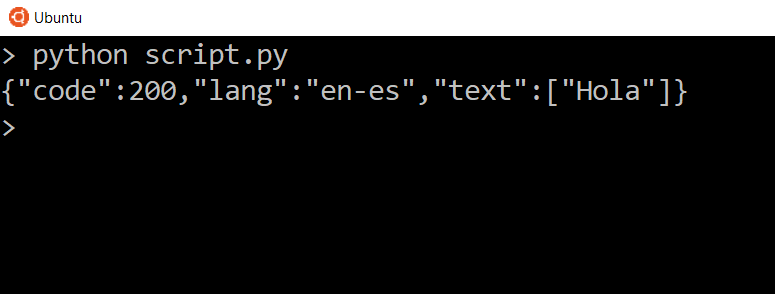
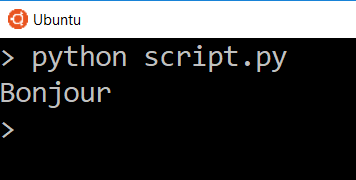
Мы видим три вещи. Мы видим код состояния, который совпадает с кодом состояния ответа, мы видим заданный нами язык и мы видим переведенный текст внутри списка. Итак, мы должны увидеть переведенный текст .
Повторите эту процедуру с кодом языка en-fr, и вы получите ответ .
script.py

Посмотрим заголовки полученного ответа.
script.py

Разумеется, заголовки должны быть другими, поскольку мы взаимодействуем с другим сервером, но в данном случае мы видим тип контента application/json вместо text/html. Это означает, что эти данные могут быть интерпретированы в формате JSON.
Если ответ имеет тип контента application/json, библиотека Requests может конвертировать его в словарь и список, чтобы нам было удобнее просматривать данные.
Для обработки данных в формате JSON мы используем метод на объекте response.
Если вы распечатаете его, вы увидите те же данные, но в немного другом формате.
script.py
 Причина отличия заключается в том, что это уже не обычный текст, который мы получаем из файла res.text. В данном случае это печатная версия словаря.
Допустим, нам нужно получить доступ к тексту. Поскольку сейчас это словарь, мы можем использовать ключ текста.
script.py
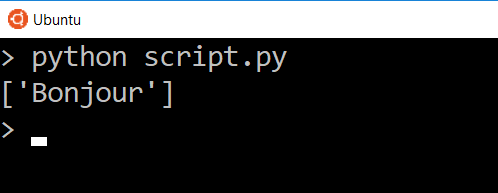 Теперь мы видим данные только для этого одного ключа. В данном случае мы видим список из одного элемента, так что если мы захотим напрямую получить текст в списке, мы можем использовать указатель для доступа к нему.
script.py
Теперь мы видим только переведенное слово.
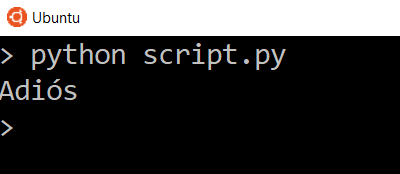
Разумеется, если мы изменим параметры, мы получим другие результаты. Изменим переводимый текст с на , изменим язык перевода на испанский и снова отправим запрос.
script.py
 Попробуйте перевести более длинный текст на другие языки и посмотрите, какие ответы будет вам присылать API.
The Message Body
According to the HTTP specification, , , and the less common requests pass their data through the message body rather than through parameters in the query string. Using , you’ll pass the payload to the corresponding function’s parameter.
takes a dictionary, a list of tuples, bytes, or a file-like object. You’ll want to adapt the data you send in the body of your request to the specific needs of the service you’re interacting with.
For example, if your request’s content type is , you can send the form data as a dictionary:
>>>
You can also send that same data as a list of tuples:
>>>
If, however, you need to send JSON data, you can use the parameter. When you pass JSON data via , will serialize your data and add the correct header for you.
httpbin.org is a great resource created by the author of , Kenneth Reitz. It’s a service that accepts test requests and responds with data about the requests. For instance, you can use it to inspect a basic request:
>>>
Request Objects
The following methods describe ’s public interface,
and so all may be overridden in subclasses. It also defines several
public attributes that can be used by clients to inspect the parsed
request.
-
The original URL passed to the constructor.
Changed in version 3.4.
Request.full_url is a property with setter, getter and a deleter. Getting
returns the original request URL with the
fragment, if it was present.
-
The URI scheme.
-
The URI authority, typically a host, but may also contain a port
separated by a colon.
-
The original host for the request, without port.
-
The URI path. If the uses a proxy, then selector
will be the full URL that is passed to the proxy.
-
The entity body for the request, or if not specified.
Changed in version 3.4: Changing value of now deletes “Content-Length”
header if it was previously set or calculated.
-
boolean, indicates whether the request is unverifiable as defined
by RFC 2965.
-
The HTTP request method to use. By default its value is ,
which means that will do its normal computation
of the method to be used. Its value can be set (thus overriding the default
computation in ) either by providing a default
value by setting it at the class level in a subclass, or by
passing a value in to the constructor via the method
argument.New in version 3.3.
Changed in version 3.4: A default value can now be set in subclasses; previously it could only
be set via the constructor argument.
- ()
-
Return a string indicating the HTTP request method. If
is not , return its value, otherwise return
if is , or if it’s not.
This is only meaningful for HTTP requests.Changed in version 3.3: get_method now looks at the value of .
- (key, val)
-
Add another header to the request. Headers are currently ignored by all
handlers except HTTP handlers, where they are added to the list of headers sent
to the server. Note that there cannot be more than one header with the same
name, and later calls will overwrite previous calls in case the key collides.
Currently, this is no loss of HTTP functionality, since all headers which have
meaning when used more than once have a (header-specific) way of gaining the
same functionality using only one header.
- (key, header)
-
Add a header that will not be added to a redirected request.
- (header)
-
Return whether the instance has the named header (checks both regular and
unredirected).
- (header)
-
Remove named header from the request instance (both from regular and
unredirected headers).New in version 3.4.
- ()
-
Return the URL given in the constructor.
Changed in version 3.4.
Returns
- (host, type)
-
Prepare the request by connecting to a proxy server. The host and type will
replace those of the instance, and the instance’s selector will be the original
URL given in the constructor.
- (header_name, default=None)
-
Return the value of the given header. If the header is not present, return
the default value.
- ()
-
Return a list of tuples (header_name, header_value) of the Request headers.
Python requests credentials
The parameter provides a basic HTTP authentication; it takes
a tuple of a name and a password to be used for a realm. A security realm
is a mechanism used for protecting web application resources.
$ sudo apt-get install apache2-utils
$ sudo htpasswd -c /etc/nginx/.htpasswd user7
New password:
Re-type new password:
Adding password for user user7
We use the tool to create a user name and a password
for basic HTTP authentication.
location /secure {

        auth_basic "Restricted Area";
        auth_basic_user_file /etc/nginx/.htpasswd;
}
Inside the nginx configuration file,
we create a secured page. The name of the realm is «Restricted Area».
index.html
<!DOCTYPE html>
<html lang="en">
<head>
<title>Secure page</title>
</head>

<body>

<p>
This is a secure page.
</p>

</body>

</html>
Inside the directory, we have
this HTML file.
credentials.py
#!/usr/bin/env python3

import requests as req

user = 'user7'
passwd = '7user'

resp = req.get("http://localhost/secure/", auth=(user, passwd))
print(resp.text)
The script connects to the secure webpage; it provides the user name
and the password necessary to access the page.
$ ./credentials.py
<!DOCTYPE html>
<html lang="en">
<head>
<title>Secure page</title>
</head>

<body>

<p>
This is a secure page.
</p>

</body>

</html>
With the right credentials, the script returns
the secured page.
In this tutorial, we have worked with the Python Requests module.
List .
Parameter Values
| Parameter | Description | |
|---|---|---|
| url | Try it | Required. The url of the request |
| data | Try it | Optional. A dictionary, list of tuples, bytes or a file object to send to the specified url |
| json | Try it | Optional. A JSON object to send to the specified url |
| files | Try it | Optional. A dictionary of files to send to the specified url |
| allow_redirects | Try it | Optional. A Boolean to enable/disable redirection.Default (allowing redirects) |
| auth | Try it | Optional. A tuple to enable a certain HTTP authentication.Default |
| cert | Try it | Optional. A String or Tuple specifying a cert file or key.Default |
| cookies | Try it | Optional. A dictionary of cookies to send to the specified url.Default |
| headers | Try it | Optional. A dictionary of HTTP headers to send to the specified url.Default |
| proxies | Try it | Optional. A dictionary of the protocol to the proxy url.Default |
| stream | Try it | Optional. A Boolean indication if the response should be immediately downloaded (False) or streamed (True).Default |
| timeout | Try it | Optional. A number, or a tuple, indicating how many seconds to wait for the client to make a connection and/or send a response.Default which means the request will continue until the connection is closed |
| verify |
Try it Try it |
Optional. A Boolean or a String indication to verify the servers TLS certificate or not.Default |
PHP GET request in Symfony
In the following example, we process a GET request in a Symfony application.
$ symfony new symreq
$ cd symreq
A new application is created.
$ composer req annot
$ composer req maker --dev
We install the and components.
$ php bin/console make:controller HomeController
We create a new controller.
src/Controller/HomeController.php
<?php

namespace App\Controller;

use Symfony\Bundle\FrameworkBundle\Controller\AbstractController;
use Symfony\Component\Routing\Annotation\Route;
use Symfony\Component\HttpFoundation\Response;
use Symfony\Component\HttpFoundation\Request;

class HomeController extends AbstractController
{
    /**
     * @Route("/", name="home", methods={"GET"})
     */
    public function index(Request $request): Response
    {
        $name = $request->query->get('name', 'guest');
        $message = $request->query->get('message', 'hello there');

        $output = "$name says: $message";

        return new Response($output, Response::HTTP_OK,
            ['content-type' => 'text/plain']);
    }
}
Inside the method,
we get the query parameters and create a response.
$name = $request->query->get('name', 'guest');
The GET parameter is retrieved with .
The second parameter of the method is a default value which is used when no
value was retrieved.
$ symfony serve
We start the server.
$ curl 'localhost:8000/?name=Lucia&message=Cau'
Lucia says: Cau
We generate a GET request with curl.
POST Multiple Multipart-Encoded Files
You can send multiple files in one request. For example, suppose you want to
upload image files to an HTML form with a multiple file field ‘images’:
<input type="file" name="images" multiple="true" required="true"/>
To do that, just set files to a list of tuples of :
>>> url = 'https://httpbin.org/post'
>>> multiple_files =
...     ('images', ('foo.png', open('foo.png', 'rb'), 'image/png')),
...     ('images', ('bar.png', open('bar.png', 'rb'), 'image/png'))]
>>> r = requests.post(url, files=multiple_files)
>>> r.text
{
  ...
  'files': {'images': 'data:image/png;base64,iVBORw ....'}
  'Content-Type': 'multipart/form-data; boundary=3131623adb2043caaeb5538cc7aa0b3a',
  ...
}
Debugging HTTP requests
Sometimes requests fail and you can’t figure out why. Logging the request and
response might give you insight to the failure. There are two ways to do this —
either by using the built in debug logging settings or by using request hooks.
Printing HTTP headers
Changing the logging debug level greater than 0 will log the response HTTP
headers. This is the simplest option, but it doesn’t allow you to see the HTTP
request or the response body. It’s useful if you’re dealing with an API that
returns a large body payload that is not suitable for logging or contains
binary content.
Any value that is greater than 0 will enable debug logging.
import requests
import http

http.client.HTTPConnection.debuglevel = 1

requests.get("https://www.google.com/")

# Output
send b'GET / HTTP/1.1\r\nHost: www.google.com\r\nUser-Agent: python-requests/2.22.0\r\nAccept-Encoding: gzip, deflate\r\nAccept: */*\r\nConnection: keep-alive\r\n\r\n'
reply 'HTTP/1.1 200 OK\r\n'
header Date Fri, 28 Feb 2020 121326 GMT
header Expires -1
header Cache-Control private, max-age=
Printing everything
If you want to log the entire HTTP lifecycle, including both the textual
representation of the request and response you can use request hooks and the
dump utils from requests_toolbelt.
I prefer this option any time I’m dealing with a REST based API that doesn’t
return very large responses.
import requests
from requests_toolbelt.utils import dump

def logging_hook(response, *args, **kwargs):
    data = dump.dump_all(response)
    print(data.decode('utf-8'))

http = requests.Session()
http.hooks"response" = logging_hook

http.get("https://api.openaq.org/v1/cities", params={"country" "BA"})

# Output
< GET v1cities?country=BA HTTP1.1
< Host api.openaq.org

> HTTP1.1 200 OK
> Content-Type applicationjson; charset=utf-8
> Transfer-Encoding chunked
> Connection keep-alive
>
{
   "meta":{
      "name""openaq-api",
      "license""CC BY 4.0",
      "website""https://docs.openaq.org/",
      "page"1,
      "limit"100,
      "found"1
   },
   "results":[
      {
         "country""BA",
         "name""Goražde",
         "city""Goražde",
         "count"70797,
         "locations"1
      }

}
See https://toolbelt.readthedocs.io/en/latest/dumputils.html