Материальный дизайн
Содержание:
- Bottom Navigation
- Build a Material Theme
- More resources
- Palette colors
- How to change text color in Google Sheets
- Typography
- How to change border color in Google Sheets
- Material Design Websites
- Material Design Color Tools
- How to remove color from cells in Google Sheets
- Customization
- Что такое Material Design
- How to alternate row color in Google Sheets
- Customization
- Выбор цвета элемента
- How to change cell color in Google Sheets
- How to remove alternating colors
- Text Fields
- Alternate column OR row color with conditional formatting in Google Sheets
- Color
- Использование цветов в UI
Material Bottom Navigation includes two main variants that inherit from the base style, with an optional style suffix: surface (default, no suffix) and colored (). Bottom Navigation labels use the theme attribute for their typography styles.
The key attributes for customizing these styles are as follows:
- : The color of the bottom navigation background. The default color is for surface bottom navigation and for colored bottom navigation.
- /: The colors of bottom navigation item icons and labels. The default colors are /(selected) for surface bottom navigation and for colored bottom navigation.
- : A flag to set whether or not a translation animation should occur when selecting bottom navigation items. The default value is false.
The base bottom navigation style (used by the widget class) can be customized and applied globally like so:
<style name="AppTheme" parent="Theme.MaterialComponents.Light"> ... <item name="bottomNavigationStyle">@style/AppBottomNavigation</item></style><style name="AppBottomNavigation" parent="Widget.MaterialComponents.BottomNavigation.Colored" />
The result can be observed in our playground screen:
Customized Bottom Navigation widget style
This is certainly not exhaustive. A more comprehensive list of all components and their attributes can be found in the Material Components for Android Docs.
Build a Material Theme
The Material Components for Android library includes a module that allows you to easily customize an existing Material Theme. It provides you with a set of XML files (/, and ) which include all of the necessary baseline theme attributes mentioned in this article. The values can be tweaked and previewed in a corresponding sample app. When you’re happy with the chosen values, the files can be dropped into a new/existing Android Studio project. A web version is also available on Glitch.
The “Build a Material Theme” sample app
More resources
- The source code for the Playground app used in this article can be found on GitHub
- “The Components of Material Design” — A great presentation by Cameron Ketcham and Gautham Sajith at Android Dev Summit 2018, covering a brief history of Material Design and how to use Material Components for Android
- “Designing and building a real Android app using Material Tools & Components” — A presentation I gave at Droidcon Kenya and DevFest South Africa 2018, covering how I designed and built Rugby Ranker using the Material Theme Editor Sketch Plugin, Material Gallery and, of course, Material Components for Android
- Material Design Codelabs
Palette colors
A color intention is a mapping of a palette color to a given intention within your application.
The theme exposes the following palette colors (accessible under ):
- primary — used to represent primary interface elements for a user. It’s the color displayed most frequently across your app’s screens and components.
- secondary — used to represent secondary interface elements for a user. It provides more ways to accent and distinguish your product. Having it is optional.
- error — used to represent interface elements that the user should be made aware of.
- warning — used to represent potentially dangerous actions or important messages.
- info — used to present information to the user that is neutral and not necessarily important.
- success — used to indicate the successful completion of an action that user triggered.
If you want to learn more about color, you can check out the color section.
How to change text color in Google Sheets
Changing the color of text in your spreadsheet is almost the exact same as changing cell background color, except that you must click a different menu to begin with.
To change text color in Google Sheets, select the range of cells that contain the text/values that you want to color, open the «Text color» menu, and then select the color that you want.
Like with changing the color of cells, when changing text color you can select a single cell, a range, a row, or a column… and then change the color to anything that you want.
In this example we are going to color the text in cell C6 red, rather than changing the color of the cell itself, which we did in the first example.
To do this simply select cell C6, then open the «Text Color» menu, and then select the color red.
Typography
Type attributes adhere to the Material Type System in terms of text typeface, weight, size, case and letter spacing. The attributes reference styles that implement (and are named after) the various type scales:
- : Light, 96sp
- : Light, 60sp
- : Regular, 48sp
- : Regular, 34sp
- : Regular, 24sp
- : Medium, 20sp
- : Regular, 16sp
- : Medium, 14sp
- : Regular, 16sp
- : Regular, 14sp
- : Regular, 12sp
- : Regular, 14sp, all caps
- : Regular, 12sp, all caps
The Material Components widgets will use these styles as per the Material guidelines.
You would typically want to keep the default weight, size, case and letter spacing for each style. However, a custom typeface can really make your app stand out. One might assume this requires overriding each and every one of these attributes. Thankfully, this can be done in a far more concise way by adding the following attributes to your app theme:
<style name="AppTheme" parent="Theme.MaterialComponents.Light"> ... <item name="fontFamily">@font/roboto_mono</item> <item name="android:fontFamily">@font/roboto_mono</item></style>
These attributes reference an XML Font or a Downloadable Font that you’ve added to your folder and will apply a custom typeface to every widget and text style in your app. There was certainly a time when it wasn’t this easy on Android!
If you do, however, wish to customize one of the Material Components text appearance styles, you would do so like this:
<style name="AppTheme" parent="Theme.MaterialComponents.Light"> ... <item name="textAppearanceButton">@style/AppTextAppearance.Button</item></style><style name="AppTextAppearance.Button" parent="TextAppearance.MaterialComponents.Button"> ... <item name="android:textAllCaps">false</item></style>
The results can be observed in our playground screen:
Playground screen with global type attributes customized
Lastly, Google Fonts is a great place to start if you’re looking for free-to-use, custom typefaces (which happen to work really well with Downloadable Fonts too).
How to change border color in Google Sheets
You may also find certain situations where you want to change the color of borders in Google Sheets.
Most likely you will want to do this to simply change the shade of grey/black of borders, but in this example I have used the color red to make the lines stand out.
To change border color in Google Sheets, you must first select the cell or range of cells that you want to modify, then open the «Borders» menu in the toolbar, then open the «Border color» menu, and then you must apply the type of border that you want to see. If you do not apply / re-apply borders, changing the line color will not take effect.
In this example we are going to color the borders of the cells in the range A2:D9 red. (I have also made the lines thicker here to make the color stand out more in the image)
To do this, select the range A2:D9, open the «Borders» menu, and then open the «Border color» menu, and then select the color red.

Material Design Websites
1. Google
When it comes to Material Design, how can we not mention Google? It’s the best practice of its own material design guidelines. The material design style is characterized by the clean typography and simple layout that is easy to understand so the user can focus on content.
2. WhatsApp
WhatsApp is a timely communication tool loved by people around the world, implements the concept of material design in its web design and mobile App design very well. In terms of colors, WhatsApp did not use a very colorful palette for its main colors, opting for a more serene mix of gray and green.
These Material Design color tools and resources will help you move to the next step in practicing building your website or App.
Actually, it’s not that hard. To create a website or App that incorporates Material Design, you only need a material design style prototyping tool. Here I give my vote to Mockplus as it has the unique advantage of both in website prototype design and mobile App prototype design. Combining the built-in material design components of Mockplus with the material design color scheme I summarized for you above, designing a Material design style application or website is no longer a difficult task.
Material Design Color Tools
1. Material.io
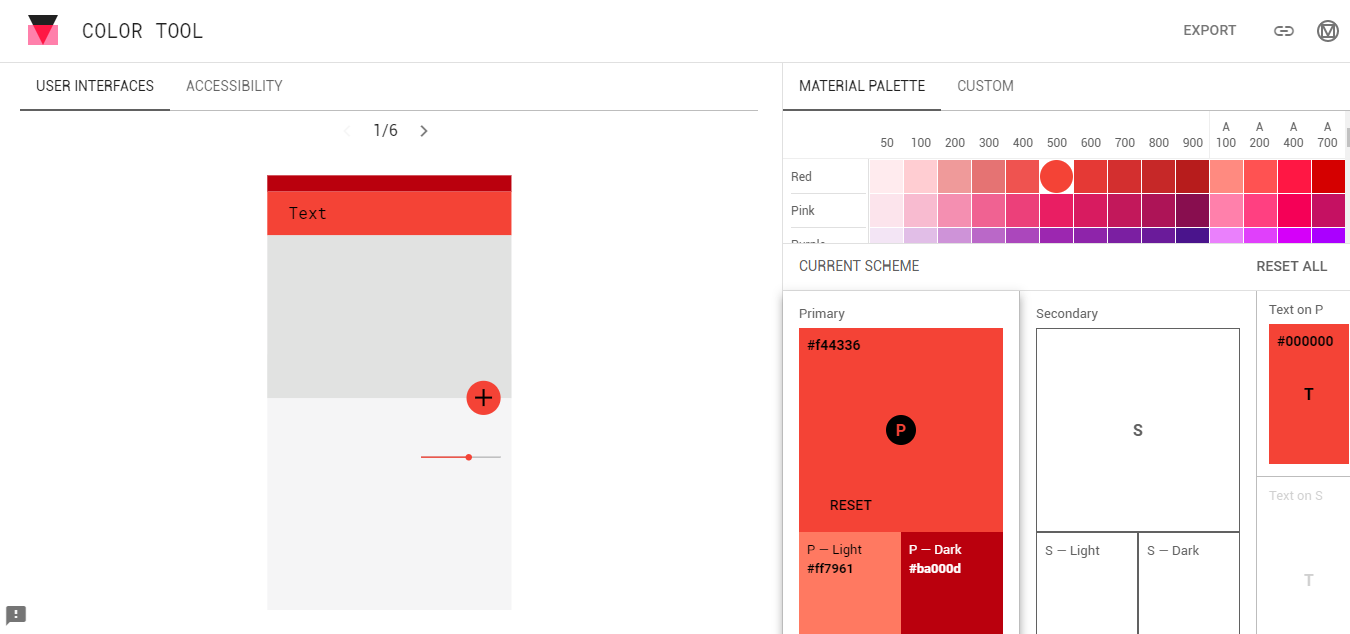
Features: Complete Color Scheme
Material.io is Google’s official material design color matching tool. The users need only select their favorite color in the palette and it will immediately display on the App interface. Use the color scheme palette, found in the lower right, to apply the current primary color, secondary color, and the color number of the text color.
Tips:
(1) In Material Design, the main color is the color that most often appears in your application. A secondary color is a color used to emphasize the key parts of your UI.
(2) The secondary colors are best used for:
- Button, floating operation button, and button text
- Text field, cursor and text selection
- Progress bar
- Select controls, buttons, and sliders
- Links
- Title
2. Material Colors

Features:
- Color Preview
- Support download
- Share online
Material Colors is not only a palette but also an icon tool and a color tool. The main feature of Material Colors is that it allows the user to select the color and preview the color effect in real time. It’s simple and easy to operate. You only need to select 1 or 2 colors, and the system will match a set of APP UI color schemes. It is worth mentioning that this site provides online sharing and downloads in a variety of formats.
3. Material UI
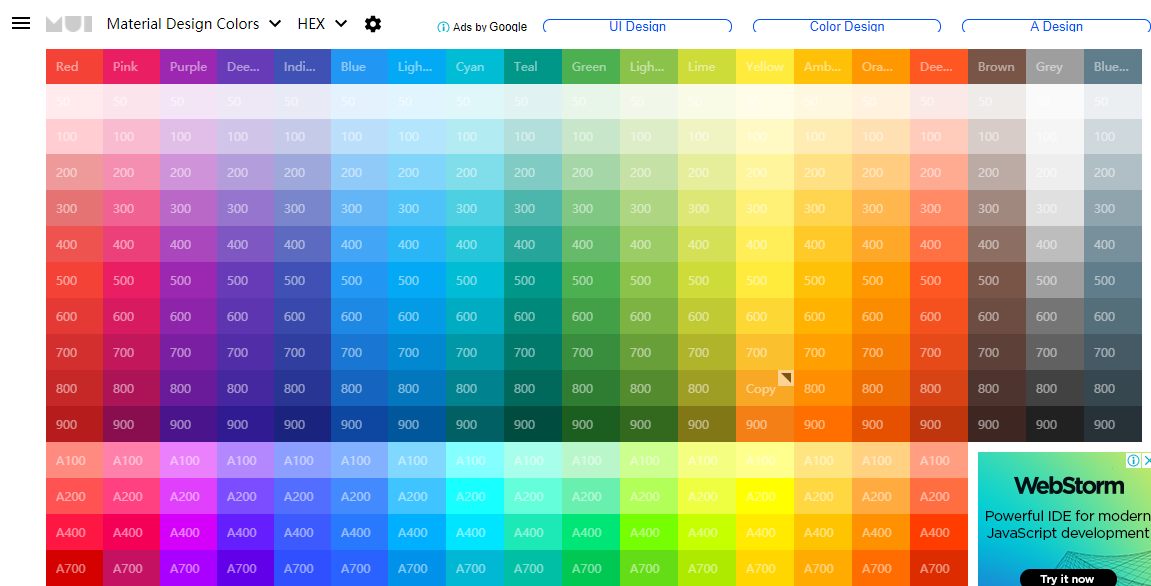
Features:
- Color code can be directly copied and pasted
- Supports multiple color format switching
This tool is primarily for developers and designers who want to quickly design a color code that meets Material Design standards. The user can click on the color box and it will automatically copy the corresponding color code to the clipboard. This site is also known as the color «cheat sheet,» which brings all available colors together on one page for the user to choose from.
4. Material Design Palette Generator

Features: Custom Swatches
If you are interested in custom swatches, try the Material Design Palette Generator. To set a color manually, either type in a color code or select a color from the color palette in the color dialog box that can be opened by clicking on a color box in the open palette. The Material Design Panel Builder will generate your swatches based on the color you choose.
5. Color — Materialize

Features: Supports color shading adjustment
This is a color palette based on the material design base color. Each color is defined with a basic color class and an optional brightening or darkening class.
How to remove color from cells in Google Sheets
Removing color from cells, is in most cases almost exactly the same process as adding color.
To remove color from cells in Google Sheets, select the cells/rows/columns that you want to remove color from, open the «Fill color» menu, and then click «Reset». You can also simply click the color white if you prefer.
Another way to remove color from cells, including any color that is applied through conditional formatting or alternating colors, is to clear the formatting of selected cells by doing the following:
- Select the cells that you want to clear color/formatting from
- Click the «Format» menu in the toolbar
- Click «Clear formatting»
(Using «Clear formatting» will clear ALL/ANY formatting from the cells)
Now you know lots of different ways to color your spreadsheets, so that you can make your finished work visually appealing and very easy to read!
Customization
You may override the default palette values by including a palette object as part of your theme.
If any of the:
palette color objects are provided, they will replace the defaults.
The palette color value can either be a object, or an object with one or more of the keys specified by the following TypeScript interface:
Using a color object
The simplest way to customize an intention is to import one or more of the provided colors
and apply them to a palette intention:
Providing the colors directly
If you wish to provide more customized colors, you can either create your own color object,
or directly supply colors to some or all of the intention’s keys:
As in the example above, if the intention object contains custom colors using any of the
«main», «light», «dark» or «contrastText» keys, these map as follows:
- If the «dark» and / or «light» keys are omitted, their value(s) will be calculated from «main»,
according to the «tonalOffset» value. - If «contrastText» is omitted, its value will be calculated to contrast with «main»,
according to the «contrastThreshold» value.
Both the «tonalOffset» and «contrastThreshold» values may be customized as needed.
The «tonalOffset» value can either be a number between 0 and 1, which will apply to both light and dark variants, or an object with light and dark variants specified by the following TypeScript type:
A higher value for «tonalOffset» will make calculated values for «light» lighter, and «dark» darker.
A higher value for «contrastThreshold» increases the point at which a background color is considered
light, and given a dark «contrastText».
Note that «contrastThreshold» follows a non-linear curve.
Что такое Material Design
К 2014 году проблему удалось решить. Именно тогда на конференции I/O Google представили свою новую дизайн-систему Material Design. Компания не просто представила гайдлайн по визуальному стилю, но и заявила о себе как о единой цифровой среде.
Что касается визуального стиля, Material Design примирил скевоморфизм с флэтом. Он не вернулся к реализму, но добавил в плоский дизайн его опыт взаимодействия с реальным миром — за счет знакомых тактильных характеристик и глубины.
Скевоморфизм — стиль в веб-дизайне, максимально подражающий объектам реального мира.
Флэт — упрощенный, минималистичный стиль с акцентом на функциональность, а не визуал.
Material Design базируется на тактильной реальности, вдохновлен изучением бумаги и чернил, технологически продвинут и открытдля воображения и магии.
В основе Material Design лежат четыре принципа:
1. Тактильные поверхности
Все элементы интерфейса — это слои цифровой бумаги. Они располагаются на разной высоте и отбрасывают тени. Это помогает пользователям отличить главные элементы от второстепенных и делает интерфейс интуитивно понятным.
2. Полиграфический дизайн
Логично, что на цифровой бумаге нужно писать цифровыми чернилами. Все, что изображено и написано на слоях-элементах, подчиняется законам печатного дизайна
Так можно акцентировать внимание пользователя на нужном элементе и обозначить иерархию интерфейса
3. Осознанная анимация
Все элементы, которые есть на экране, не могут просто так появляться и исчезать, — ведь в реальной жизни так не бывает. Объекты плавно переходят один в другой и подсказывают пользователю, как работает интерфейс.
4. Адаптивный дизайн
Все вышеперечисленное должно работать на любых устройствах.
Четыре основных принципа Material Design наглядно. Источник
Как видите, анимация — одна из основ Material Design. И хотя некоторые ее критикуют, поклонников все же больше. И вот почему.
How to alternate row color in Google Sheets
In some cases you may want to color every other row in your spreadsheet, and this can be done in a much easier way than by manually selecting every other line before coloring.
To alternate row color in Google Sheets, select the range that you want to apply alternating colors to, open the «Fill color» menu, click «Alternating colors…», customize the options for styling, and then click «Done».
(If you want, you can also select the header or even the entire sheet)
If you prefer, you can also open the alternating colors menu without selecting a range first, and then type the range that you want to color in the «Apply to range» field. If you select the range before opening the menu, you will see that the «Apply to range» field will already be filled in.
When styling alternating colors, you can select a default style, or you can also specify which colors that you want to use.
You can also select whether or not you want there to be a special color for the header/footer.
If the color does not begin on the row that you want, for example if you want the color to be on even rows instead of odd rows… you can either adjust your source range by one row, or flip the colors assigned to «Color 1» and «Color 2» in the menu.
In this example the range that we are applying alternating colors to is A2:D9.
Customization
Custom colors
Source · Difficulty: easy
Material for MkDocs implements colors using CSS variables (custom properties). If you want to customize the colors beyond the palette (e.g. to use your brand-specific colors), you can add an and tweak the values of the CSS variables.
Let’s say you’re YouTube, and want to set the primary color to your brand’s palette. Just add:
See the file containing the color definitions for a list of all CSS variables.
Custom color schemes
Source · Difficulty: easy
Besides overriding specific colors, you can create your own, named color scheme by wrapping the definitions in the , which you can then set via as described in the section:
Additionally, the color scheme defines all of it’s colors via color functions and deduces its colors from the CSS variable. You can tune the theme with:
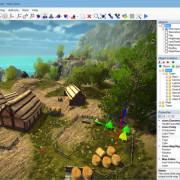
Выбор цвета элемента
Чтобы изменить фоновый цвет страницы, используйте поле Заливка на панели Свойства, когда элементы не выбраны.
Можно изменять цвет контура и заливки элементов с помощью инструментов для работы с цветом. Чтобы настраивать цвета, используйте панели «Цвет» и «Свойства» или инструменты «Контур» и «Заливка» на панели инструментов.
С помощью панели «Цвет»
- Нажмите на элемент, для которого нужно выбрать цвет.
- Нажмите на образец цвета возле параметра Заливка или Граница в верхней части панели «Цвет».
- Выберите цвет на цветовой панели или в палитре образцов цветов.
С помощью панели «Свойства»
- Нажмите на элемент, для которого нужно выбрать цвет.
- В разделе Стиль панели Свойства нажмите на образец в поле Цвет заливки или Цвет границы. Откроется цветовая панель.
- Выберите цвет на цветовой панели, в палитре образцов цветов или в рабочей области с помощью инструмента «Пипетка».
С помощью инструмента «Заливка»
- Выберите инструмент Заливка на панели инструментов или нажмите клавишу F. Если на панели инструментов есть инструмент «Контур» или «Градиент» , нажмите и удерживайте его, чтобы выбрать инструмент «Заливка» во всплывающем меню.
- Выберите цвет, нажав на значок с образцом или используя панель «Цвет».
- Наведите указатель мыши на элемент, для которого нужно выбрать цвет. Вокруг него появится зеленый контур.
- Нажмите на элемент.
С помощью инструмента «Контур»
- Нажмите и удерживайте инструмент Заливка на панели инструментов, затем во всплывающем меню выберите инструмент Контур . Если на панели инструментов отображается инструмент «Градиент», нажмите и удерживайте его кнопку, чтобы выбрать инструмент «Контур» во всплывающем меню. Также можно нажать клавишу K.
- Настройте контур:
- Чтобы выбрать цвет контура или границы, нажмите на значок с образцом на панели инструментов.
- Укажите толщину границы (для большинства элементов) или контура (для объектов типа «Линия» и «Овал») на панели настроек инструмента.
- Выберите стиль границ в раскрывающемся меню Стиль на панели настроек инструмента.
- Наведите указатель мыши на элемент, границы которого нужно изменить. Вокруг него появится зеленый контур.
- Нажмите на элемент.
How to change cell color in Google Sheets
First, let’s change the color of a single cell. When referring to changing the color of a cell itself, we are talking about changing the background color of that cell.
To color a cell in Google Sheets, select the cell that you want to color, open the «fill color» menu, then select the color that you want.
Notice that in this example, in cell C6, the assignment grade is 32.71%. Let’s say that we want to manually mark this cell red, to make it stand out.
To do this simply click/select cell C6, then open the «Fill Color» menu, then select the color red.
(See the top of this article for visual instructions on selecting color from the palette)
How to remove alternating colors
At the bottom of this article I will go over how to remove color from cells in general, but let’s go over how to remove alternating colors specifically.
To remove alternating colors in Google Sheets, select the range that has color to remove, open the alternating color menu while (open the «Fill color» menu, then click «Alternating colors»), and then click «Remove alternating colors».
Alternating row color is a format that will remain even if you click «Reset» in the color menu. If you manually color a cell that already has alternating colors, you will see the color change to what you manually select, but the alternating color format will still be applied in the background unless you click «Remove alternating colors» as described above.
To remove alternating colors, after selecting the range that you want to remove color from, you can also open the «Format» menu, and then click «Clear formatting».
I’ll go over clearing formatting more below, but for now, note that this will remove ALL formatting from a cell.
Text Fields
Material Text Fields include two main variants. As a result of porting the pre-existing AppCompat and classes, there are in fact two base styles: and . The variants have a style suffix and include filled box (default, ) and outlined box (). All text field variants use the standard text appearance for input and the theme attribute for “helper” text (labels, errors, counters, etc.).
The key attributes for customizing the styles are as follows:
- : The mode of the box background, which can be either , or .
- : The color of the text field background. The default enabled color is for filled box text fields and transparent for outlined box text fields.
- : The color of the stroke around the text field background. The default color is (in default state) for outlined box text fields and is ignored for filled box text fields.
- //: Various colors for different “helper” text sub-components.
- : The shape appearance of the text field background. The default value is .
The base text field style (used by the widget class) can be customized and applied globally like so:
<style name="AppTheme" parent="Theme.MaterialComponents.Light"> ... <item name="textInputStyle">@style/AppTextField</item></style><style name="AppTextField" parent="Widget.MaterialComponents.TextInputLayout.FilledBox"><item name="boxBackgroundColor">@color/text_field_background</item></style>
Note: is a that uses and the same alpha values as the default .
The result can be observed in our playground screen:

Customized Text Field widget styles
Alternate column OR row color with conditional formatting in Google Sheets
Another way to use alternating colors is the use conditional formatting. With this method you will be able to alternate row colors, or if needed you will also be able to alternate column colors.
To apply alternating colors with conditional formatting, use any of the 4 formulas below, in the «Format cells if…» options, under the «Custom formula is» drop-down selection:
- =ISEVEN(ROW())
- =ISODD(ROW())
- =ISEVEN(COLUMN())
- =ISODD(COLUMN())
Conditional formatting is an amazingly useful tool that allows you to format cells based on their contents, and the following is just one of the many ways that you can use conditional formatting in Google Sheets.
Like in the last example, here you can either select the range to color first, or you can type it into the «Apply to range» field in the conditional formatting menu.
To open the conditional formatting menu do either of the following:
- Click the «Format» menu, and the click «Conditional formatting…» or…
- Open the «Fill color» menu, and click «Conditional formatting…»
Then select «Custom formula is» from the drop-down menu under the «Format cells if…» options.
Then use one of the formulas described below, depending on your preference/situation.
The formula below will color even rows:
=ISEVEN(ROW())
The formula below will color odd rows:
=ISODD(ROW())
The formula below will color even columns (B, D, F, etc…):
=ISEVEN(COLUMN())
The formula below will color odd columns (A, C, E, etc…):
=ISODD(COLUMN())
If you want you can choose your own color from the formatting style options, and you can select other formatting options to apply to the cells/rows/columns that your conditional formatting rules apply to.
The example below uses the formula =ISEVEN(ROW()) to color even rows. The range that the rule / color is applied to is A1:K1000

This example uses the formula =ISEVEN(COLUMN()) to color even columns. The range that the rule / color is applied to is A1:K1000

To remove this type of alternating color that is applied with conditional formatting, you can do either of the following:
- Open the conditional formatting menu and click «Remove rule» (Trash can symbol) to remove the conditional formatting or…
- Select a range, then click «Format, then click «Clear formatting». But note that this method will remove ALL formatting
Color
Color attributes consist mainly of primary, secondary, error, surface and background colors, along with their respective secondary variants and “on” colors. Some of these have been reused from the AppCompat themes (eg. , and ):
- : The primary brand color of your app, used most predominantly in theming
- : A lighter/darker variant of your primary brand color, used sparingly in theming
- : The color used for elements displayed on top of your primary colors (eg. Text and icons, often white or semi-transparent black depending on accessibility)
- : The secondary brand color of your app, used mostly as an accent for certain widgets that need to stand out
- : A lighter/darker variant of your secondary brand color, used sparingly in theming
- : The color used for elements displayed on top of your secondary colors
- : The color used for errors (often a shade of red)
- : The color used for elements displayed on top of your error color
- : The color used for surfaces (i.e. Material “sheets”)
- : The color used for elements displayed on top of your surface color
- : The color behind all other screen content
- : The color used for elements displayed on top of your background color
These colors can be added to your app theme like so:
<style name="AppTheme" parent="Theme.MaterialComponents.Light"> <item name="colorPrimary">#212121</item> <item name="colorPrimaryVariant">#000000</item> <item name="colorOnPrimary">#FFFFFF</item> <item name="colorSecondary">#2962FF</item> <item name="colorSecondaryVariant">#0039CB</item> <item name="colorOnSecondary">#FFFFFF</item> <item name="colorError">#F44336</item> <item name="colorOnError">#FFFFFF</item> <item name="colorSurface">#FFFFFF</item> <item name="colorOnSurface">#212121</item> <item name="android:colorBackground">@color/background</item> <item name="colorOnBackground">#212121</item></style><color name="background">#FAFAFA</color>
Note 1: Hex color codes are not currently supported for , hence why a color resource was used.
Note 2: Use and attributes to theme system bars.
The result can be observed in our playground screen:

Playground screen with global color attributes customized
A great way to quickly preview the appearance of primary/secondary colors is to use the Material Color Tool.
Использование цветов в UI
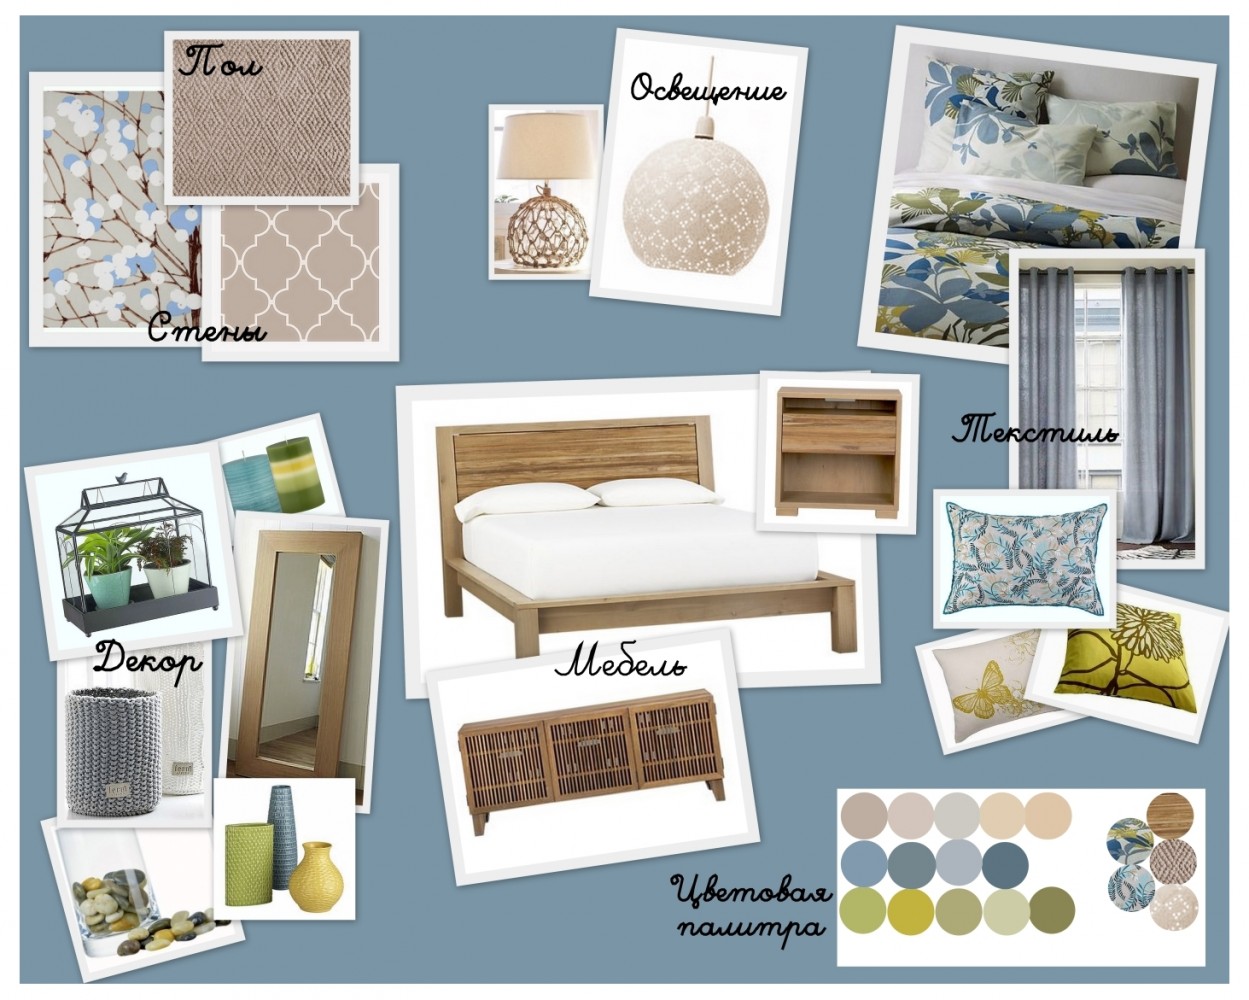
Выберите палитру
Чтобы ограничить свою цветовую выборку выберите три оттенка из основной палитры и один акцентный цвет из вспомогательной палитры.
Пример основной цветовой палитры
Пример вспомогательной палитры
Используйте непрозрачность для текста, иконок и разделителей
Чтобы сообщить пользователю, насколько важна определенная информация относительно остального текста, вы можете изменять непрозрачность текста.
Темный текст на светлом фоне
Белый текст на темном фоне
Если темный текст расположен на светлом фоне, непрозрачность основного текста должна составлять 87%. Вспомогательный текст, расположенный ниже в визуальной иерархии, должен иметь непрозрачность 54%
Текстовые подсказки для пользователей, вроде тех, что расположены в текстовых полях и в метках, имеют еще меньшую визуальную важность и непрозрачность 26%
| Темный текст (#000000) | Непрозрачность |
| Основной текст | 87% |
| Вспомогательный текст | 54% |
| Подсказки (текстовые поля, метки) | 26% |
Светлый текст на темном фоне
Значения в таблице отражают относительную значимость светлого текста на темном фоне.
| Светлый текст (#FFFFFF) | Непрозрачность |
| Основной текст | 100% |
| Вспомогательный текст | 70% |
| Подсказки (текстовые поля, метки) | 30% |
Текст на цветном фоне
Для случаев расположения белого или черного текста на цветном фоне ознакомьтесь с этими , в которых указаны оптимальные значения контраста и альфа-канала.
Прочие элементы
Прочие элементы, такие как иконки и разделители, тоже выигрывают, если в качестве величины цвета используют шестнадцатеричное значение черного или белого, поскольку это гарантирует, что они дадут желаемый результат на фоне любого цвета.
Панели инструментов и панели состояния
Панели инструментов и более крупные цветные блоки должны использовать основной оттенок (500) главного цвета вашего приложения. Панель состояния должна использовать более темный оттенок (700) вашего основного цвета.
Смелое использование цвета в больших полях поощряется в UI. Различные элементы в UI могут использовать различные части вашей цветовой темы.
Акцентный цвет
Используйте акцентный цвет для вашей основной кнопки действия и компонентов, таких как переключатели или слайдеры.
В плавающей кнопке действия используется акцентный цвет.
Переключатель, использующий акцентный цвет.
Правильно.
В основном тексте используйте акцентный цвет только для привлечения внимания к веб-ссылке.
Неправильно.
Не используйте акцентный цвет в качестве цвета основного текста.
Правильно
Используйте акцентный цвет для вашей основной кнопки действия и компонентов, таких как переключатели или слайдеры.
Неправильно.
Не используйте акцентный цвет для панелей своего приложения или для крупных цветных участков. Избегайте использования одного и того же цвета для плавающей кнопки действия и для фона.
Запасные акцентные цвета
Если выбранный вами акцентный цвет окажется слишком светлым или слишком темным для выбранного фона, то в качестве запасного варианта обычно используется более темный или светлый оттенок акцентного цвета. Если ваш акцентный цвет совершенно не подходит, используйте оттенок 500 вашего основного цвета на белом фоне. Если для цвета фона выбран оттенок 500 вашего основного цвета, используйте 100% белый или 54% черный.
Правильно
Если цветной фон окажется слишком светлым или слишком темным, используйте запасной акцентный цвет.
Неправильно.
Не используйте акцентный цвет на цветном фоне, если контраст недостаточно высок.